- ok, I'm feeling MUCH better-rested.
-I'm spending soo much more time with the kid (great!) and the wife (she doesn't seem so amused!)
-the job prospect that looked so good- tanked. They wanted more systems integration (I could have spun my experience on that end) and programming (not a fuckin' clue).
-I am well and fully sick of sitting around the house. Was gonna go rabbit hunting, but that ended on 01MAR. Turkey season is coming up- so I've got my shotgun ready and will get some #4 buck and give it a go on opening day (01APR).
-Currently working on a holster for my BUG. It's a Taurus 85UL in .38SPL. It'll be IWB, clipped, similar to an old holster I got from HighNoon. This is my first "from the ground up" design, so we'll see how it goes. Will be making a OWB beltslide or my P11/P40 next.
-Welcome to the blogroll, Baked Porkchop Goodness!
Showing posts with label holsters. Show all posts
Showing posts with label holsters. Show all posts
15 March 2009
06 February 2009
The Tool is Tooling Up...
...or, I'm finally getting the holster-making business together.
Just ordered about $200 worth of leathercrafting goods from Tandy. 15 square-foot 8 ounce double shoulder, edgers, slickers, tragazanth gum, stains, sealers, groovers, the whole freaking lot of it.
Have 5 guys at work (carrying weapons when not on duty seems to go along with the job, here) alrady asking me to make holsters for them, and I've not even advertised yet. Also a couple guys from the range, and there's at least 3 holsters I want to make for my personal sidearms as well. Even if that's all I get out of this, it's break-even.
23 January 2009
Google-fu: Holster-making
in checking out my stats, it looks like I am one of the top 5 hits when one looks up holster-making in AOL search, Google search, and a few other search engines.
I need to get back to work on that. I've a few handguns that I need holsters for at the house, and several friends that are wanting holsters as well.
I need to get back to work on that. I've a few handguns that I need holsters for at the house, and several friends that are wanting holsters as well.
11 October 2008
Holster-making gallery (56K death!)
If you've got dialup, you might want to go grab a coffee...
This is in response to several folks that have asked for more info regarding the stitching and so on.
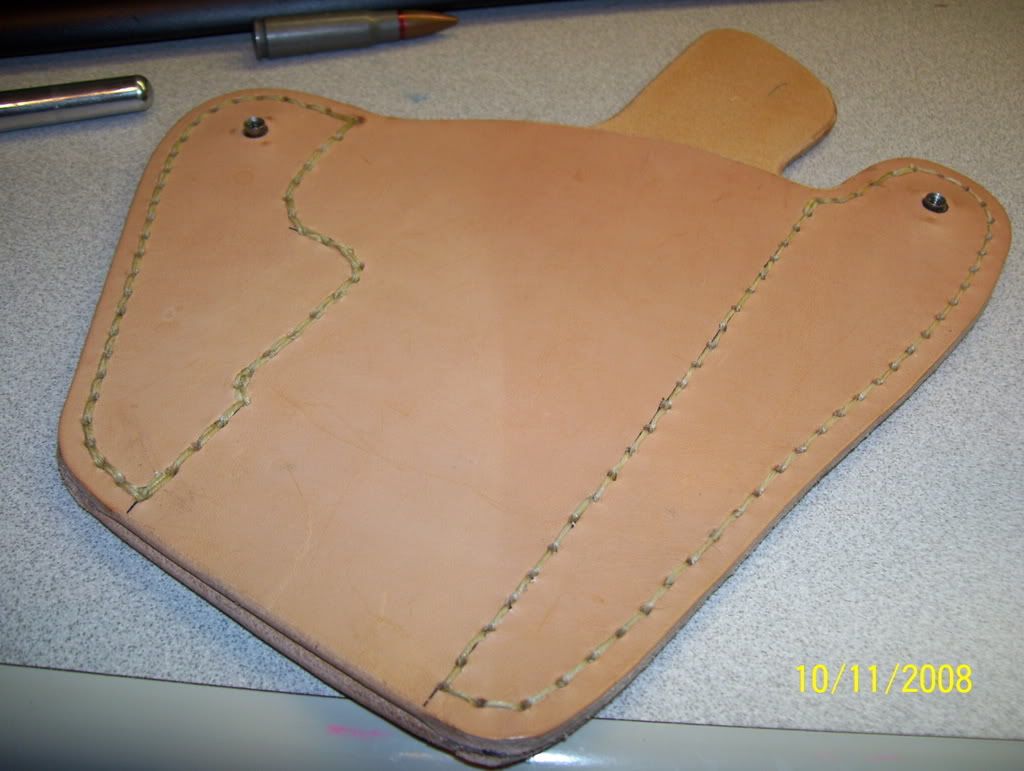
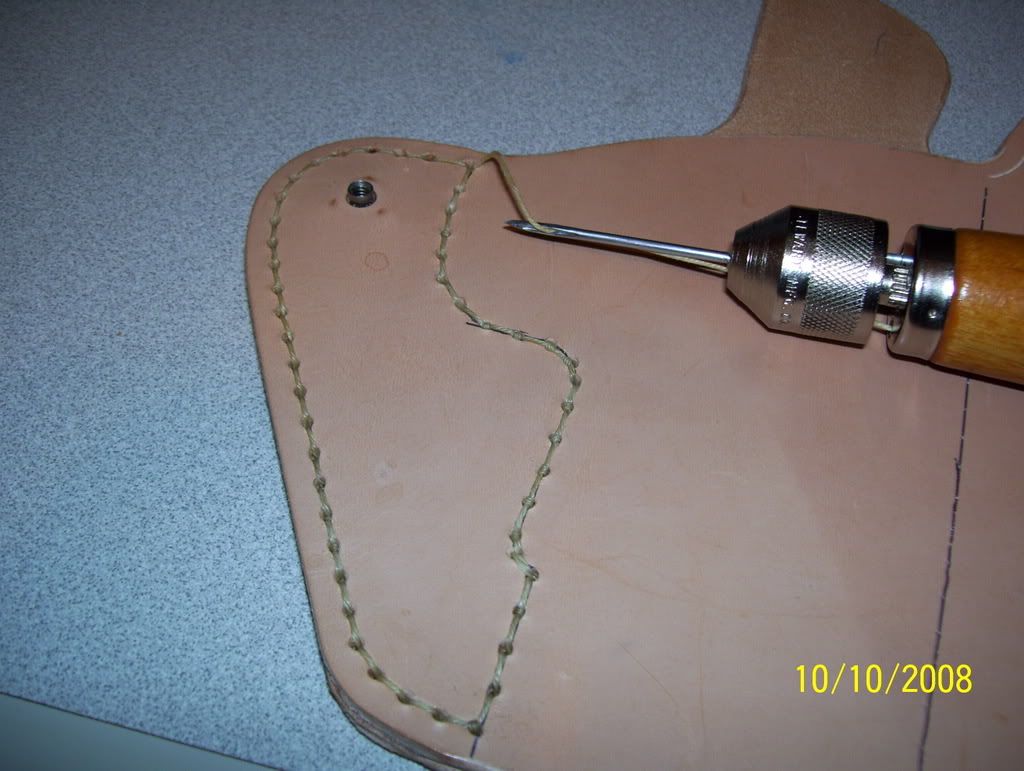 Here you see that I've gone round the back wing, drilling holes with my Dremel first, then doing a simple lock-stitch. Note that the holes are, frankly, too large. I couldn't find my smallest drill bit at the time. I ended up doing a second trip around the stitching to make up for the gaping holes in the leather left by the drill, and my less-than-optimum control of the awl. If you look closely, you can see where some of the knots have come through the front. VERY amateur, but I learned quickly!
 Another, closer, view of same. Also note the T-nut that I forgot to mention installing. Install is simple: drill hole (come to think, that was already done, too- did I mention Nate made this EASY?), insert T-nut, then glue the two halves together. Closer stitch detail, too. See what I mean about the knots coming through the front? Beginner mistake!
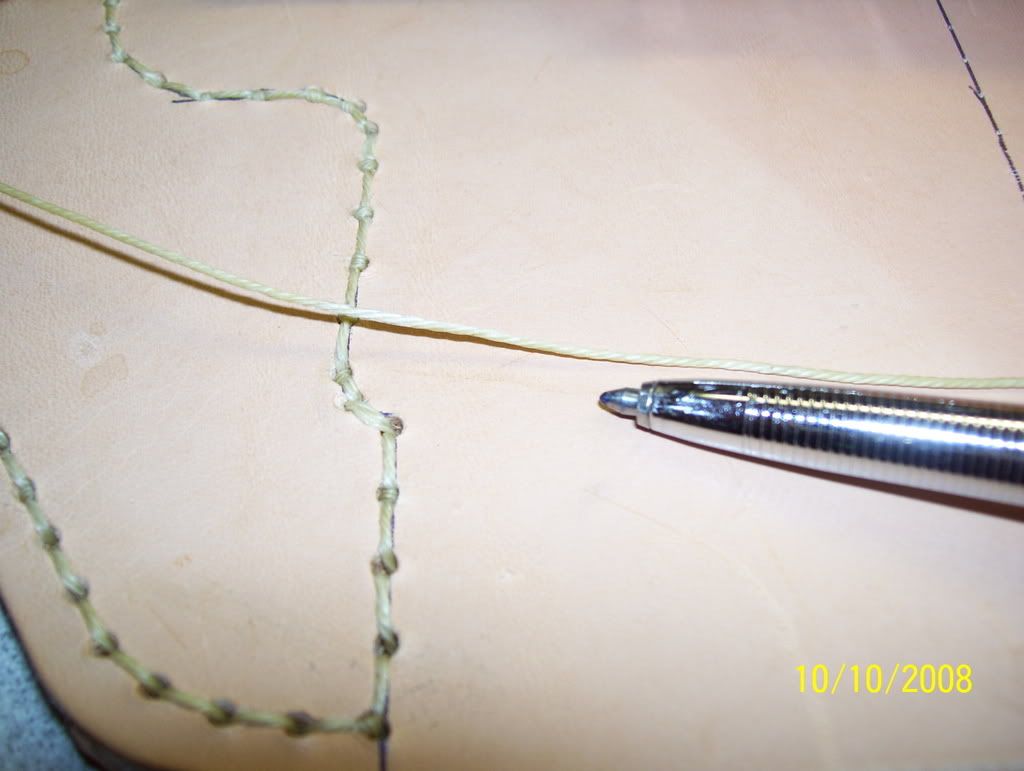 Closeup mainly to show the size of the line I am using. It's too big to call thread, too small to call rope. Waxed polyester, has a pretty hefty breaking strength. Yeah, it'll work! BTW- if you're looking for a sewing awl, by no means go buy one at your local boater's shop. I paid $27 for one at West Marine (well, I needed it THEN, to repair my ruck, going camping with the kid the next day). I could have gotten one for $13 online, and I stumbled across one VERY similar in Harbor Freight, with a 100-yard (as opposed to 30) skein of line, for $5 a few weeks later. Hell yes I bought it- I can't even get the line itself that cheap elsewhere. Need one? Drop me a line! (You see, how I made that little pun there... I am a kidder. I kid)
 I should have mocked this one up better. What you are looking at is how the lockstitch works. Basically, poke the awl through the holes, then pull out a quantity of line on the back side, at least enough to go around the perimeter 1.5 times or you'll be cutting and retracing your route often to get a good lock. Getting the string to the back is easier said than done unless those holes are WAY too big. Solution: Punch awl all the way through. Pull it about halfway out. Use the tip of a spitzer round (or a pen, chopstick, whatever's handy) to grab that loop, and pull the awl through. Now pull the bitter (loose) end of the line through. Poke the awl through the next hole, withdraw, and run the bitter end through the loop. Pull on both lines, you've made a stitch!
I'm not real clear on the proper way to terminate the stitch. I backstitch two stitches, then run the bitter end through the loop three times, then pull. Cut flush, and apply brief heat to the remaining bit of the line. This ought to work.
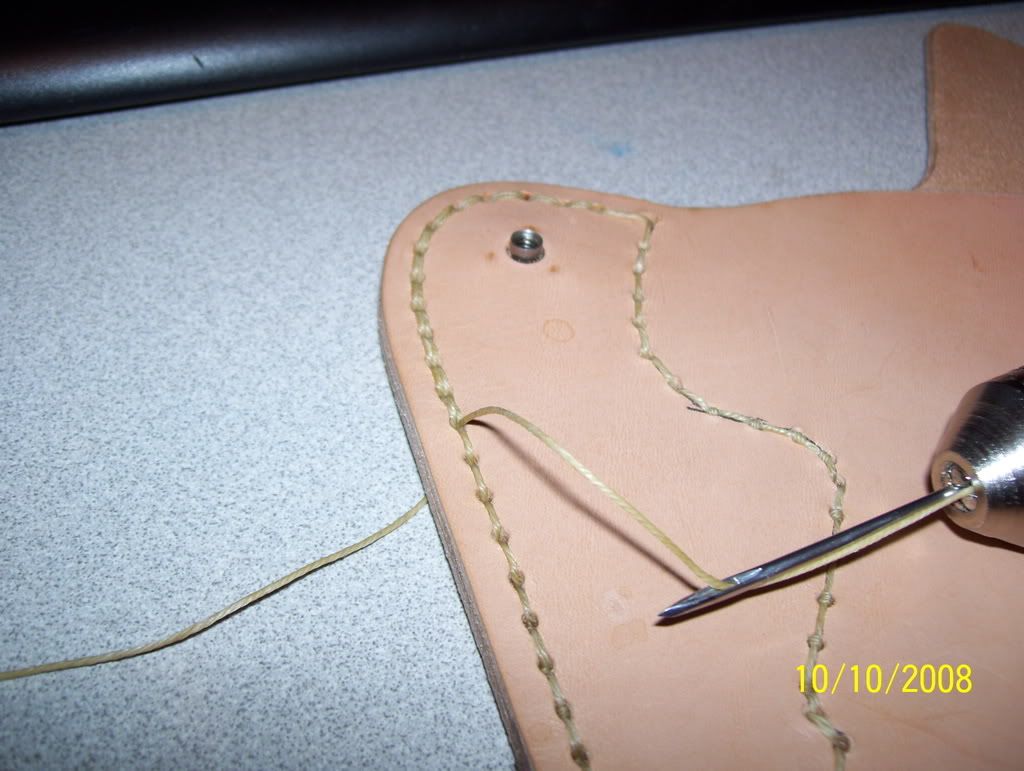
 Second lap of stitching on the back wing, completed. Looks a lot better now. For production use, I will run a double row of stitching up against the weapon as it's a high-stress area. Otherwise, single will be fine.
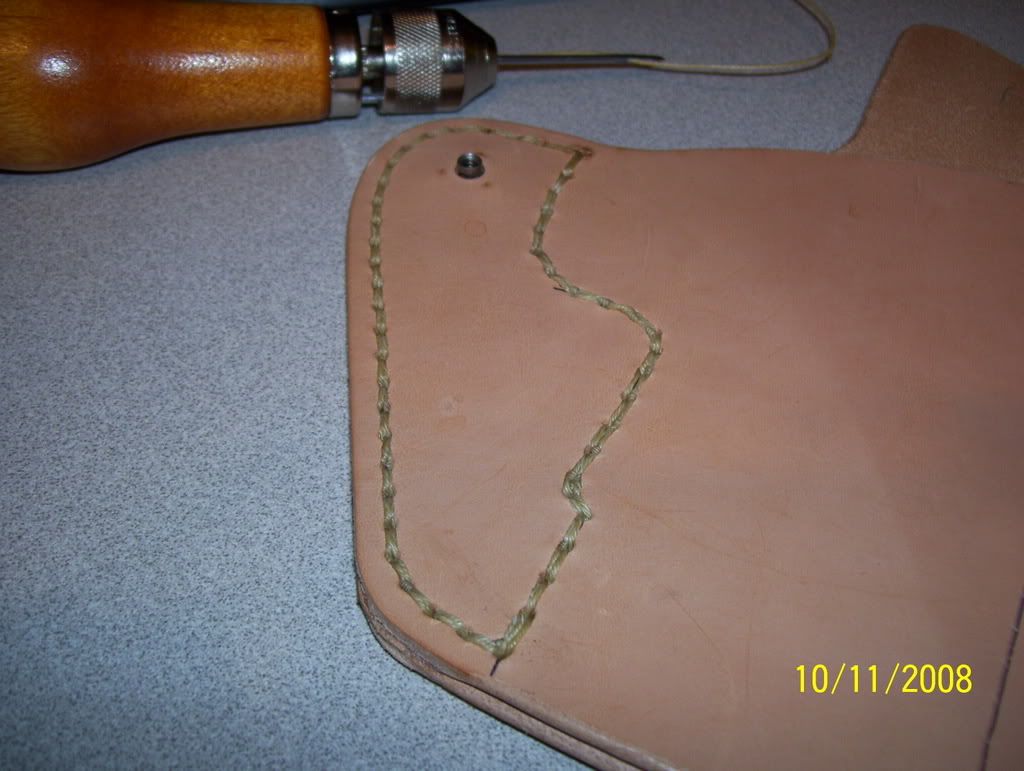
 Front wing completed now, too. Can you notice the difference? I found my smaller (smallest) bit, so only had to run one loop. Also, I had figured out how to run the awl properly at this point, ending up with the locks in the middle of the holes, not on the front or back. MUCH more professional. Almost looks like I know what I am doing, huh?
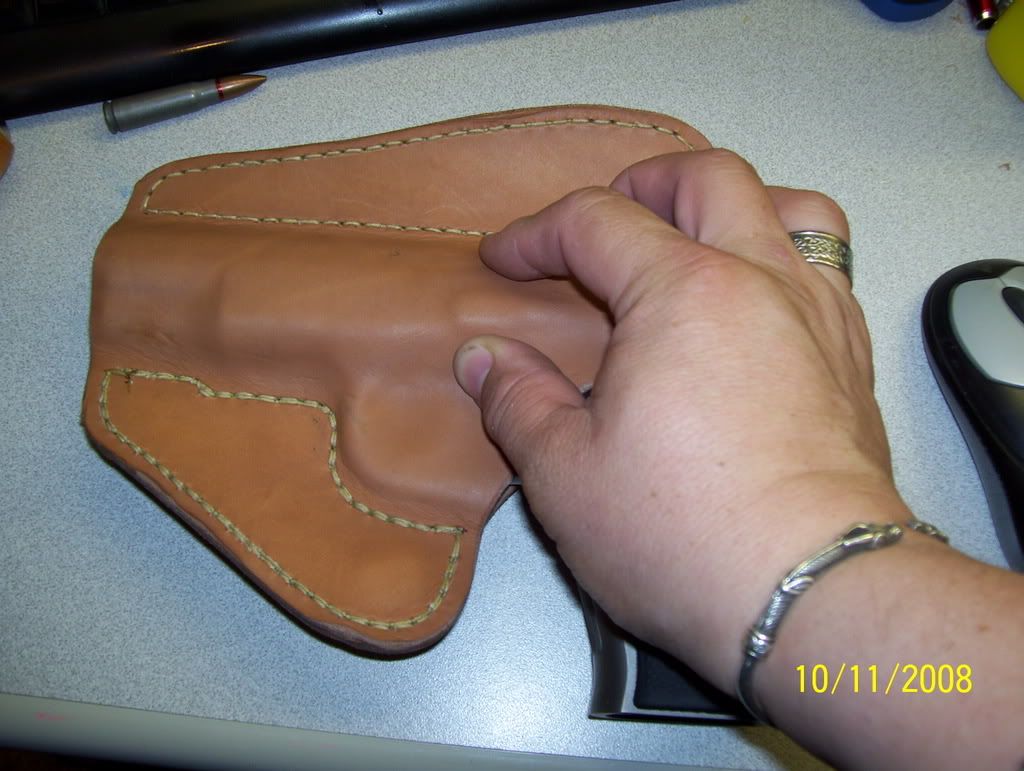 I've wet the leather, just to the point that it's darker-brown. Literally a minute in very hot bathwater. Put it in the tub and swish it around- when it is uniformly dark, it's ready. It's very much like working with stiff clay at this point. You can see I've started the boning process, the trigger guard, dust cover, and takedown lever are most evident. Yes, I am a man that wears jewelry. Celtic stuff, mainly. Shaddup.
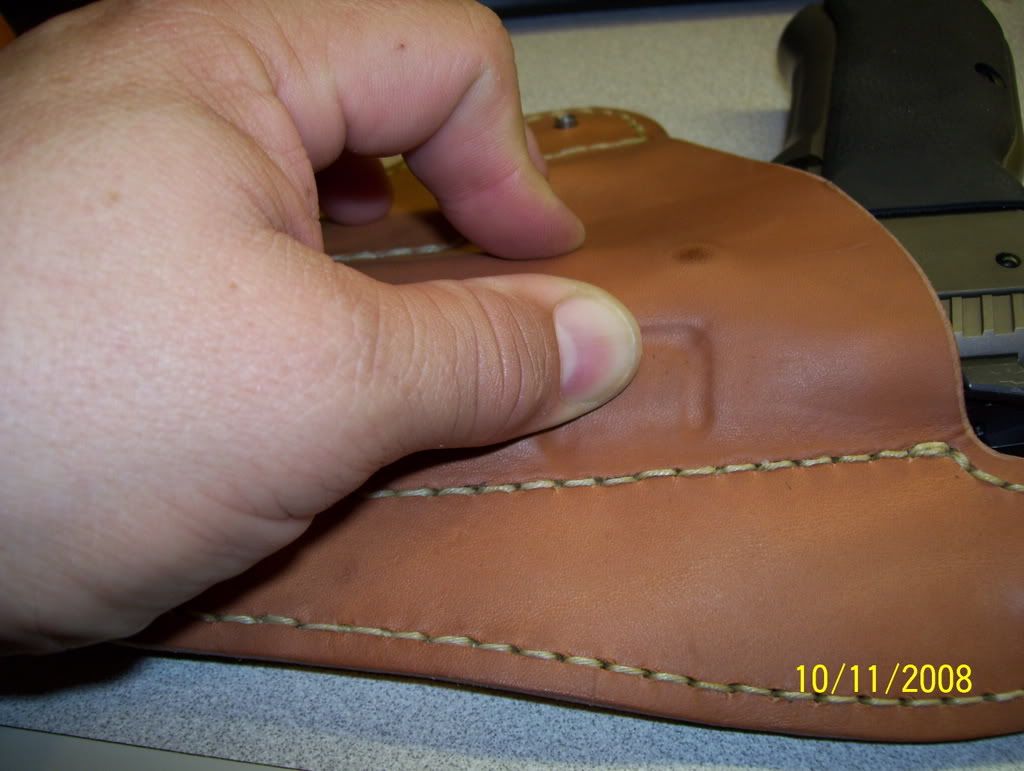
 In the name of safety, and not wanting an AD when reholstering, I use an ultra high-tech, precision-engineered Trigger Guard Embossing device. OK, so it's my thumb. This ain't rocket science, folks. As a famous holster-maker once said "There's only so many ways to wrap leather around a fuckin' gun". Curmudgeonly fellow, that. I think I'd enjoy his company.
 Hey, if it's stupid but works... it ain't stupid. 'Nuff said.
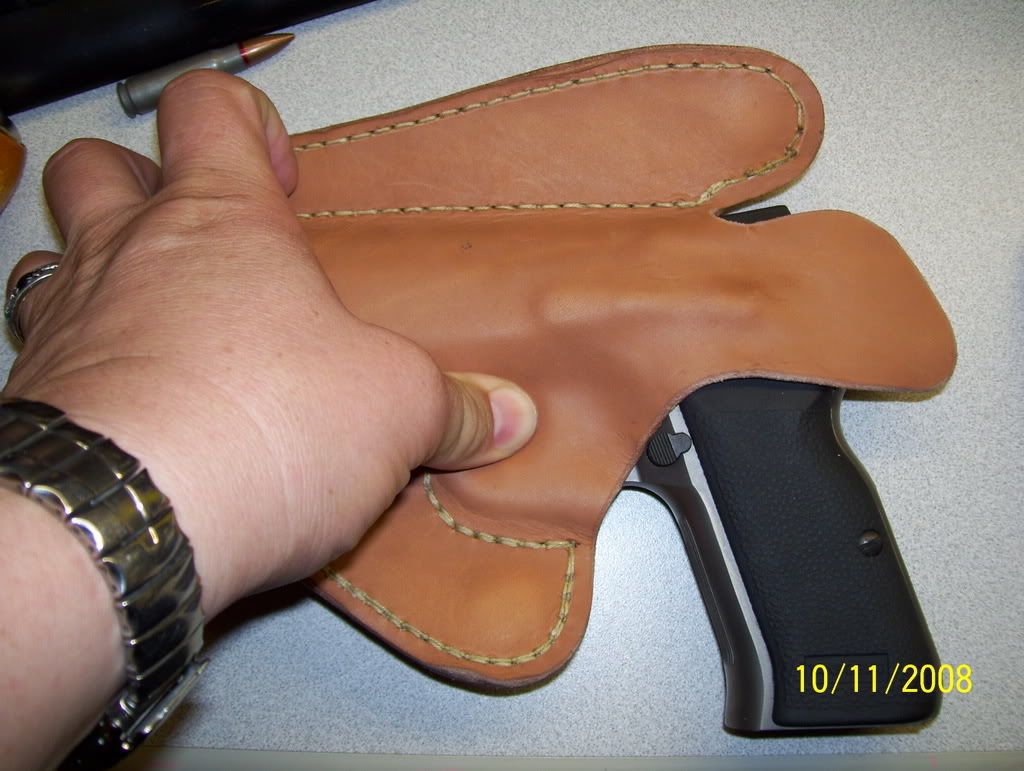
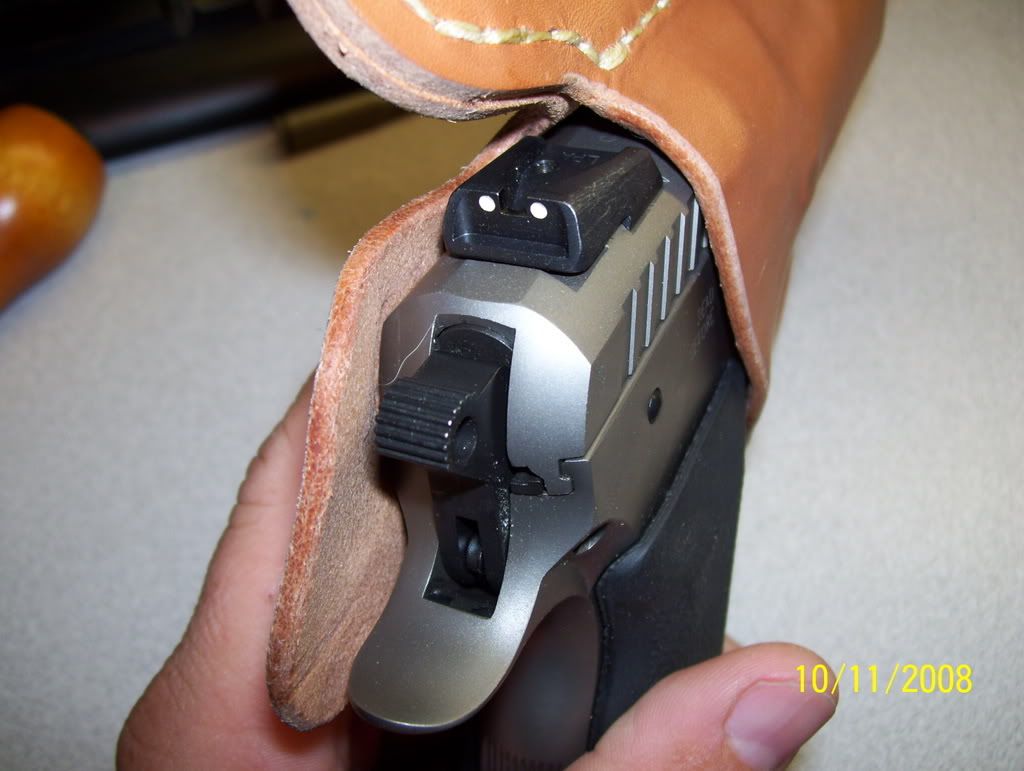 As you can see, there's a VERY snug, secure fit. This weapon won't come out unless you mean to use it.
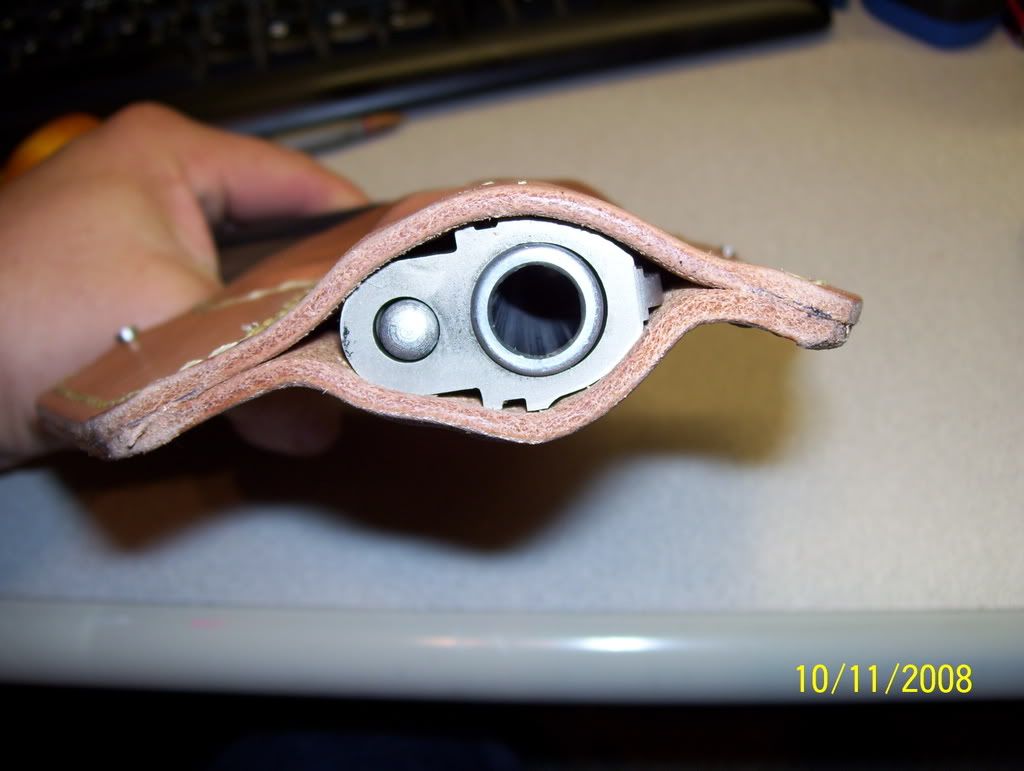 YES, I know. Shut up! I am flat-out OUT of ammo for this weapon at this time, the safety is on, the trigger is covered, and my finger is nowhere near the trigger. Also, I cleared the weapon three times before putting it in the holster. I'm not a complete idiot (there are parts missing!). Nice view to show how the boning is split between the halves of the holster, to suck it into the hip more. Also, all the better to marvel at these cheap 6MP cameras that are out now. Why did I wait so long?
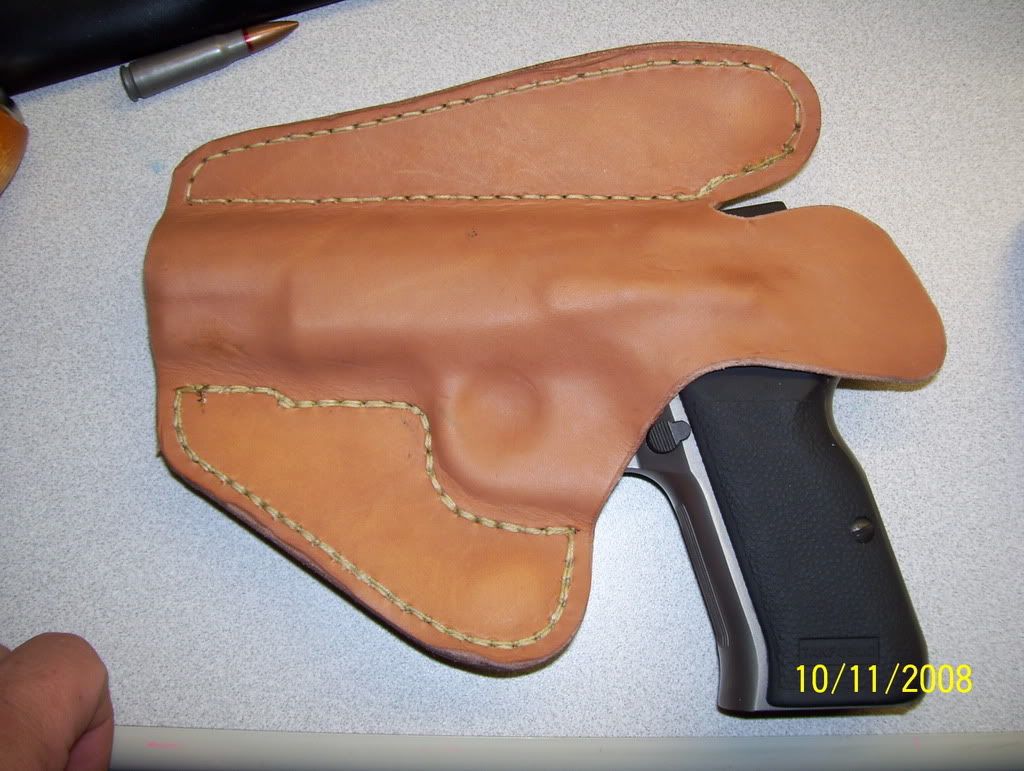
 Two shots of attempting to bone the ejection port with my thumb. Fail. While it's good enough for some folks, I like a holster with a well-defined ejection port- better retention. Hmm.. what can I use to better emboss this? If I only had some more deer antler left over I could make a tool with my Dremel tool...
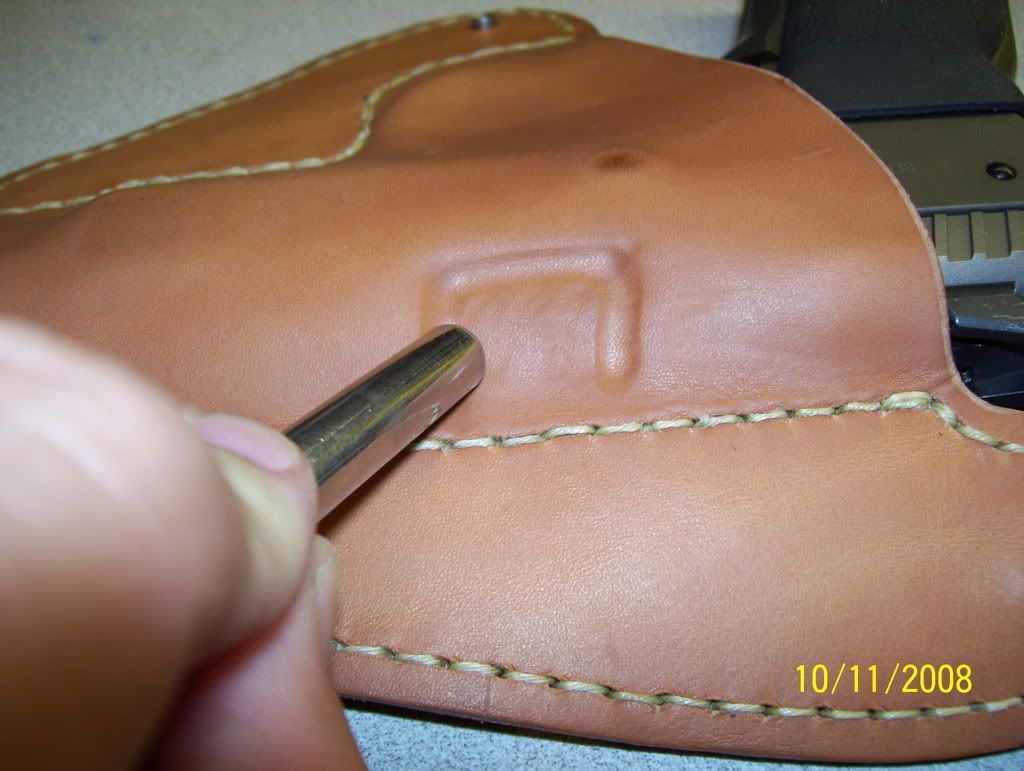 That's the ticket! A Fisher compact Space pen. Not only does it write in zero-g, vacuum, upside down, and prevent global thermonuclear war while saving the Apollo-13 astronauts- it also makes a damn fine embossing tool for wet leather. OK, so would a AA battery. But darn, now I have these nasty over-emphasized embossing marks around the port that look like crap. This would be easy to fix it this was really wet clay. Hmmm...
 Nice! Apparently the wet clay metaphor was more accurate than I realized.
 A very well-boned holster.
I've got to invest in a better backdrop. Are you folks tired of seeing my keyboard and desk yet?
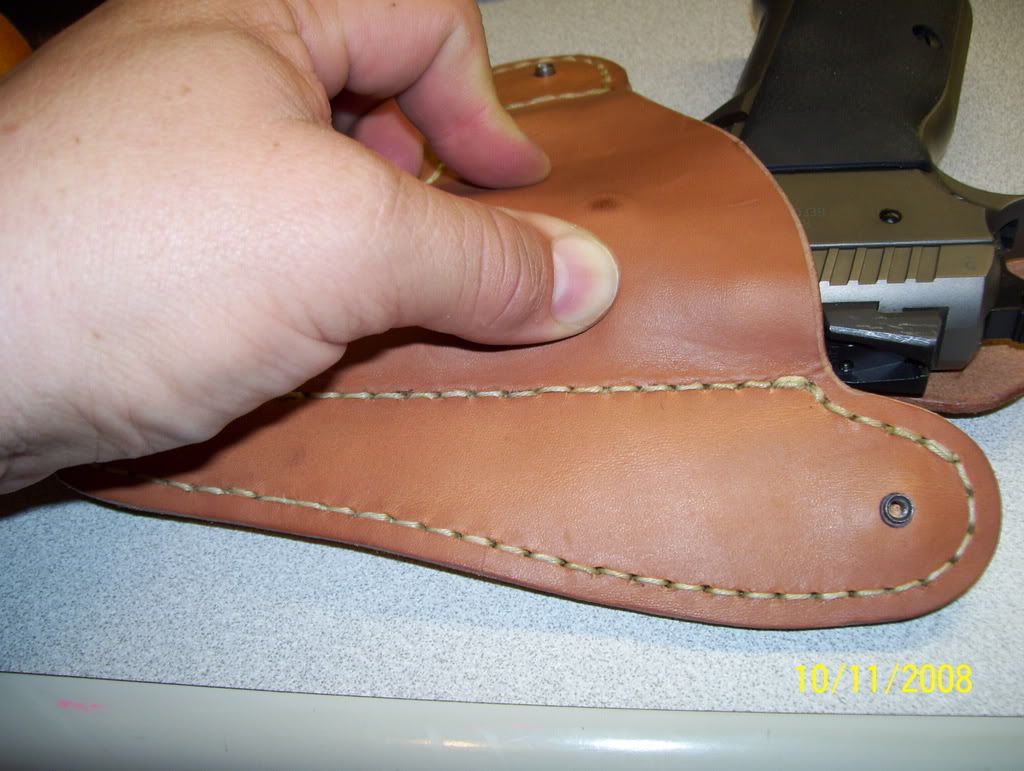
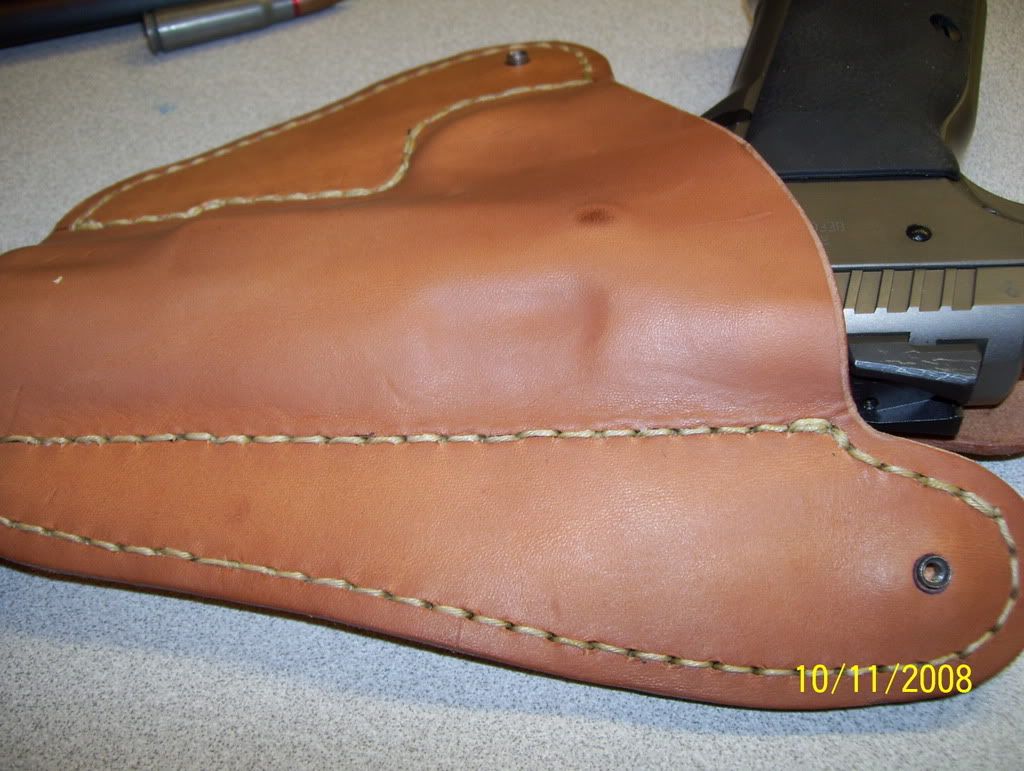
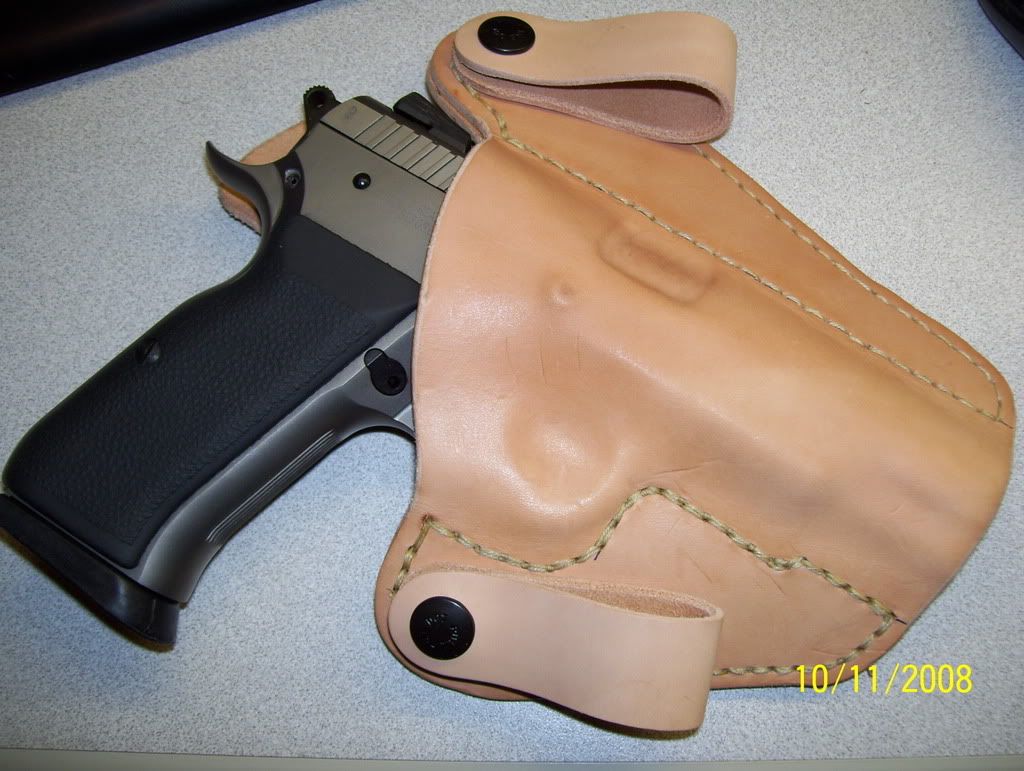
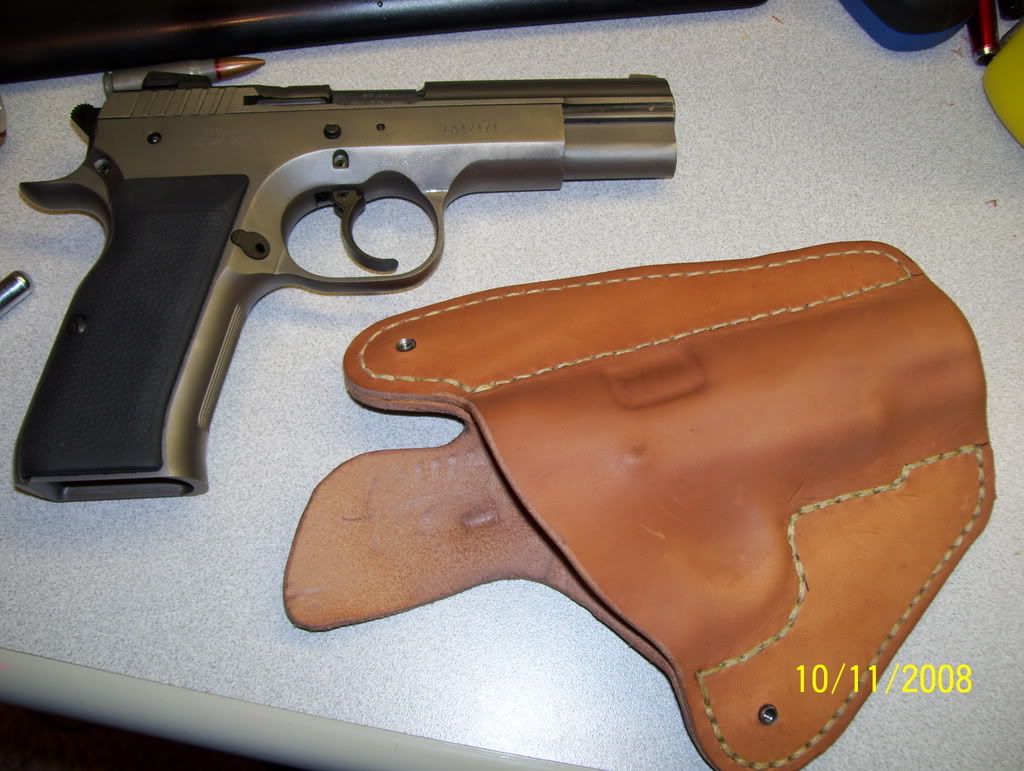 Finished product shots
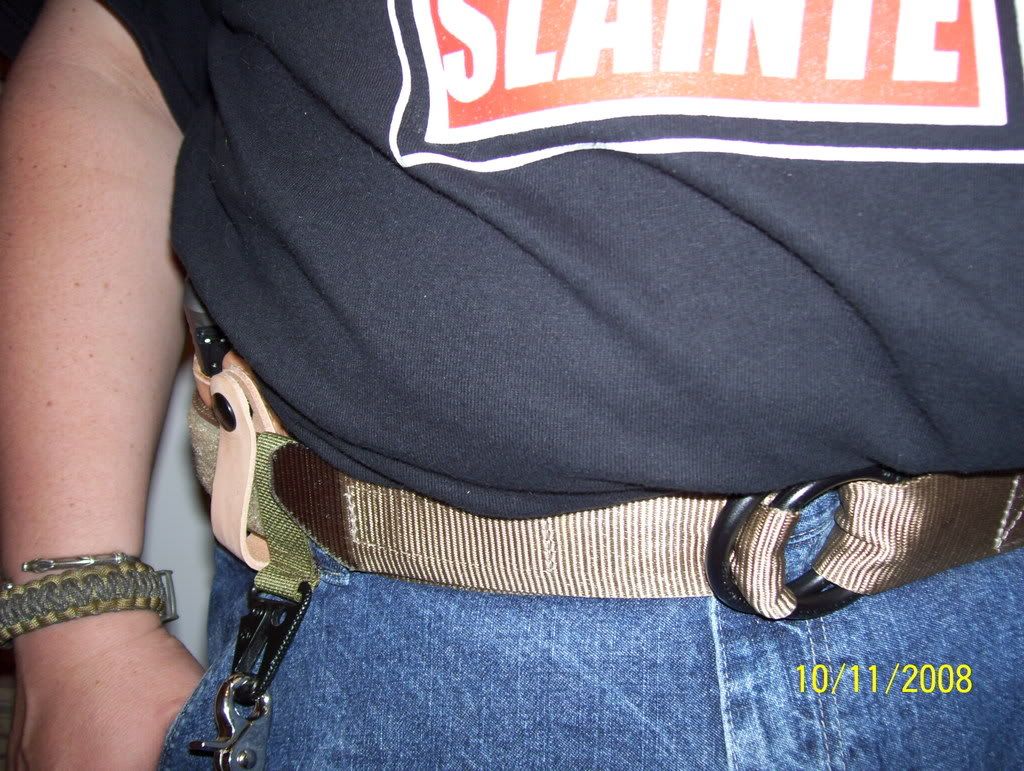 It wears well, too!
This is in response to several folks that have asked for more info regarding the stitching and so on.
Here you see that I've gone round the back wing, drilling holes with my Dremel first, then doing a simple lock-stitch. Note that the holes are, frankly, too large. I couldn't find my smallest drill bit at the time. I ended up doing a second trip around the stitching to make up for the gaping holes in the leather left by the drill, and my less-than-optimum control of the awl. If you look closely, you can see where some of the knots have come through the front. VERY amateur, but I learned quickly! Another, closer, view of same. Also note the T-nut that I forgot to mention installing. Install is simple: drill hole (come to think, that was already done, too- did I mention Nate made this EASY?), insert T-nut, then glue the two halves together. Closer stitch detail, too. See what I mean about the knots coming through the front? Beginner mistake!Closeup mainly to show the size of the line I am using. It's too big to call thread, too small to call rope. Waxed polyester, has a pretty hefty breaking strength. Yeah, it'll work! BTW- if you're looking for a sewing awl, by no means go buy one at your local boater's shop. I paid $27 for one at West Marine (well, I needed it THEN, to repair my ruck, going camping with the kid the next day). I could have gotten one for $13 online, and I stumbled across one VERY similar in Harbor Freight, with a 100-yard (as opposed to 30) skein of line, for $5 a few weeks later. Hell yes I bought it- I can't even get the line itself that cheap elsewhere. Need one? Drop me a line! (You see, how I made that little pun there... I am a kidder. I kid)I should have mocked this one up better. What you are looking at is how the lockstitch works. Basically, poke the awl through the holes, then pull out a quantity of line on the back side, at least enough to go around the perimeter 1.5 times or you'll be cutting and retracing your route often to get a good lock. Getting the string to the back is easier said than done unless those holes are WAY too big. Solution: Punch awl all the way through. Pull it about halfway out. Use the tip of a spitzer round (or a pen, chopstick, whatever's handy) to grab that loop, and pull the awl through. Now pull the bitter (loose) end of the line through. Poke the awl through the next hole, withdraw, and run the bitter end through the loop. Pull on both lines, you've made a stitch!I'm not real clear on the proper way to terminate the stitch. I backstitch two stitches, then run the bitter end through the loop three times, then pull. Cut flush, and apply brief heat to the remaining bit of the line. This ought to work.
Second lap of stitching on the back wing, completed. Looks a lot better now. For production use, I will run a double row of stitching up against the weapon as it's a high-stress area. Otherwise, single will be fine. Front wing completed now, too. Can you notice the difference? I found my smaller (smallest) bit, so only had to run one loop. Also, I had figured out how to run the awl properly at this point, ending up with the locks in the middle of the holes, not on the front or back. MUCH more professional. Almost looks like I know what I am doing, huh? I've wet the leather, just to the point that it's darker-brown. Literally a minute in very hot bathwater. Put it in the tub and swish it around- when it is uniformly dark, it's ready. It's very much like working with stiff clay at this point. You can see I've started the boning process, the trigger guard, dust cover, and takedown lever are most evident. Yes, I am a man that wears jewelry. Celtic stuff, mainly. Shaddup. In the name of safety, and not wanting an AD when reholstering, I use an ultra high-tech, precision-engineered Trigger Guard Embossing device. OK, so it's my thumb. This ain't rocket science, folks. As a famous holster-maker once said "There's only so many ways to wrap leather around a fuckin' gun". Curmudgeonly fellow, that. I think I'd enjoy his company.Hey, if it's stupid but works... it ain't stupid. 'Nuff said.As you can see, there's a VERY snug, secure fit. This weapon won't come out unless you mean to use it.YES, I know. Shut up! I am flat-out OUT of ammo for this weapon at this time, the safety is on, the trigger is covered, and my finger is nowhere near the trigger. Also, I cleared the weapon three times before putting it in the holster. I'm not a complete idiot (there are parts missing!). Nice view to show how the boning is split between the halves of the holster, to suck it into the hip more. Also, all the better to marvel at these cheap 6MP cameras that are out now. Why did I wait so long?Two shots of attempting to bone the ejection port with my thumb. Fail. While it's good enough for some folks, I like a holster with a well-defined ejection port- better retention. Hmm.. what can I use to better emboss this? If I only had some more deer antler left over I could make a tool with my Dremel tool...That's the ticket! A Fisher compact Space pen. Not only does it write in zero-g, vacuum, upside down, and prevent global thermonuclear war while saving the Apollo-13 astronauts- it also makes a damn fine embossing tool for wet leather. OK, so would a AA battery. But darn, now I have these nasty over-emphasized embossing marks around the port that look like crap. This would be easy to fix it this was really wet clay. Hmmm... Nice! Apparently the wet clay metaphor was more accurate than I realized.A very well-boned holster. I've got to invest in a better backdrop. Are you folks tired of seeing my keyboard and desk yet?
Finished product shotsIt wears well, too!
Made a holster!
I have to say, I am pretty damn pleased with myself on this one...
First off- thanks to Nate at UBGHolsters for providing the die-cuts. He made this project REALLY easy, and confidence-inspiring.
This all came about because I wanted an IWB holster for my Tanfoglio TZ75 in 10mm. It's similar to the CZ, but different enough 'round the trigger guard that he wasn't sure it would work. So the whole "thought about building your own?" idea came about, and we ran with it from there.
He sent me a set of die-cuts (think, flats cut from cowhide, shaped like a holster but without the molding), a set of straps (which he was nice enough to assemble as I didn't have the press, belt clips (unrelated to the project but thrown in because he's a nice guy), and instructions. He's also taken great effort to reply to 40+ emails in the course of the discussion.
I provided the tools -a 7.62X39 round (get the bitter end of the line started), a Fisher Space Pen (for boning), rubber cement, a Dremel, draftsman's dividers, and a Sewing Awl- and effort. This was very much a "use what ya got laying about" effort. There are purpose built tools for this sort of work, but they're not needed.
To assemble the holster, I took the diecuts and lined them up all around the perimeter. Nate was good enough to mark out the glued area by way of using his CZ75 as a model for the TZ that now takes its place. I applied rubber cement to each side in accordance with the directions for a permanent bond, and let the joined pieces sit overnight under my rangebag with a few pistols in it. I measured off 5 millimeters (about as close as I could figure to 1/5 of an inch) and locked my dividers in, then followed the stitchline with them as if I was plotting a course, which if you think about it, I was.
I took the joined pieces, a 2X4 bit of scrap, my Dremel, and a TINY bit (about 1/32 if I recall- it's too small to read), and drilled at each mark the dividers had left. I used my sewing awl to sew up each stitchline, and then tried to testfit the weapon- it will NOT go, dry, don't even try it.
So then I wet the holster thoroughly in hot bath water. You don't want to let it sit in there for any more than a minute or so- I actually just grabbed it and slid it around in the water till it was visibly wet through (watch for the color change). At this point the leather will have the consistency of wet clay. I took my well-oiled gun and slid it into the holster- it will go with a little effort- and then started on the boning.
You use your fingers and smooth the leather around all the points of the weapon- the safety, the triggerguard, and so on. With automatics, pay particular attention to the ejection port and the trigger guard- this is where your retention comes from. Now is a good time to set the holster in terms of it's curvature, as well- it's going to have to curve to go around the body part it's designed to fit (round my waist in this case). Once happy, pull the weapon out, and set the holster in front of a fan for a few hours to a few days, depending on how wet you got the leather. Now- go dry, clean, and oil your weapon, particularly if you've got a parkerized finish!
As this is my first go at this, and I used natural polyester waxed thread (read- it won't take dye), I'm going to leave this holster in the natural. Next one will be sewed with my preferred black thread, and will be dyed black. I have no experience with that as of yet, but I'm told to use oil-based dyes and a sealer.
Not bad for a first go, all things considered. I learned a lot here.
I can not thank Nate of UBGHolsters enough for his encouragement, parts, advice and overall brain-dump when it came to my numerous stupid questions. He made what could have been a disaster, easy. I've been wanting to try this for years and after all his effort the hardest part of the job was sewing the leather. By the way- he gave me all this info all the while knowing that I was considering starting up a holster-making business.
First off- thanks to Nate at UBGHolsters for providing the die-cuts. He made this project REALLY easy, and confidence-inspiring.
This all came about because I wanted an IWB holster for my Tanfoglio TZ75 in 10mm. It's similar to the CZ, but different enough 'round the trigger guard that he wasn't sure it would work. So the whole "thought about building your own?" idea came about, and we ran with it from there.
He sent me a set of die-cuts (think, flats cut from cowhide, shaped like a holster but without the molding), a set of straps (which he was nice enough to assemble as I didn't have the press, belt clips (unrelated to the project but thrown in because he's a nice guy), and instructions. He's also taken great effort to reply to 40+ emails in the course of the discussion.
I provided the tools -a 7.62X39 round (get the bitter end of the line started), a Fisher Space Pen (for boning), rubber cement, a Dremel, draftsman's dividers, and a Sewing Awl- and effort. This was very much a "use what ya got laying about" effort. There are purpose built tools for this sort of work, but they're not needed.
To assemble the holster, I took the diecuts and lined them up all around the perimeter. Nate was good enough to mark out the glued area by way of using his CZ75 as a model for the TZ that now takes its place. I applied rubber cement to each side in accordance with the directions for a permanent bond, and let the joined pieces sit overnight under my rangebag with a few pistols in it. I measured off 5 millimeters (about as close as I could figure to 1/5 of an inch) and locked my dividers in, then followed the stitchline with them as if I was plotting a course, which if you think about it, I was.
I took the joined pieces, a 2X4 bit of scrap, my Dremel, and a TINY bit (about 1/32 if I recall- it's too small to read), and drilled at each mark the dividers had left. I used my sewing awl to sew up each stitchline, and then tried to testfit the weapon- it will NOT go, dry, don't even try it.
So then I wet the holster thoroughly in hot bath water. You don't want to let it sit in there for any more than a minute or so- I actually just grabbed it and slid it around in the water till it was visibly wet through (watch for the color change). At this point the leather will have the consistency of wet clay. I took my well-oiled gun and slid it into the holster- it will go with a little effort- and then started on the boning.
You use your fingers and smooth the leather around all the points of the weapon- the safety, the triggerguard, and so on. With automatics, pay particular attention to the ejection port and the trigger guard- this is where your retention comes from. Now is a good time to set the holster in terms of it's curvature, as well- it's going to have to curve to go around the body part it's designed to fit (round my waist in this case). Once happy, pull the weapon out, and set the holster in front of a fan for a few hours to a few days, depending on how wet you got the leather. Now- go dry, clean, and oil your weapon, particularly if you've got a parkerized finish!As this is my first go at this, and I used natural polyester waxed thread (read- it won't take dye), I'm going to leave this holster in the natural. Next one will be sewed with my preferred black thread, and will be dyed black. I have no experience with that as of yet, but I'm told to use oil-based dyes and a sealer.
Not bad for a first go, all things considered. I learned a lot here.
I can not thank Nate of UBGHolsters enough for his encouragement, parts, advice and overall brain-dump when it came to my numerous stupid questions. He made what could have been a disaster, easy. I've been wanting to try this for years and after all his effort the hardest part of the job was sewing the leather. By the way- he gave me all this info all the while knowing that I was considering starting up a holster-making business.
11 September 2008
Best businessman ever
I really can't say enough about the gent that runs Ugly Bald Guy Holsters.
First off- the product is excellent- hand crafted, extremely durable, and the way a holster should be. Without being all gross about it- I carry my weapon IWB (that's Inside Waist Band- think of "Mexican Carry"- just jammed down the pants- except with a covered triggerguard and holster to keep the weapon in place). I've been doing a lot of yard work the last few weeks and with the high humidity and 90+ degree heat, things get a bit moist. So having a slab of cowhide against my hide, it obviously gets soaked. I haven't been able to note and soaking of the leather, and it's been exceedingly comfortable through me bending, twisting, and moving about as I work on a minor construction project. The first few days I got a chafe spot until I learned to move the weapon to 3:30 instead of 3 o'clock, but even that wouldn't have been an issue had I worn an undershirt or something to go between the front edge of the holster and my hip, like boxers.
I've already ordered two holsters from him, and recommended his gear to several friends. I was ordering another, for my Tanfoglio 10mm pistol for hunting duty ('cuz I want to have a way to address Mr Bear if he should show up and claim the deer I take), when he suggested during the conversation that since he's not able to make the holster (the weapon is a CZ75 clone, but differs enough in the trigger guard that it won't fit the same holster), so why not send me a "kit" consisting of a couple of precut slabs of leather, so I can give a try at making my own holster. Got to discussing the idea, he packaged everything up, and I mentioned it to a few gunnies in passing. They turn out to have a couple weapons they want to have holsters for, like Makarovs and other oddball weaponry, and next thing I know I have a few orders for holsters... and I've not made one yet!
I mentioned this in passing, and next I know the guy that runs the show at UBGHolsters is giving me a data-dump on tips and tricks to make a holster- even mentioning that I should consider a side business of holster-making... the work is relaxing, and it's very good money to be had.
We shall see. The kit should arrive this week. Other than what's in the box, if I decide to get into this on even a personal level, just making holsters for my knives, I'll be busy. I'm going to have to order a shoulder of hide and see what I can swing on my own.
I'll post pics of the process once I get the kit.
Subscribe to:
Posts (Atom)


