Welcome to 2012, folks.
Those of you counting down to "ZOMG!! TEH END OF TEH YEAR ON DECEMBER 21, 2012" Should go right ahead and leave.
Now. Quietly... or there will be no apologies. ;)
I hope all are doing well after the holiday season. I, for one, feel MUCH better, having it aft of us. I HATE that time of the year, not for philosophical reasons, more for familial stressors and the overarching fact that just about everyone has forgotten the meaning of the season- and no, I'm not referring to strictly the Christian mythos, either... most belief systems have a common goal for the November/December timeframe... but I'm off-mission, there... ;)
So I am STILL working on this darn truck. It pains me to admit I am looking at about 7 months since I've driven it. Long story short, the axle ripped out about June, I wasted a month and a half while a buddy was insisting he'd "get it out in a day or two" while adapting one of my Dana 44 solid axles to replace the back Corporate 10 bolt, I finally said hell with it and decided to just dive in and do the solid axle swap (ie: cut off the factory IFS (Independent Front Suspension)) and convert the whole damn thing to oldschool solid axles out of a Wagoneer) myself.
"Couldn't take more than a month or two, longest".
Pfft.
Well, yeah- if I'd had bank to back up the goal, no job, more tools, etc, etc...
I am wrapping up the project now, though.
One of the things I found after mounting the springs as far forward as I could without fabricating a frame extension, was that I needed to still move the axle 2" forward to clear the back
of the fenderwell- I couldn't cut the fenderwell because on this truck the back of the fenderwell is actually the firewall, and if I didn't move the axle forward I'd actually have shortened the overall wheelbase- not something you want to do on this truck, given my goals.
The easy solution would be to completely rework the entire front so I could use different springs off of a YJ (about $400 for springs, plus all my wasted time, etc). No.
Or, I could order some custom springs with the spring pin moved 2" forward. I checked into that and it's about $400 or so, and would bolt in... but might provide it's own problems by way of addressing lift discrepancies front/rear.
Or, I could just drill a hole 2" forward on the springs I have built. Gee, how hard could that be, after all I own a drill press... Go google "drilling leaf springs" and you'll find the following "advice" (all of which proves to take anything you see on the Internet with a VERY big grain of salt...)
-don't EVER drill springs, if you do the stress risers induced in the metal will make the springs fail in short order, and you'll die when the axle comes out from under the truck
>(I should note, I actually saw a highly-degreed fellow (at least, he claimed to be) espousing this approach. Now, I respect the man's education and qualifications- but I feel the need to wax Heinleinian here: "Always listen to experts. They'll tell you what can't be done and why. Then do it. - Robert Heinlein. Yes, I am a bit partial to just about anything Heinlein said or did, as I basically consider myself a Heinleinian Libertartian, but that is Another Discussion Entirely(tm).. and requires alcohol, steak, and a fine cigar). I should note I've actually seen this attitude invoked by people whose rigs look like company advertisements for Rusty's Offroad Products, and anyone who's had a chance to inspect the aftermath of when those products fail should realize that's a pretty big freaking joke. I had a friend (mumbles something about "Absent Companions") whose XJ's lower control arm actually broke at the weld- while backing out of the driveway. Anyway- enough said about that at the moment...
-heat the spring with a oxy-acetylene torch to detemper it, drill the hole in the now unhardened steel, and retemper it. Use your barbeque and a 5 gallon bucket of water to do this.
>Gods, where to begin! First off- your barbeque grill is NOT going to get the steel hot enough to properly detemper/retemper the steel, even if you can get the damn spring to fit into it (how many of you have a 5' long barbeque, hmm?). Likewise, that 5 gallon bucket of water isn't going to quench the red-hot steel, either- quenching steel requires IMMERSING it in a liquid, entirely, and usually oil to boot so you get some carbon transfer from said oil. Thirdly, tempering/detempering steel properly is a rather exacting operation involving heating the steel to a specific temperature and doing so in a uniform matter. While yes, it is done in primitive conditions (notably by Nepalese blacksmiths- see the Gurkhas and their distinctive khukuri blades), those folks aren't depending on the product to maintain safe operation while several tons of force are regularly conspiring against the integrity of said product.
-cut the hole with a plasma cutter
>yes, because everyone owns a plas. Nevermind that the plasma operation doesn't transfer *as much* heat into the spring, it is still transferring LOADS of heat into a spot on the spring- to the tune of several thousand degrees.... it's *plasma*, folks. Not real wise.
-cut the hole with a oxy torch
>I'm suddenly glad I have no hair, as it would really suck to be ripping it out right now.
-can't be done, don't even try, you'll induce stress risers into the spring and it will fail
>Yes, if you cut the hole with the wrong sort of bit, with no lube, and "just go at it" on high-speed. NEVER cut steel on a high speed, particularly tempered steel. First off, you'll just harden the steel as you're trying to cut it- you're working against yourself.
-use a carbide/titanium/unobtainium bit. Replace often.. even if you can resharpen the bits yourself.
>expensive, and seems a rather "hack" method of operating. Anytime you're using a tool for its intended purpose and then throwing it away immediately, you're probably doing it wrong.
-use a hammer and a punch, do it with the spring at room temperature
>:crickets: Really? Look, if you've done this, I will NEVER give you any trouble, lest you smite me mightily...
-use a step-drill in a drillpress, and it's no problem.
>this sounded like utter bunk to me- my experience with uni-bits (step drills) always seemed to end up regarding them as the adjustable wrench of the drill world. It'll work, kinda, but will cause more damage than it's worth, because it's not the proper tool... plus they're expensive. I did grab a pack of 3 a few months back at Harbor Freight for $10, as a gamble.
Please note, I say it "sounded" like BS. As in, past tense...
Since I am trying to keep this build as inexpensive (read: "Best bang for the buck") as possible, I elected to drill the spring. Read on...
I've been sick with a low-grade stomach flu since Thursday, so the past weekend has sucked to say the least... even so, I managed to pull the spring on Thursday after work and attempt to drill the hole 2" forward of stock. I used a 1/8" drillbit, and even with it being a high-grade TiNitride bit, still had to sharpen it 4 times. I stepped up a couple sizes- and about 1/4 of the way through the pack (of 7 leaves, so not even getting 2 leaves) I hit the wall. I'd been using plenty of oil, moderate pressure, and still it work hardened and I could go no further. I tried for two hours, numerous bits, all freshly sharpened with my Drill Doctor (BUY one, now, if you haven't!) and it was an act of desperation.
I tried the step-drill thing yesterday- disassembled the pack, got one of those cheapo step drills, expecting to frag it immediately... setup the drillpress (again, Harbor Freight*, and the second-best $50 item in my shop) shrugged, and spun the feed wheel around- and the damn bit sunk through the steel like it wasn't even there. I am EXTREMELY impressed.
So, long story short- need to drill holes in a leaf spring? Use a good step drill, a drill press set to slowest speed (sub 700RPM), lots of oil. Cut each spring individually. Easy.
*BTW- yes, I know they're cheap tools, made in China, and no I'm not real happy about it. But when I can spend $50 on a chopsaw that will cost easily 4 times the price if it's "made in the USA" (and that's likely a lie- it's likely made in... China) and it lasts me 9 years of just beating the hell out of it while building several jeeps and projects, and then only needs a new set of brushes, I don't mind saying I got my money's worth. Conversely- I bought American- a Hobart
(aka Miller) plasma cutter (AC250i, I think it was?) for $800, using it occasionally, and the damn thing flat-out DIED after less than 2 hours' runtime... to the tune of needing a new $670 mainboard which the company would not honor warranty on, and told me "you can't let them sit, they have to be used often to maintain them (unbelievable levels of bullshit, that- and yes I am qualified to judge)... well hell, no "Made in America" for me, thanks. I have a jeeping buddy who uses a cheap Chinese plasma cutter (I want to say the Cut250?) in his shop all the time and it's not given him any problems- and cost less than half of what I wasted. Well, he's using that tool to put food on the table and it's not even hiccupped. I bought mine as a hobby/very occasional use tool, and I now have a $800 paperweight. How smart was "buying American", again?
Showing posts with label DIY. Show all posts
Showing posts with label DIY. Show all posts
03 January 2012
28 August 2011
What's taking all my time lately...
So the 10-bolt in the back of my 89 Blazer crapped out back in June. I have had axles and just about everything for my SAS swap laying out in my back yard for about 10 years. Perfect time to get after it! Get the junk out of the back yard, give the wife less to *%$@#* about (though I gotta admit she was right to do so), get my truck safe and the way I want it. Win/win/win/win!~!
I've got the rear axle rebuilt and mounted under the truck, springover, just have to figure out a way to drop the rear brake softline so I don't have to buy an expensive drop line (and to keep as much stock as possible when time comes to work on it), and likewise with the parking brake cables.
Have another set of the rear springs to use up front- I may end up going to Dakotas as folks that have done this before me say the stock rears are too soft for the front, but I have these on hand.
Likewise a drop pitman from an XJ (Jeep Cherokee, FYI) if I need it. May well end up going to the XJ steering box if I have steering concerns. I'll also change out the steering rag joint to a YJ steering shaft to get rid of the stupid slop in the steering- the truck is downright DANGEROUS now, it wanders so (now being, before I started this- the suspension is, near as I can tell, untouched over the last 22 years). As I've found on the S-10 forums, even with brand new (stock) components, the steering is VERY sloppy. I aim to fix that.
I have 33" Cooper STs on the rear now- and the truck is honestly a tad taller than I want it. This will be my daily driver, mind. My short ass (5'6") may need a stirrup to mount up. Hey, that's funny right there... all the more reason to do it!
Today.. well, Not as much as I'd like to have achieved this weekend- but we are well and truly NOT going back to stock. Yes, I am kinda afraid, here..
Removed all the "small stuff" on driver's side. Shock, brakeline, upper a-arm bolts, and then got waylaid on the wife's jeep (brakelight kept coming on- broken adjuster in LR drum brake at fault), and changing the spare tire mount on the rear bumper on the Blaze from the stock pattern to 6X5.5 for the proper spare tire. (As an aside- Kennesaw Mountain Accessories couldn't even drill the *%$@#* mount holes 5.5" apart or whatever stock size was, properly. No, not either one of these patterns! I paid WAY too much for that bumper!)
on the driver's side, all I have to disconnect is the tie rod, lower control arms (2 bolts), and bolts for the swaybar (got 1 off, 2 others seized and soaking in PB Blaster now).
Oh yeah, got the Hilift that sat in my back yard for 7 years out in the weather behind my shed cleaned up (lubed, not painted, though the only thing showing rust is the base plate) working properly, shortened the handle, and mounted it to my rear bumper. Granted, the mount was already there, but I spent about 30 minutes working on it.
Not bad work for the weekend of a large Hurricane, eh? Granted, it only skirted us, but still- way it was blowing and raining Friday, I thought we'd have a problem so I spent the afternoon sterilizing and filling water cans and doing misc preps.
Bloody hell it was HOT today! FYI, a 16 ounce tumbler half-full of lemonade and topped off with Bud Light is damned tasty in such a situation.
29 July 2009
... and on that note....
I'd like to welcome Dr. StrangeGun to the blogroll...
came across his site while looking for 1911 hammer hook pics.
(yeah, mine is POOCHED! Might be able to save it with some file time, though...)
came across his site while looking for 1911 hammer hook pics.
(yeah, mine is POOCHED! Might be able to save it with some file time, though...)
So.. looks like I get to play gunsmith...
Couple months back I bought a Colt Sistema, used (no, really?)...
Got to doing some research on 1911 issues- hammer follows, trigger stacking, safety work, etc...
Turns out the gun is a basket case. I'm looking at replacing the disconnector, sear, hammer, possibly the trigger, and safety.
Given that the gun is not stock (it's got a Kart National Match barrel) and was ripping chunks out of my hand, I might as well throw a beavertail in there while I'm at it...
Add to that some stripped out grip bushing holes...
... and then there's the issue that I'm not sure I prefer the curved backstap, though it does have a lanyard loop like I wanted...
I bought a couple hammers and safeties off gunbroker. I'm not convinced they're serviceable. They were sold as Colt takeouts- I am no expert, but cursory investigation leads me to believe they may well have been from some smith's "oh, shit!" bucket.. cast offs from a wayward slip of a file. Example-- I'm not sure the half-cock notches on the hammers are even there anymore.
I got a hammer from the local smith- it has a functional and serviceable halfcock (though it holds the hammer AWFULY close to the fully-decocked position- pics forthcoming) and fullcock. The halfcock IS held off the firing pin, so that's good.
Dropped in the takeout ambi-safety from my Taurus 1911AR. While it works, I would prefer something made from tool steel in that application. Also, being a righty, I prefer a non-ambi safety.
I've got it shootable now-- but it's by no means where I want it. Also, it's missing a lot of the finish. There's a Duracoat session in its near future. I'm debating between Flat Desert Earth or Dark Green for the frame, with a black slide. Need to scare up my airbrush and airbrush compressor first, though.
Scarey: When I took the ambi safeties out of the Taurus 1911, I installed the takeout safety, and had intended to carry the weapon. Luckily I didn't- because I found that the weapon would fire if I had the safety on-- *something* caused the safety to toggle off, and hammer to follow.
Got to researching this evening and discovered that, in dryfire, luckily. I was reading a thread on THR regarding safety fitment, and learned much!
26 July 2009
Got a smokin' deal...
I've been muling over getting a Beretta 92FS (as I understand it, it's the civvie version of the M9 the military uses) for quite some time. The only thing that really had me hesitant was that I was originally trained on the 1911 platform and while I did have some time with the M9 in my military service, I never cared for the slide-mounted safety. By that time it was just counterintuitive to have to reach for the safety waaaaay up there.
I'd heard there were versions of the Beretta with frame-mount, but as I understood it they were early models, and weren't the recipients of better metallurgy in the locking block and slide. I was aware of the Taurus offering, and I am a fan of Taurus, having several of their pistols, but didn't want an M9-type of pistol to pay upwards of $500- if it came to that I was going to grab another 24/7, maybe the OSS version that Taurus makes-- I'm already equipped with holsters for them and am quite happy with the platform.
Stopped in at a pawnshop "just to look" after picking up my Sistema and an AR15 from them for a great price-- there was a Taurus PT92AF(d) with decent finish (though showing some holster wear) for $200. I pawed it for a while, asked i they would move on the price-- they said they couldn't till the boss got back. Figured I would come back the nect day and talk with him about it, jumped in my jeep and headed home. On the way, I got to thinking that $200 for a decocker-equipped Beretta 92 clone with frame-mounted safety and decocker was more than fair, so I went back and bought it. It came with one mag, that apparently gave trouble- it wouldn't reliably hold the slide back, and would not drop free. No worries-- mags are cheap.
Went to the range, sure enough, the mag fed fine but wouldn't reliably hold the slide open after the last round. Bought a Promag to address that- problem solved.
The next day I stopped in at the local surplus store and saw 10 Army-surplus M9 mags in their case. 1 old civilian Beretta mag from the first lot of pistols with the Euro mag release in the heel of the weapon, 2 Beretta M9 contract, and the balance being checkmate mags. Aware of the problems with the checkmates, I asked what he wanted for all of the mags. $70. Sold!
I got to experimenting and found if I changed the spring and follower in the heel-release and the Taurus mag, I ended up with two mags that both worked just fine. Odd, but it works for now- I can always swap in Wolf springs if there's issue. Of course the Beretta and M9 mags won't work in the Taurus without being held in place- the mag release catch is different- but that's easily addressed. A few minutes with my Dremel tool and they'll stay in place. However, the front of the Beretta and M9 mags is just a hair wider, causing it to catch on the Taurus release. A few passes with a stone to relieve the lower side of the catch solves that problem as well, and they work slicker than one would expect a "noncompatible" mag to work. While it's true that if one were to swap the mag release to a left-hander, I'd have to go about modifying the other side of each mag, and would probably have to replace the mag release-- I don't care. I'm 1) not left handed, and 2) not getting rid of the weapon.
So all told, I've got the ability to carry about 210 rounds of pistol ammo on me, should the need occur. I don't expect it ever should- and in fact pray it doesn't-But for the price, you can't beat it. Just a hair over $300 for a serviceable weapon that's proven in combat (the Taurus is carried by the military and police of Brazil as well as a few other nations, and has seen service in Iraq, though I have no way of knowing if this weapon has a history), and enough mags to carry over 4 boxes of ammo. Works!
Taurus haters- send it to /dev/null. The 92 series is a proven commodity, and in fact the Taurus surpasses the Beretta original in several areas- example: the locking block. Also, as I understand it they're built on the Beretta tooling in Brazil, much the same as my Sistema was built on Colt tooling in Argentina.
Look for a series of posts on the modifications that I had to make to the mags, complete with How-To pics, possibly this evening...
11 October 2008
Holster-making gallery (56K death!)
If you've got dialup, you might want to go grab a coffee...
This is in response to several folks that have asked for more info regarding the stitching and so on.
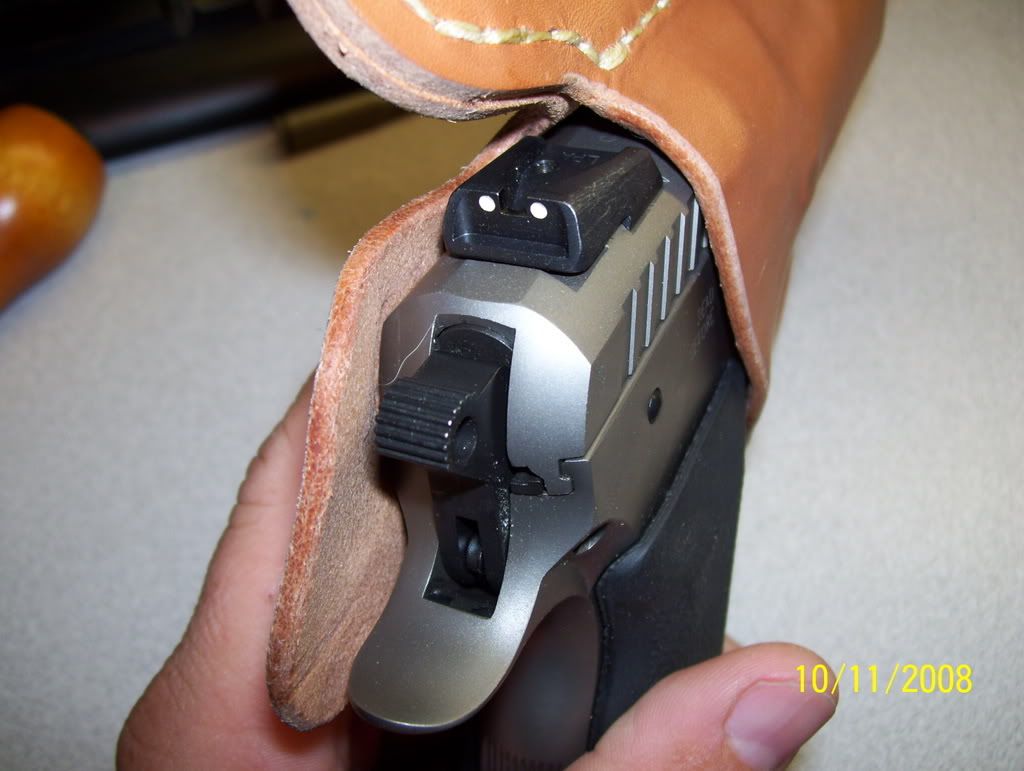
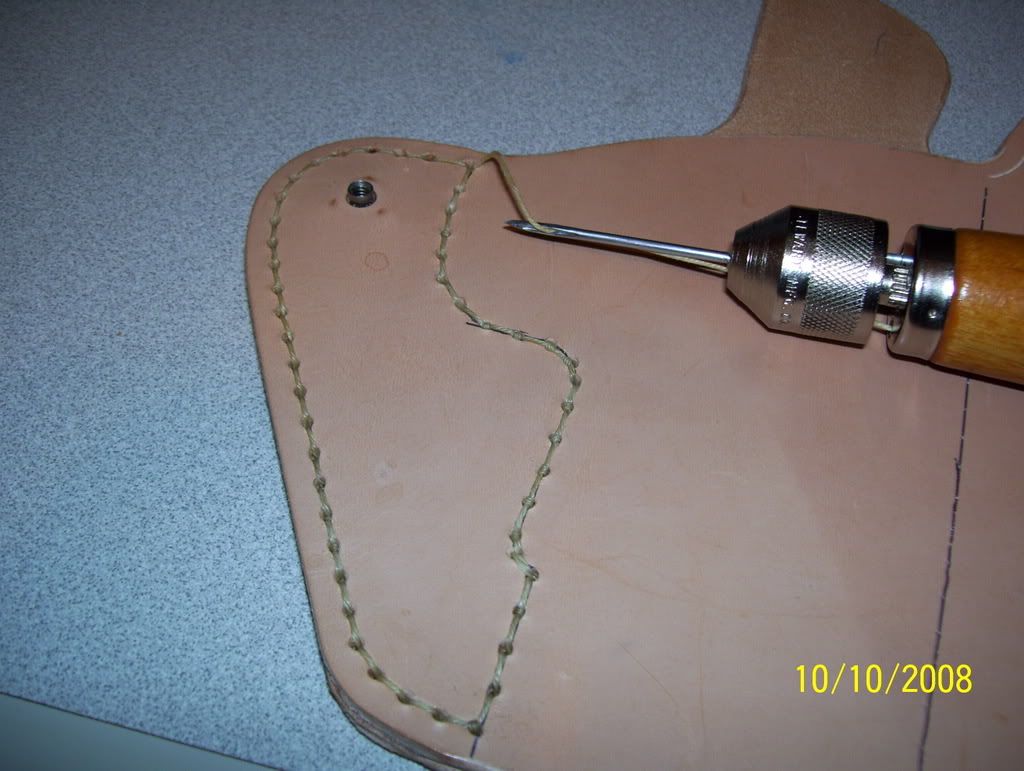 Here you see that I've gone round the back wing, drilling holes with my Dremel first, then doing a simple lock-stitch. Note that the holes are, frankly, too large. I couldn't find my smallest drill bit at the time. I ended up doing a second trip around the stitching to make up for the gaping holes in the leather left by the drill, and my less-than-optimum control of the awl. If you look closely, you can see where some of the knots have come through the front. VERY amateur, but I learned quickly!
 Another, closer, view of same. Also note the T-nut that I forgot to mention installing. Install is simple: drill hole (come to think, that was already done, too- did I mention Nate made this EASY?), insert T-nut, then glue the two halves together. Closer stitch detail, too. See what I mean about the knots coming through the front? Beginner mistake!
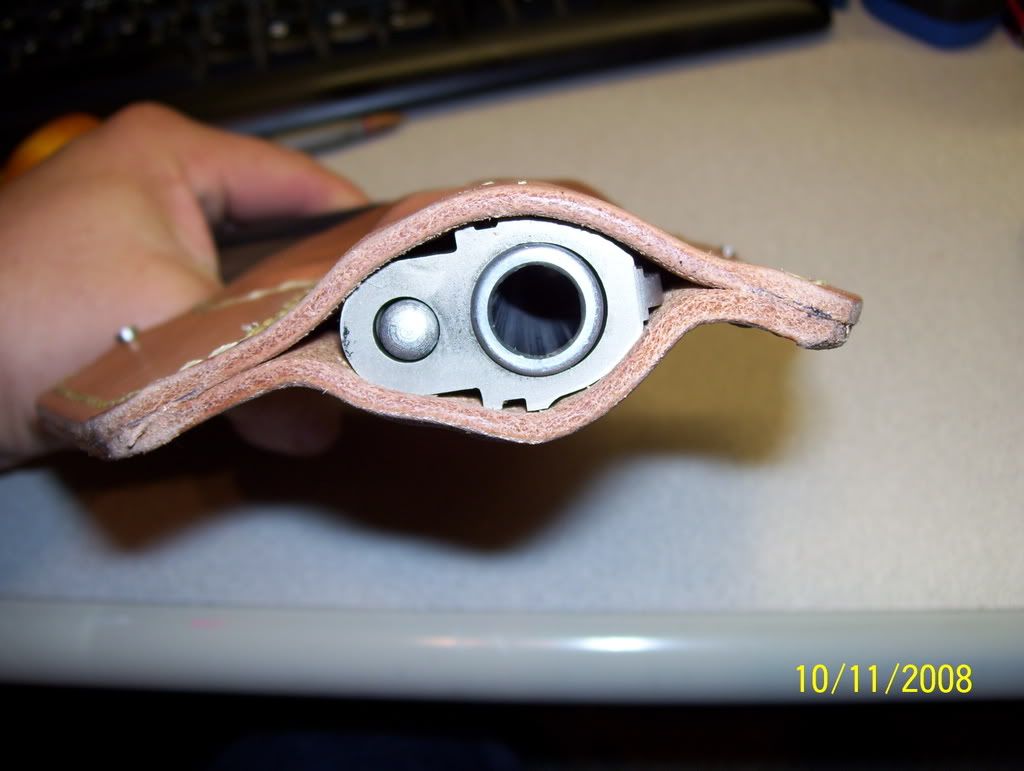
 Closeup mainly to show the size of the line I am using. It's too big to call thread, too small to call rope. Waxed polyester, has a pretty hefty breaking strength. Yeah, it'll work! BTW- if you're looking for a sewing awl, by no means go buy one at your local boater's shop. I paid $27 for one at West Marine (well, I needed it THEN, to repair my ruck, going camping with the kid the next day). I could have gotten one for $13 online, and I stumbled across one VERY similar in Harbor Freight, with a 100-yard (as opposed to 30) skein of line, for $5 a few weeks later. Hell yes I bought it- I can't even get the line itself that cheap elsewhere. Need one? Drop me a line! (You see, how I made that little pun there... I am a kidder. I kid)
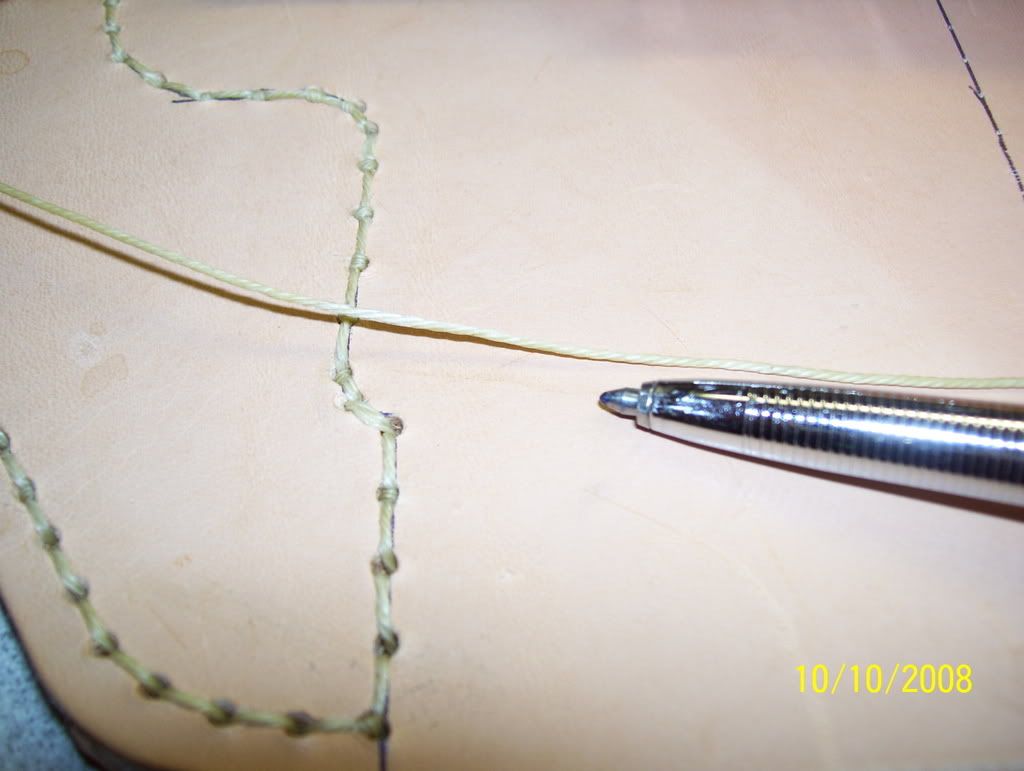
 I should have mocked this one up better. What you are looking at is how the lockstitch works. Basically, poke the awl through the holes, then pull out a quantity of line on the back side, at least enough to go around the perimeter 1.5 times or you'll be cutting and retracing your route often to get a good lock. Getting the string to the back is easier said than done unless those holes are WAY too big. Solution: Punch awl all the way through. Pull it about halfway out. Use the tip of a spitzer round (or a pen, chopstick, whatever's handy) to grab that loop, and pull the awl through. Now pull the bitter (loose) end of the line through. Poke the awl through the next hole, withdraw, and run the bitter end through the loop. Pull on both lines, you've made a stitch!
I'm not real clear on the proper way to terminate the stitch. I backstitch two stitches, then run the bitter end through the loop three times, then pull. Cut flush, and apply brief heat to the remaining bit of the line. This ought to work.
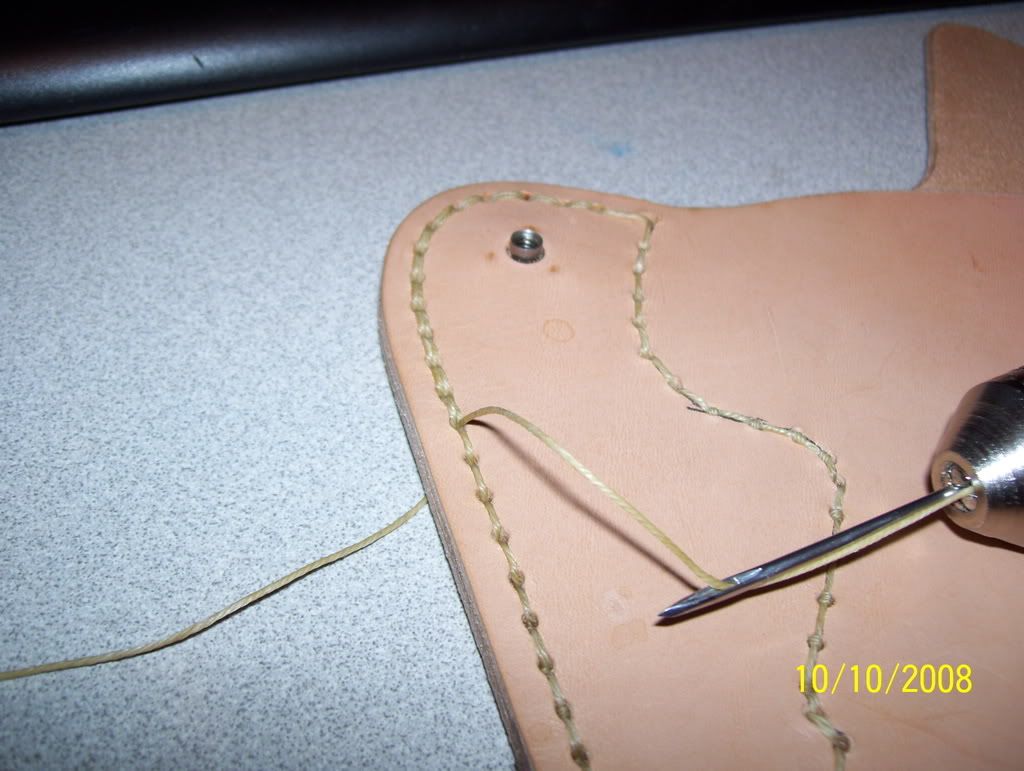
 Second lap of stitching on the back wing, completed. Looks a lot better now. For production use, I will run a double row of stitching up against the weapon as it's a high-stress area. Otherwise, single will be fine.
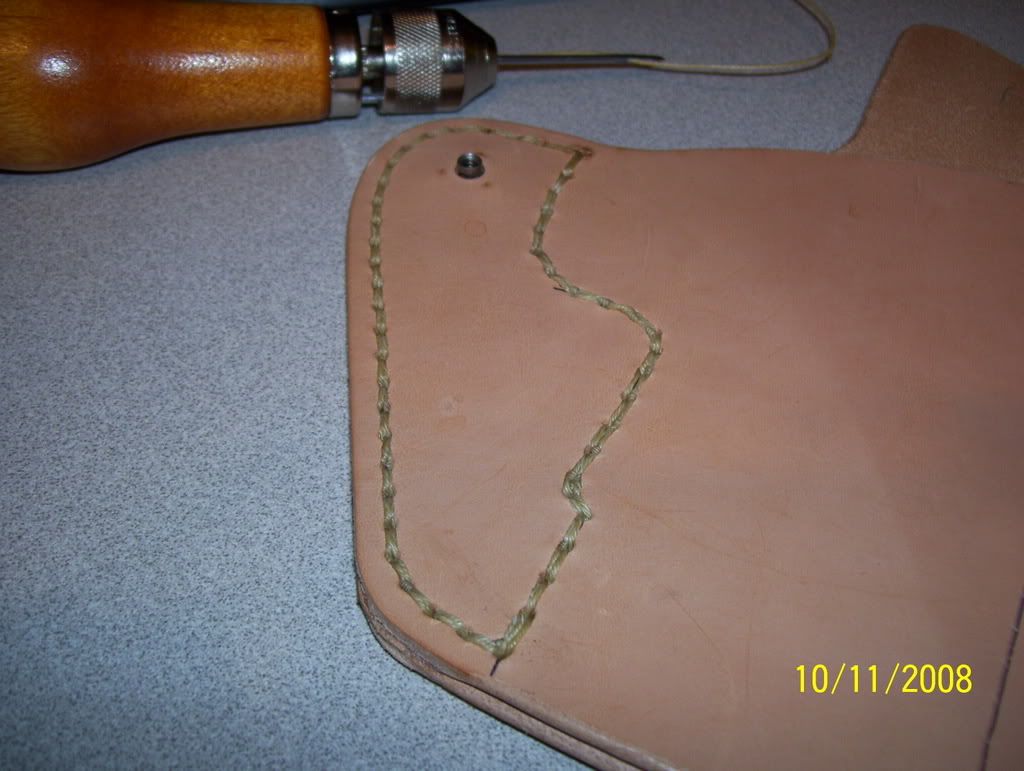
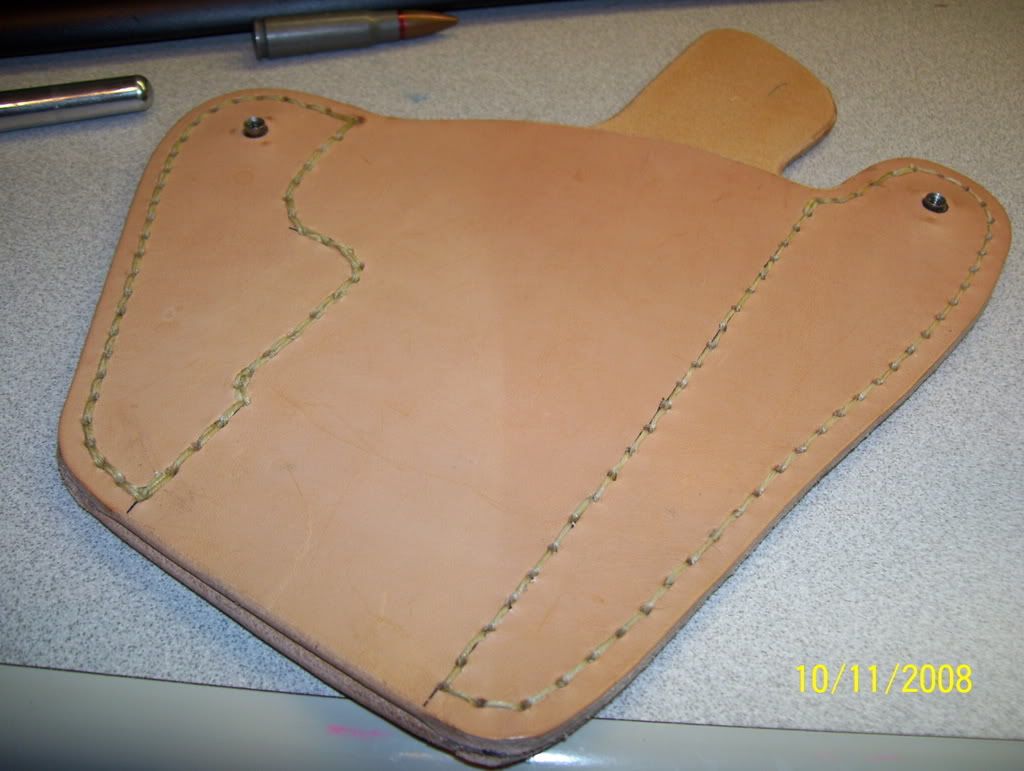 Front wing completed now, too. Can you notice the difference? I found my smaller (smallest) bit, so only had to run one loop. Also, I had figured out how to run the awl properly at this point, ending up with the locks in the middle of the holes, not on the front or back. MUCH more professional. Almost looks like I know what I am doing, huh?
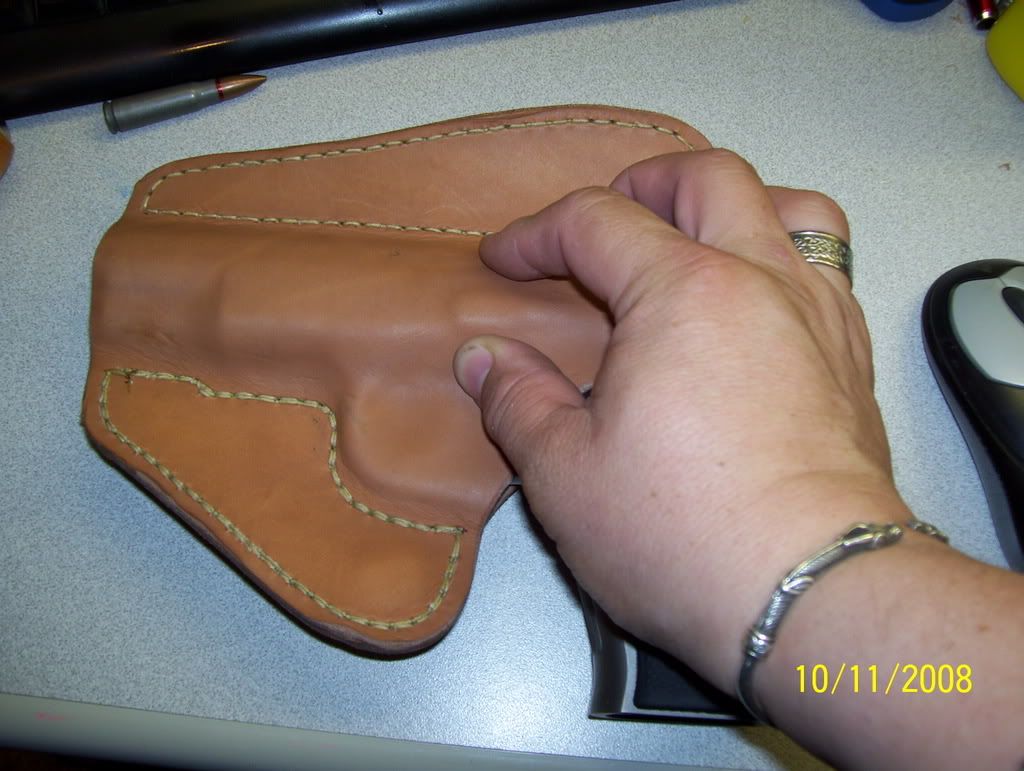 I've wet the leather, just to the point that it's darker-brown. Literally a minute in very hot bathwater. Put it in the tub and swish it around- when it is uniformly dark, it's ready. It's very much like working with stiff clay at this point. You can see I've started the boning process, the trigger guard, dust cover, and takedown lever are most evident. Yes, I am a man that wears jewelry. Celtic stuff, mainly. Shaddup.
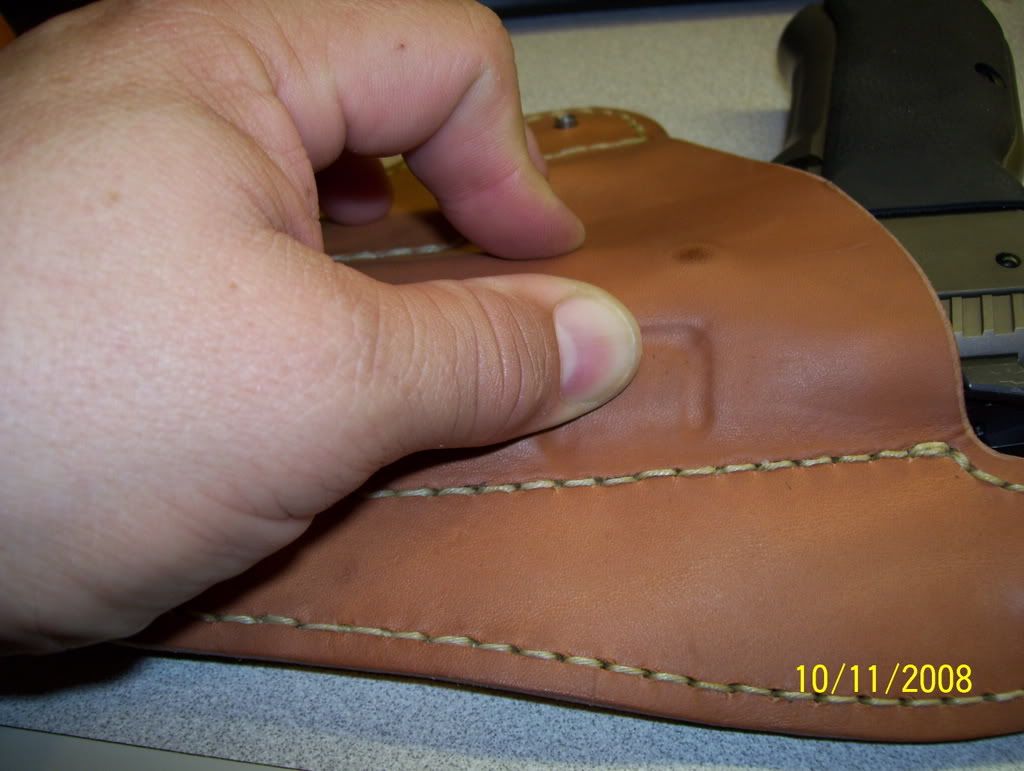
 In the name of safety, and not wanting an AD when reholstering, I use an ultra high-tech, precision-engineered Trigger Guard Embossing device. OK, so it's my thumb. This ain't rocket science, folks. As a famous holster-maker once said "There's only so many ways to wrap leather around a fuckin' gun". Curmudgeonly fellow, that. I think I'd enjoy his company.
 Hey, if it's stupid but works... it ain't stupid. 'Nuff said.
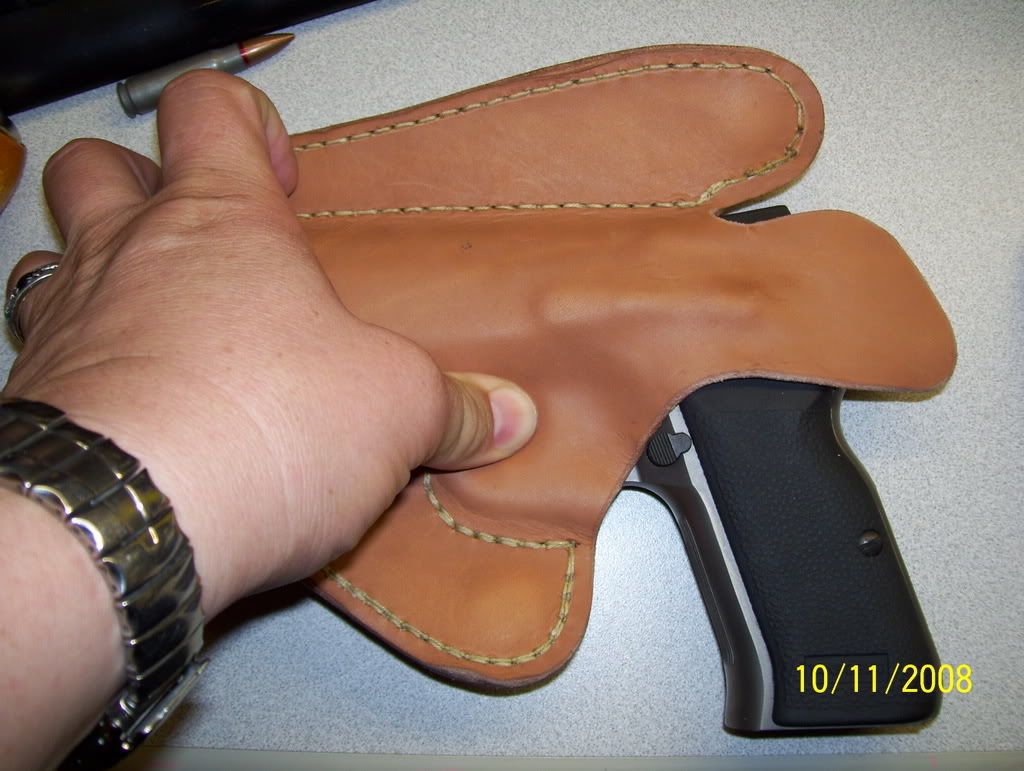
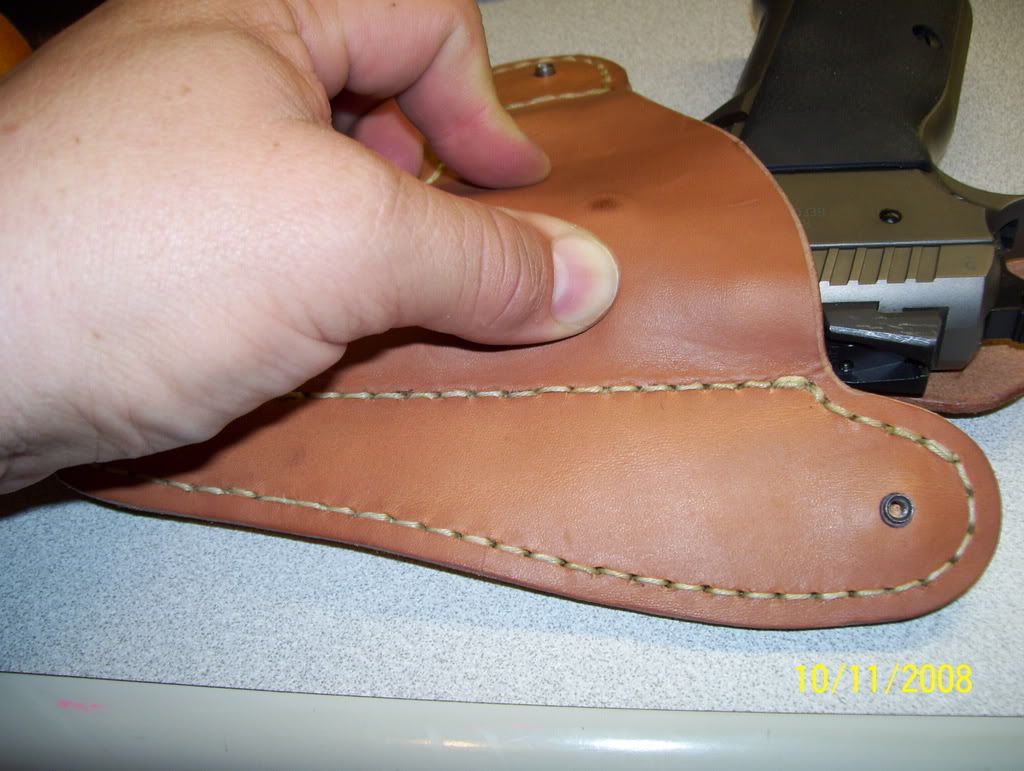
 As you can see, there's a VERY snug, secure fit. This weapon won't come out unless you mean to use it.
 YES, I know. Shut up! I am flat-out OUT of ammo for this weapon at this time, the safety is on, the trigger is covered, and my finger is nowhere near the trigger. Also, I cleared the weapon three times before putting it in the holster. I'm not a complete idiot (there are parts missing!). Nice view to show how the boning is split between the halves of the holster, to suck it into the hip more. Also, all the better to marvel at these cheap 6MP cameras that are out now. Why did I wait so long?
 Two shots of attempting to bone the ejection port with my thumb. Fail. While it's good enough for some folks, I like a holster with a well-defined ejection port- better retention. Hmm.. what can I use to better emboss this? If I only had some more deer antler left over I could make a tool with my Dremel tool...
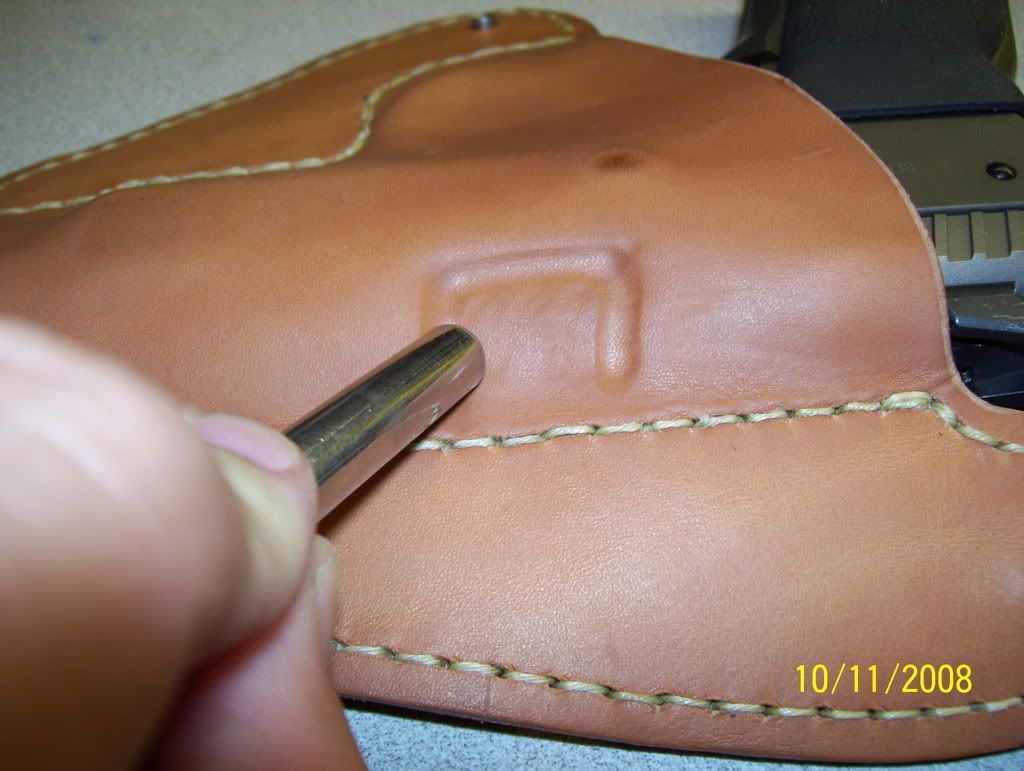 That's the ticket! A Fisher compact Space pen. Not only does it write in zero-g, vacuum, upside down, and prevent global thermonuclear war while saving the Apollo-13 astronauts- it also makes a damn fine embossing tool for wet leather. OK, so would a AA battery. But darn, now I have these nasty over-emphasized embossing marks around the port that look like crap. This would be easy to fix it this was really wet clay. Hmmm...
 Nice! Apparently the wet clay metaphor was more accurate than I realized.
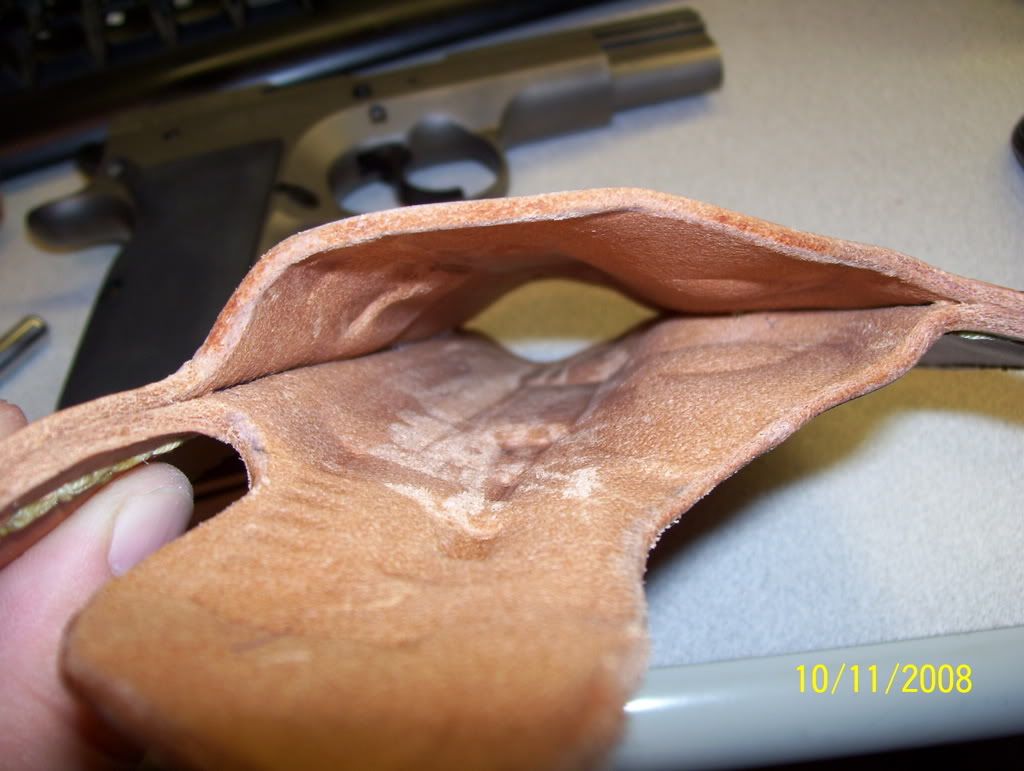 A very well-boned holster.
I've got to invest in a better backdrop. Are you folks tired of seeing my keyboard and desk yet?
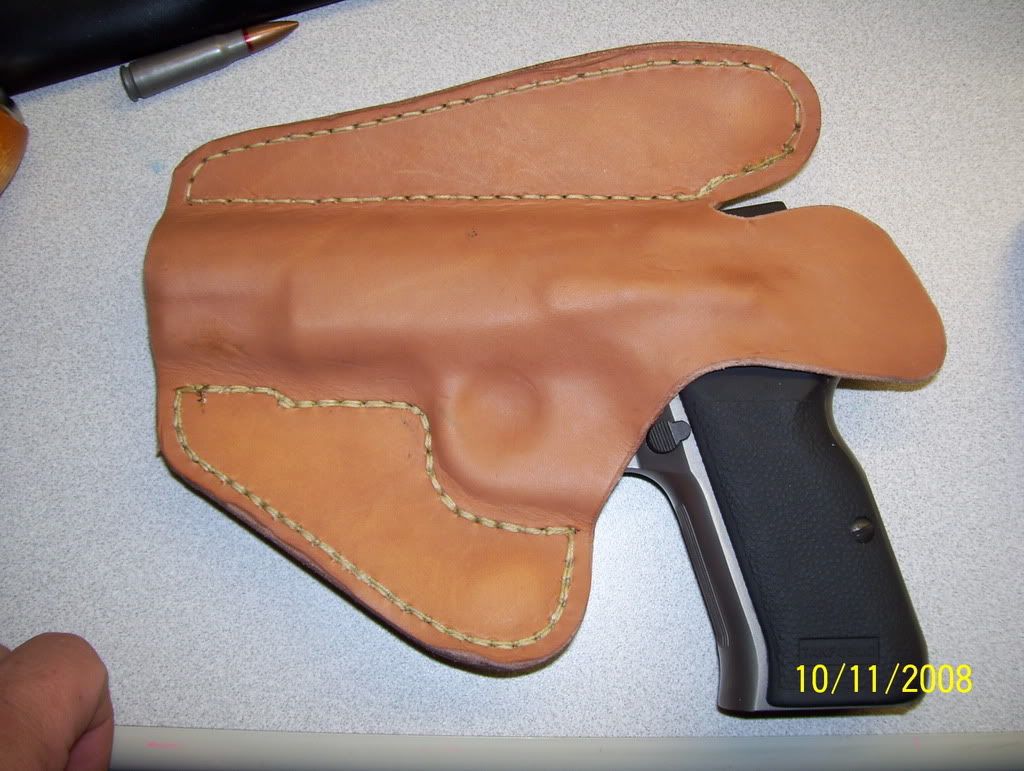
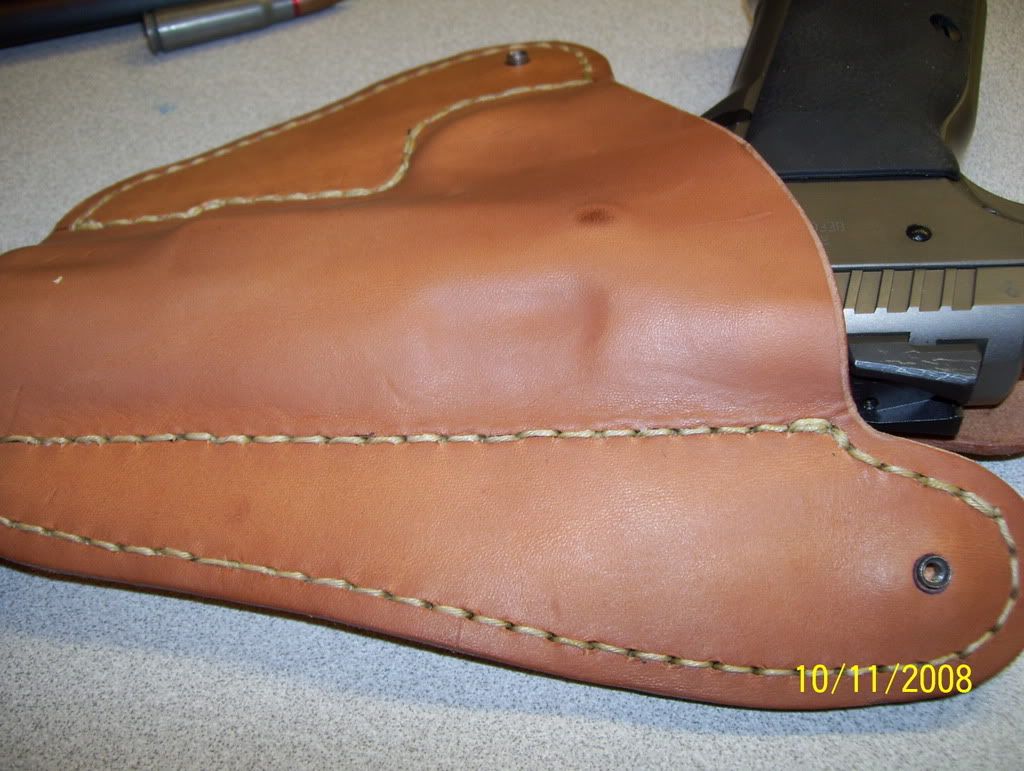
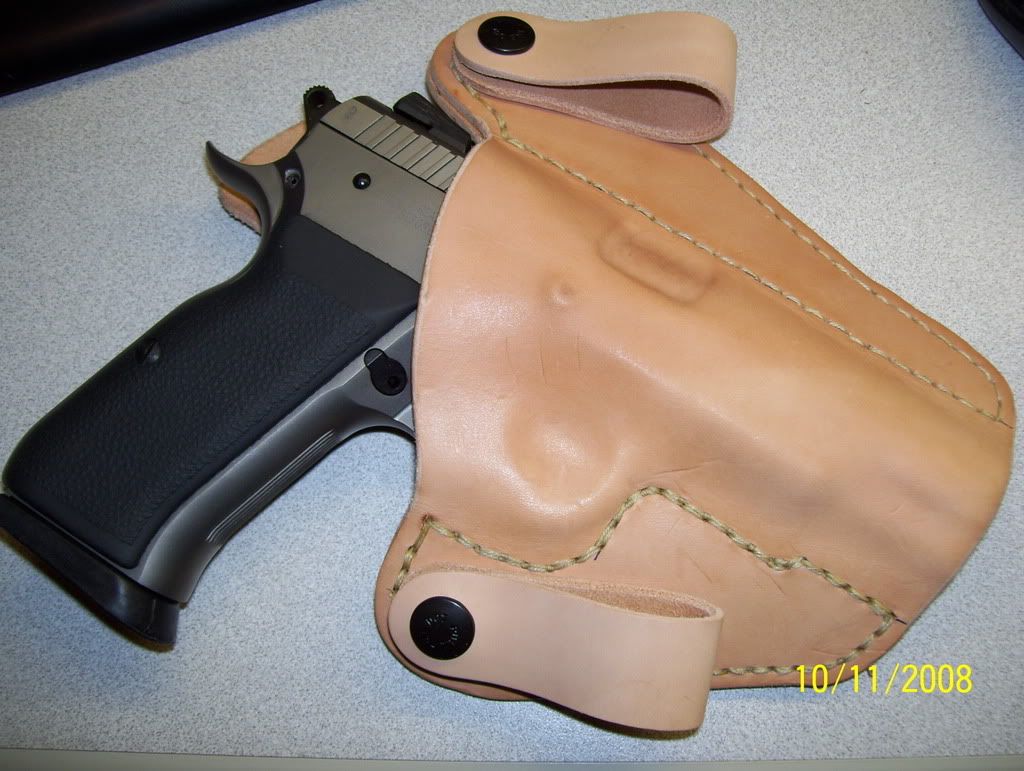
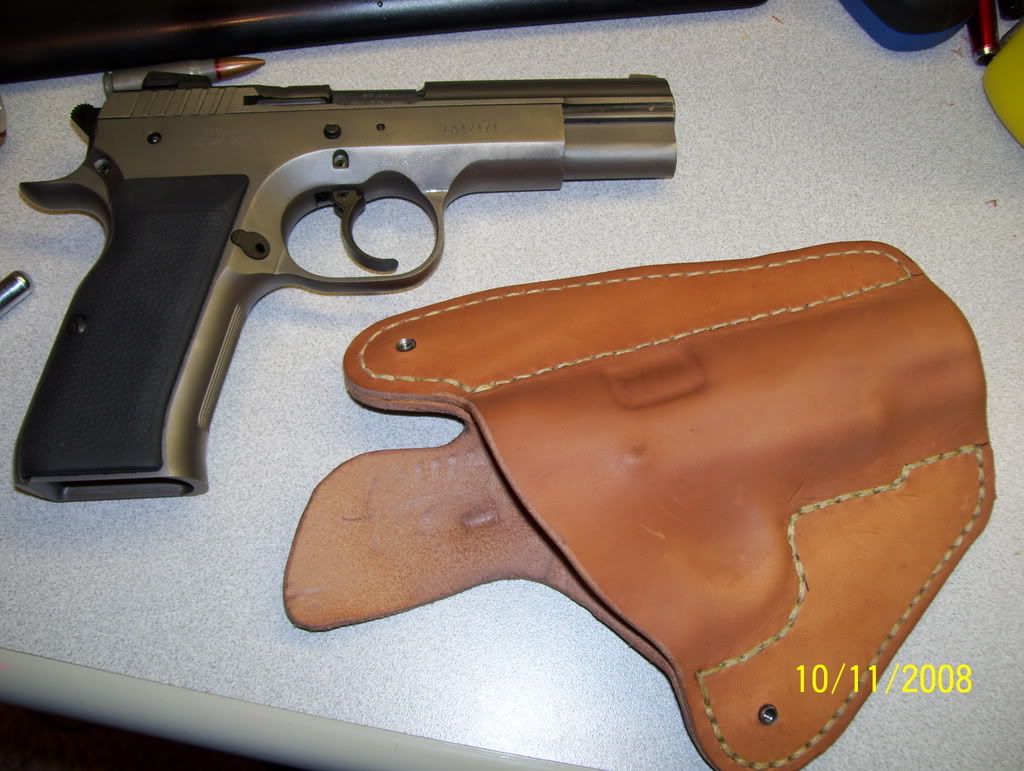 Finished product shots
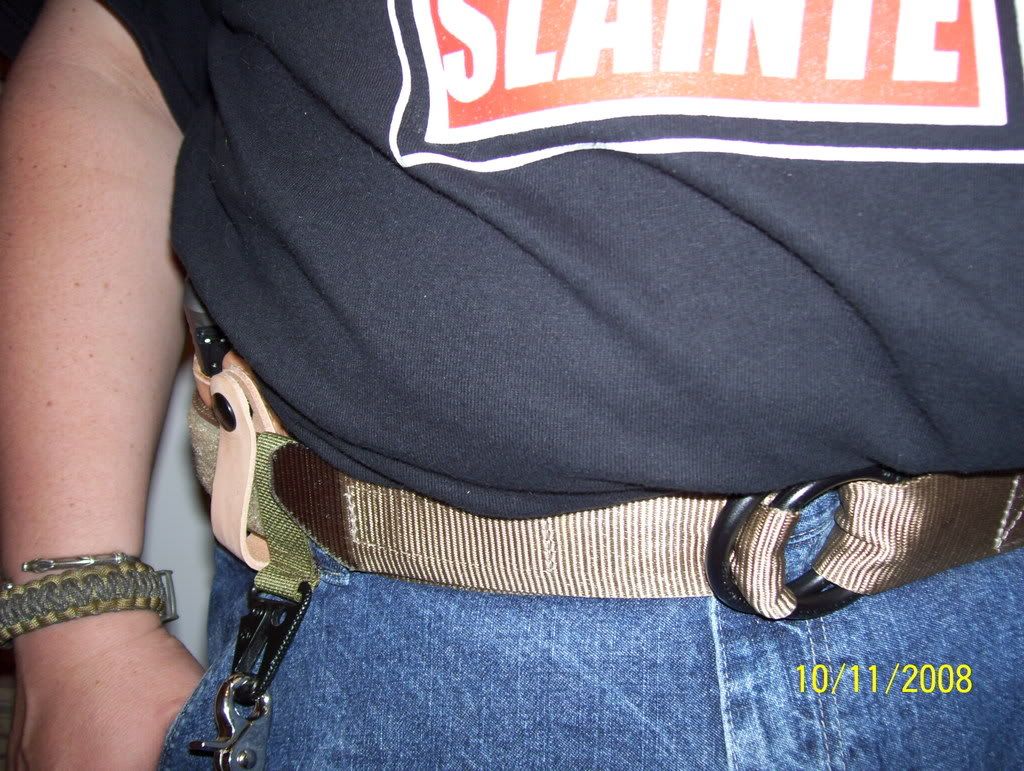 It wears well, too!
This is in response to several folks that have asked for more info regarding the stitching and so on.
Here you see that I've gone round the back wing, drilling holes with my Dremel first, then doing a simple lock-stitch. Note that the holes are, frankly, too large. I couldn't find my smallest drill bit at the time. I ended up doing a second trip around the stitching to make up for the gaping holes in the leather left by the drill, and my less-than-optimum control of the awl. If you look closely, you can see where some of the knots have come through the front. VERY amateur, but I learned quickly! Another, closer, view of same. Also note the T-nut that I forgot to mention installing. Install is simple: drill hole (come to think, that was already done, too- did I mention Nate made this EASY?), insert T-nut, then glue the two halves together. Closer stitch detail, too. See what I mean about the knots coming through the front? Beginner mistake!Closeup mainly to show the size of the line I am using. It's too big to call thread, too small to call rope. Waxed polyester, has a pretty hefty breaking strength. Yeah, it'll work! BTW- if you're looking for a sewing awl, by no means go buy one at your local boater's shop. I paid $27 for one at West Marine (well, I needed it THEN, to repair my ruck, going camping with the kid the next day). I could have gotten one for $13 online, and I stumbled across one VERY similar in Harbor Freight, with a 100-yard (as opposed to 30) skein of line, for $5 a few weeks later. Hell yes I bought it- I can't even get the line itself that cheap elsewhere. Need one? Drop me a line! (You see, how I made that little pun there... I am a kidder. I kid)I should have mocked this one up better. What you are looking at is how the lockstitch works. Basically, poke the awl through the holes, then pull out a quantity of line on the back side, at least enough to go around the perimeter 1.5 times or you'll be cutting and retracing your route often to get a good lock. Getting the string to the back is easier said than done unless those holes are WAY too big. Solution: Punch awl all the way through. Pull it about halfway out. Use the tip of a spitzer round (or a pen, chopstick, whatever's handy) to grab that loop, and pull the awl through. Now pull the bitter (loose) end of the line through. Poke the awl through the next hole, withdraw, and run the bitter end through the loop. Pull on both lines, you've made a stitch!I'm not real clear on the proper way to terminate the stitch. I backstitch two stitches, then run the bitter end through the loop three times, then pull. Cut flush, and apply brief heat to the remaining bit of the line. This ought to work.
Second lap of stitching on the back wing, completed. Looks a lot better now. For production use, I will run a double row of stitching up against the weapon as it's a high-stress area. Otherwise, single will be fine. Front wing completed now, too. Can you notice the difference? I found my smaller (smallest) bit, so only had to run one loop. Also, I had figured out how to run the awl properly at this point, ending up with the locks in the middle of the holes, not on the front or back. MUCH more professional. Almost looks like I know what I am doing, huh? I've wet the leather, just to the point that it's darker-brown. Literally a minute in very hot bathwater. Put it in the tub and swish it around- when it is uniformly dark, it's ready. It's very much like working with stiff clay at this point. You can see I've started the boning process, the trigger guard, dust cover, and takedown lever are most evident. Yes, I am a man that wears jewelry. Celtic stuff, mainly. Shaddup. In the name of safety, and not wanting an AD when reholstering, I use an ultra high-tech, precision-engineered Trigger Guard Embossing device. OK, so it's my thumb. This ain't rocket science, folks. As a famous holster-maker once said "There's only so many ways to wrap leather around a fuckin' gun". Curmudgeonly fellow, that. I think I'd enjoy his company.Hey, if it's stupid but works... it ain't stupid. 'Nuff said.As you can see, there's a VERY snug, secure fit. This weapon won't come out unless you mean to use it.YES, I know. Shut up! I am flat-out OUT of ammo for this weapon at this time, the safety is on, the trigger is covered, and my finger is nowhere near the trigger. Also, I cleared the weapon three times before putting it in the holster. I'm not a complete idiot (there are parts missing!). Nice view to show how the boning is split between the halves of the holster, to suck it into the hip more. Also, all the better to marvel at these cheap 6MP cameras that are out now. Why did I wait so long?Two shots of attempting to bone the ejection port with my thumb. Fail. While it's good enough for some folks, I like a holster with a well-defined ejection port- better retention. Hmm.. what can I use to better emboss this? If I only had some more deer antler left over I could make a tool with my Dremel tool...That's the ticket! A Fisher compact Space pen. Not only does it write in zero-g, vacuum, upside down, and prevent global thermonuclear war while saving the Apollo-13 astronauts- it also makes a damn fine embossing tool for wet leather. OK, so would a AA battery. But darn, now I have these nasty over-emphasized embossing marks around the port that look like crap. This would be easy to fix it this was really wet clay. Hmmm... Nice! Apparently the wet clay metaphor was more accurate than I realized.A very well-boned holster. I've got to invest in a better backdrop. Are you folks tired of seeing my keyboard and desk yet?
Finished product shotsIt wears well, too!
Made a holster!
I have to say, I am pretty damn pleased with myself on this one...
First off- thanks to Nate at UBGHolsters for providing the die-cuts. He made this project REALLY easy, and confidence-inspiring.
This all came about because I wanted an IWB holster for my Tanfoglio TZ75 in 10mm. It's similar to the CZ, but different enough 'round the trigger guard that he wasn't sure it would work. So the whole "thought about building your own?" idea came about, and we ran with it from there.
He sent me a set of die-cuts (think, flats cut from cowhide, shaped like a holster but without the molding), a set of straps (which he was nice enough to assemble as I didn't have the press, belt clips (unrelated to the project but thrown in because he's a nice guy), and instructions. He's also taken great effort to reply to 40+ emails in the course of the discussion.
I provided the tools -a 7.62X39 round (get the bitter end of the line started), a Fisher Space Pen (for boning), rubber cement, a Dremel, draftsman's dividers, and a Sewing Awl- and effort. This was very much a "use what ya got laying about" effort. There are purpose built tools for this sort of work, but they're not needed.
To assemble the holster, I took the diecuts and lined them up all around the perimeter. Nate was good enough to mark out the glued area by way of using his CZ75 as a model for the TZ that now takes its place. I applied rubber cement to each side in accordance with the directions for a permanent bond, and let the joined pieces sit overnight under my rangebag with a few pistols in it. I measured off 5 millimeters (about as close as I could figure to 1/5 of an inch) and locked my dividers in, then followed the stitchline with them as if I was plotting a course, which if you think about it, I was.
I took the joined pieces, a 2X4 bit of scrap, my Dremel, and a TINY bit (about 1/32 if I recall- it's too small to read), and drilled at each mark the dividers had left. I used my sewing awl to sew up each stitchline, and then tried to testfit the weapon- it will NOT go, dry, don't even try it.
So then I wet the holster thoroughly in hot bath water. You don't want to let it sit in there for any more than a minute or so- I actually just grabbed it and slid it around in the water till it was visibly wet through (watch for the color change). At this point the leather will have the consistency of wet clay. I took my well-oiled gun and slid it into the holster- it will go with a little effort- and then started on the boning.
You use your fingers and smooth the leather around all the points of the weapon- the safety, the triggerguard, and so on. With automatics, pay particular attention to the ejection port and the trigger guard- this is where your retention comes from. Now is a good time to set the holster in terms of it's curvature, as well- it's going to have to curve to go around the body part it's designed to fit (round my waist in this case). Once happy, pull the weapon out, and set the holster in front of a fan for a few hours to a few days, depending on how wet you got the leather. Now- go dry, clean, and oil your weapon, particularly if you've got a parkerized finish!
As this is my first go at this, and I used natural polyester waxed thread (read- it won't take dye), I'm going to leave this holster in the natural. Next one will be sewed with my preferred black thread, and will be dyed black. I have no experience with that as of yet, but I'm told to use oil-based dyes and a sealer.
Not bad for a first go, all things considered. I learned a lot here.
I can not thank Nate of UBGHolsters enough for his encouragement, parts, advice and overall brain-dump when it came to my numerous stupid questions. He made what could have been a disaster, easy. I've been wanting to try this for years and after all his effort the hardest part of the job was sewing the leather. By the way- he gave me all this info all the while knowing that I was considering starting up a holster-making business.
First off- thanks to Nate at UBGHolsters for providing the die-cuts. He made this project REALLY easy, and confidence-inspiring.
This all came about because I wanted an IWB holster for my Tanfoglio TZ75 in 10mm. It's similar to the CZ, but different enough 'round the trigger guard that he wasn't sure it would work. So the whole "thought about building your own?" idea came about, and we ran with it from there.
He sent me a set of die-cuts (think, flats cut from cowhide, shaped like a holster but without the molding), a set of straps (which he was nice enough to assemble as I didn't have the press, belt clips (unrelated to the project but thrown in because he's a nice guy), and instructions. He's also taken great effort to reply to 40+ emails in the course of the discussion.
I provided the tools -a 7.62X39 round (get the bitter end of the line started), a Fisher Space Pen (for boning), rubber cement, a Dremel, draftsman's dividers, and a Sewing Awl- and effort. This was very much a "use what ya got laying about" effort. There are purpose built tools for this sort of work, but they're not needed.
To assemble the holster, I took the diecuts and lined them up all around the perimeter. Nate was good enough to mark out the glued area by way of using his CZ75 as a model for the TZ that now takes its place. I applied rubber cement to each side in accordance with the directions for a permanent bond, and let the joined pieces sit overnight under my rangebag with a few pistols in it. I measured off 5 millimeters (about as close as I could figure to 1/5 of an inch) and locked my dividers in, then followed the stitchline with them as if I was plotting a course, which if you think about it, I was.
I took the joined pieces, a 2X4 bit of scrap, my Dremel, and a TINY bit (about 1/32 if I recall- it's too small to read), and drilled at each mark the dividers had left. I used my sewing awl to sew up each stitchline, and then tried to testfit the weapon- it will NOT go, dry, don't even try it.
So then I wet the holster thoroughly in hot bath water. You don't want to let it sit in there for any more than a minute or so- I actually just grabbed it and slid it around in the water till it was visibly wet through (watch for the color change). At this point the leather will have the consistency of wet clay. I took my well-oiled gun and slid it into the holster- it will go with a little effort- and then started on the boning.
You use your fingers and smooth the leather around all the points of the weapon- the safety, the triggerguard, and so on. With automatics, pay particular attention to the ejection port and the trigger guard- this is where your retention comes from. Now is a good time to set the holster in terms of it's curvature, as well- it's going to have to curve to go around the body part it's designed to fit (round my waist in this case). Once happy, pull the weapon out, and set the holster in front of a fan for a few hours to a few days, depending on how wet you got the leather. Now- go dry, clean, and oil your weapon, particularly if you've got a parkerized finish!As this is my first go at this, and I used natural polyester waxed thread (read- it won't take dye), I'm going to leave this holster in the natural. Next one will be sewed with my preferred black thread, and will be dyed black. I have no experience with that as of yet, but I'm told to use oil-based dyes and a sealer.
Not bad for a first go, all things considered. I learned a lot here.
I can not thank Nate of UBGHolsters enough for his encouragement, parts, advice and overall brain-dump when it came to my numerous stupid questions. He made what could have been a disaster, easy. I've been wanting to try this for years and after all his effort the hardest part of the job was sewing the leather. By the way- he gave me all this info all the while knowing that I was considering starting up a holster-making business.
04 October 2008
Geekin' out with the kid...
Today I made a stove for camping with the rugrat.
Out of two soda cans!
No, seriously...
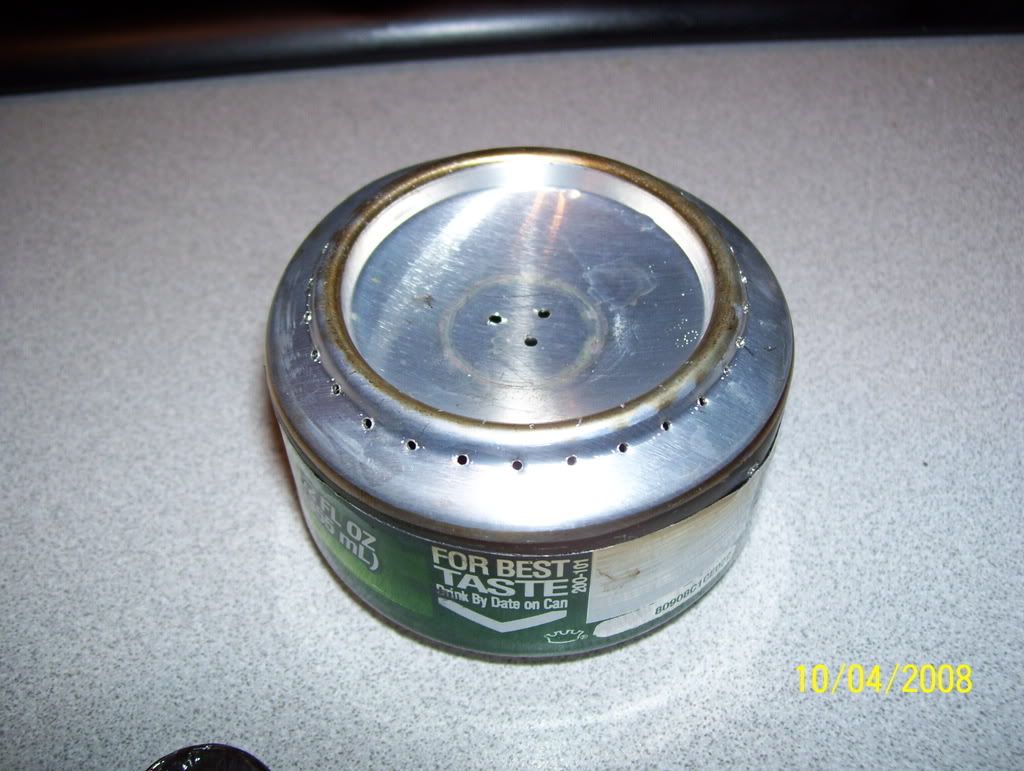
Tested it by boiling water for the kid and I for hot cocoa. Took 6 minutes to boil half a liter of water. I'd call it a success! By the way, it uses high-proof alcohol (70% or better, isopropyl, methanol, or drinking)for fuel.
Will build a bigger one shortly, as I've just reached the bottom of the second can of Foster's Lager...
Yes, I could have bought a whole messkit WITH a stove very similar, that is able to be capped and reclosed, for $30. I still may, for the ability to be able to stop and start the stove at will with fuel still inside. If interested, I believe they're called Trangia stoves.
This was mainly an intellectual exercise in figuring out how the thing works, if it works well, and to do something with my kid while instilling a thirst for knowledge and ability to reason through problems that might be encountered. Cost was really $0- I pulled the cans out of the trash.
Success, on all fronts, beyond measure. I'm gonna have to run this up the flagpole at the next Scout campout and see if they would like me to teach the boys how to do it (with adult help, of course).
Out of two soda cans!
No, seriously...
Tested it by boiling water for the kid and I for hot cocoa. Took 6 minutes to boil half a liter of water. I'd call it a success! By the way, it uses high-proof alcohol (70% or better, isopropyl, methanol, or drinking)for fuel.
Will build a bigger one shortly, as I've just reached the bottom of the second can of Foster's Lager...
Yes, I could have bought a whole messkit WITH a stove very similar, that is able to be capped and reclosed, for $30. I still may, for the ability to be able to stop and start the stove at will with fuel still inside. If interested, I believe they're called Trangia stoves.
This was mainly an intellectual exercise in figuring out how the thing works, if it works well, and to do something with my kid while instilling a thirst for knowledge and ability to reason through problems that might be encountered. Cost was really $0- I pulled the cans out of the trash.
Success, on all fronts, beyond measure. I'm gonna have to run this up the flagpole at the next Scout campout and see if they would like me to teach the boys how to do it (with adult help, of course).
11 September 2008
Thoughts on biking with a canine?
I've been wanting to do this for a while, both to give me some much-needed exercise, and to give my Australian Shepherd some exercise as well.
From what I've found, there's a couple thoughts on the subject:
-buy a special attachment that bolts to the rear triangle and holds the dog's leader at a level near the axle, where it has little mechanical advantage and is subject to the master's full weight to resist it. Probably not an issue if you're a thin female with a 180-pound Mastiff along for the run, but I don't have that problem. My buddy is an Australian Shepherd, and I outweigh her by a fair margin. Ok, a more than fair margin. Shaddup. The examples I've seen run about $60, like the BikeDog (which it seems I now can't find the link to)
-similar to the above, except attaches to the seat tube. The WalkyDog is an example of this, about $50. More mechanical advantage for the pup, but it's not likely to be an issue with my riding partner and myself. The biggest thing I have against this is the $50- I have a welder, and regularly fab stuff with webbing (slings and similar), shouldn't be a problem to make the soft part). More to the point, it's been out of stock for at least the last year, near as I can tell. It looks like it's just a dressed-up pneumatic QD fitting and a post. I may have to take a look around Lowes and see what I can cobble up.
-use a standard 6'foot leash. Put the loop around your right bicep, curl it around the headset, and then to the dog. I see lots of opportunity for problems here: the dog has mechanical advantage against the pivot point (tire/ground interface) of the bike/rider assembly. Also there's an issue with the lead possibly fowling in the chainring or at least being a hindrance to the rider's leg. I know a couople folks that've had problems with otherwise-calm dogs bolting at the sight of a squirrel and causing injuries with this sort of setup. I know Xavier doesn't have a problem with this arrangement- I'm just not comfortable with the idea. While my Aussie is very calm (I can walk her without a leash and she has never left my side), I don't want to go this route.
Anyone have other thoughts or input?
DIY Slings
While typing up the previous entry, I received a box o' goodies from Slingworks. 50 feet of 1.5" OD webbing, 5 feet of velcro, HK hooks and other assorted odds and ends.
I'll be making a sling adaptor and a 3-point sling for my AR and my AK (1 sling for each). The sling adaptors move the sling from the bottom of the AR to the top, enabling the weapon to hang at the ready. During 6 years of humping an M16 in the Army, that was alwas the thing that bothered me the most- we had to jury-rig a proper tac sling out of paracord and the issue parade sling. I'm not sure if the 3-point design was around then- I got out in 1994- but it sure would have been handy. Most folks will think it a bit silly to make a tac sling for a civilian-owned AR15. Well, to an extent, yes. This is the same argument that can be made for owning an AR15, or for that matter, for owning car insurance or a fire extinguisher.
-Have I ever needed it? No.
-Do I expect to ever need it? Not really.
-Then why do you have it? Because if I ever need it, I'm going to need it DESPERATELY, RIGHT THE HELL NOW, and it'll be too late to get it.
After I've made the tac slings, I'll try my hand at making a Scout Sling, along the lines of Colonel Jeff Coopers thoughts on the subject of slings and shooting, and will put it on my Marlin 30-30 and SMLE No1MK4 Sporter.
Best businessman ever
I really can't say enough about the gent that runs Ugly Bald Guy Holsters.
First off- the product is excellent- hand crafted, extremely durable, and the way a holster should be. Without being all gross about it- I carry my weapon IWB (that's Inside Waist Band- think of "Mexican Carry"- just jammed down the pants- except with a covered triggerguard and holster to keep the weapon in place). I've been doing a lot of yard work the last few weeks and with the high humidity and 90+ degree heat, things get a bit moist. So having a slab of cowhide against my hide, it obviously gets soaked. I haven't been able to note and soaking of the leather, and it's been exceedingly comfortable through me bending, twisting, and moving about as I work on a minor construction project. The first few days I got a chafe spot until I learned to move the weapon to 3:30 instead of 3 o'clock, but even that wouldn't have been an issue had I worn an undershirt or something to go between the front edge of the holster and my hip, like boxers.
I've already ordered two holsters from him, and recommended his gear to several friends. I was ordering another, for my Tanfoglio 10mm pistol for hunting duty ('cuz I want to have a way to address Mr Bear if he should show up and claim the deer I take), when he suggested during the conversation that since he's not able to make the holster (the weapon is a CZ75 clone, but differs enough in the trigger guard that it won't fit the same holster), so why not send me a "kit" consisting of a couple of precut slabs of leather, so I can give a try at making my own holster. Got to discussing the idea, he packaged everything up, and I mentioned it to a few gunnies in passing. They turn out to have a couple weapons they want to have holsters for, like Makarovs and other oddball weaponry, and next thing I know I have a few orders for holsters... and I've not made one yet!
I mentioned this in passing, and next I know the guy that runs the show at UBGHolsters is giving me a data-dump on tips and tricks to make a holster- even mentioning that I should consider a side business of holster-making... the work is relaxing, and it's very good money to be had.
We shall see. The kit should arrive this week. Other than what's in the box, if I decide to get into this on even a personal level, just making holsters for my knives, I'll be busy. I'm going to have to order a shoulder of hide and see what I can swing on my own.
I'll post pics of the process once I get the kit.
Subscribe to:
Posts (Atom)


