Testify, my brother:
23 October 2008
19 October 2008
Just lost all respect for Colin Powell
So Powell's done what there's been rumor of for months, and come out supporting Obama.
While I don't think it's "just because he's black", I do believe that it indicates that Powell's not showing the best judgement.
I hereby retract any and all indicators of support for Powell in my previous posts or comments (both personally and in the blogosphere), and am strongly considering retracting my opinion of him as "a good man".
REMARKABLY ill-advised, General. I'm glad you didn't this lack of judgement when I served under you. Sir.
14 October 2008
13 October 2008
4-wheeling Monday
Let's start the week off on a high note, shall we?
If this song doesn't stick in your head, nothing will...
Note how the TJ just walks right on past the H1 in the rock field.
Fair disclosure: I drive a 90 XJ. Yep, I'm a Jeep guy.
If this song doesn't stick in your head, nothing will...
Note how the TJ just walks right on past the H1 in the rock field.
Fair disclosure: I drive a 90 XJ. Yep, I'm a Jeep guy.
12 October 2008
Thomas Paine talks Common Sense
Most important part of the video is at the end.
"Choose to be part of the Second American Revolution- not of bullets and of violence, but of Pressure! Pressure!Pressure! Call the Congressional Switchboard every day at 1-866-340-9281"
EDIT: perhaps the video is a bit dated. The 866 number didn't work for me. The verified number is 202-224-3121.
I'm not condoning a violent revolution by ANY means. I'd love to see a Voting Revolution- clear all the dead wood out of office and let them know if they don't respect the Constitution and the will of the people they WILL be replaced.
The stuff that's happening now is the sort of stuff that leads to violent revolution. It is my sincere wish that we can avoid that.
EDIT: not sure what that "Download video" crap is about.
11 October 2008
Heimliched the pooch...
So I'm sitting there talking to my wife about some things while all three dogs are chewing on their new toys.
 Suddenly Kylie (my Aussie) comes running at me, fullspeed, and claws me full on in the chest several times, hard. I look at her, wondering what's the matter, and notice she's making this motion like she's trying to bark, hard, but nothing's coming out.
I realize she's choking, and give her a healthy swat on both sides at once. Being rather alarmed, afraid I was about to lose my buddy, it was all I could think to do.
GACK!! A loud cough and apparently the bit of her chewie that was stuck in her windpipe dislodged and was swallowed. TONS of hugs and kisses after. Yes, she actually does hug.
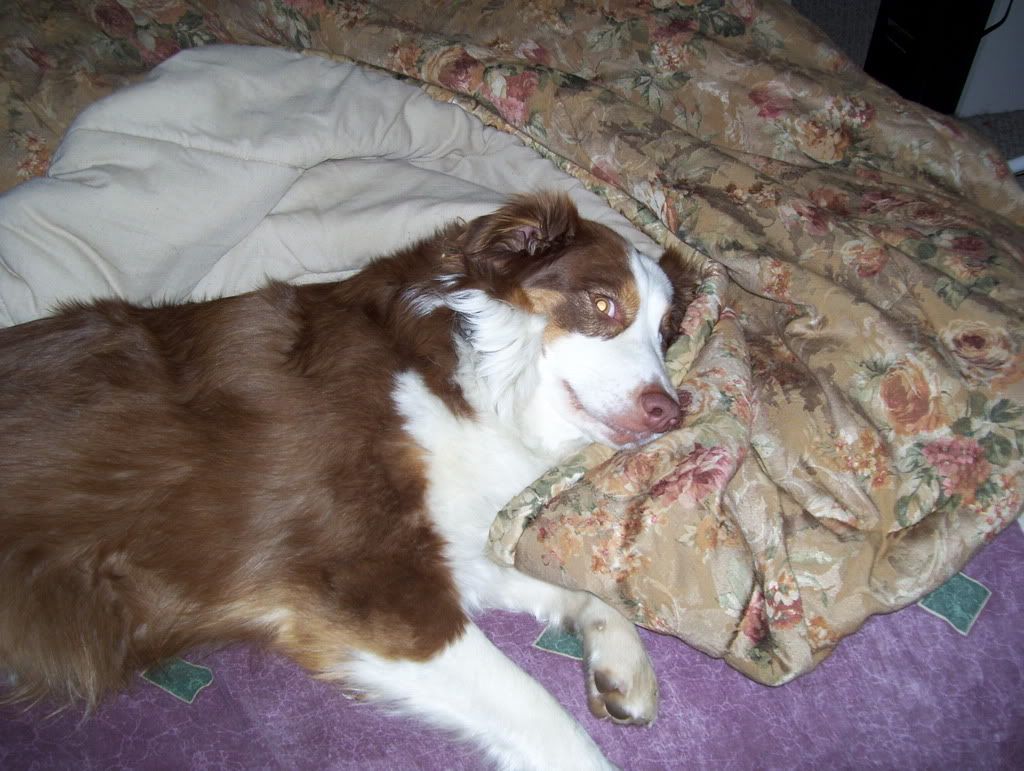
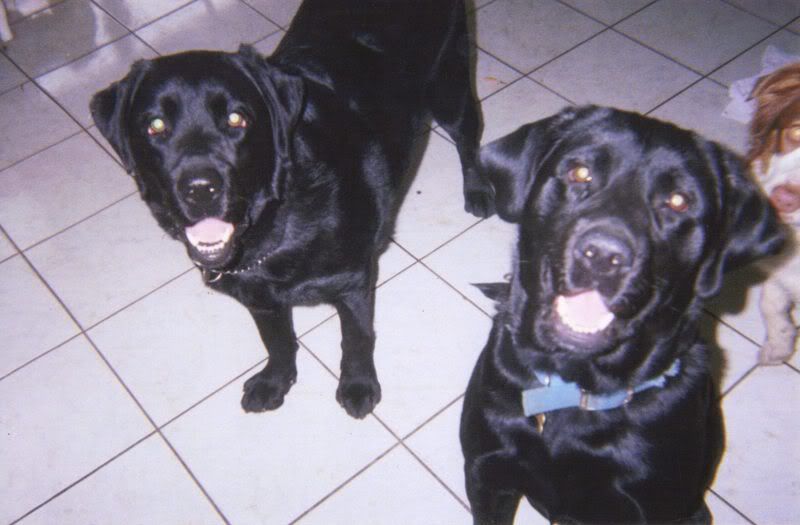 Close one. I'd have missed my little girl. She's an amazing dog, and sharp as a tack. Besides, who else is going to keep the Lab Boys (bka the Idjuts) in line?
Suddenly Kylie (my Aussie) comes running at me, fullspeed, and claws me full on in the chest several times, hard. I look at her, wondering what's the matter, and notice she's making this motion like she's trying to bark, hard, but nothing's coming out.I realize she's choking, and give her a healthy swat on both sides at once. Being rather alarmed, afraid I was about to lose my buddy, it was all I could think to do.
GACK!! A loud cough and apparently the bit of her chewie that was stuck in her windpipe dislodged and was swallowed. TONS of hugs and kisses after. Yes, she actually does hug.
Close one. I'd have missed my little girl. She's an amazing dog, and sharp as a tack. Besides, who else is going to keep the Lab Boys (bka the Idjuts) in line?
Holster-making gallery (56K death!)
If you've got dialup, you might want to go grab a coffee...
This is in response to several folks that have asked for more info regarding the stitching and so on.
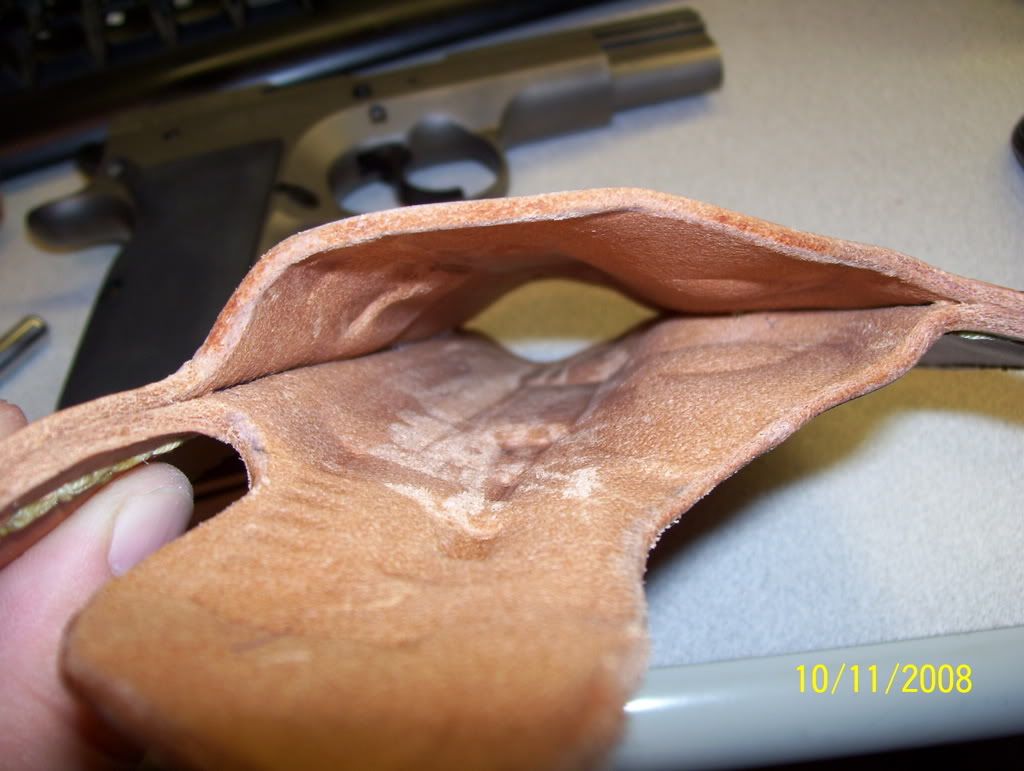
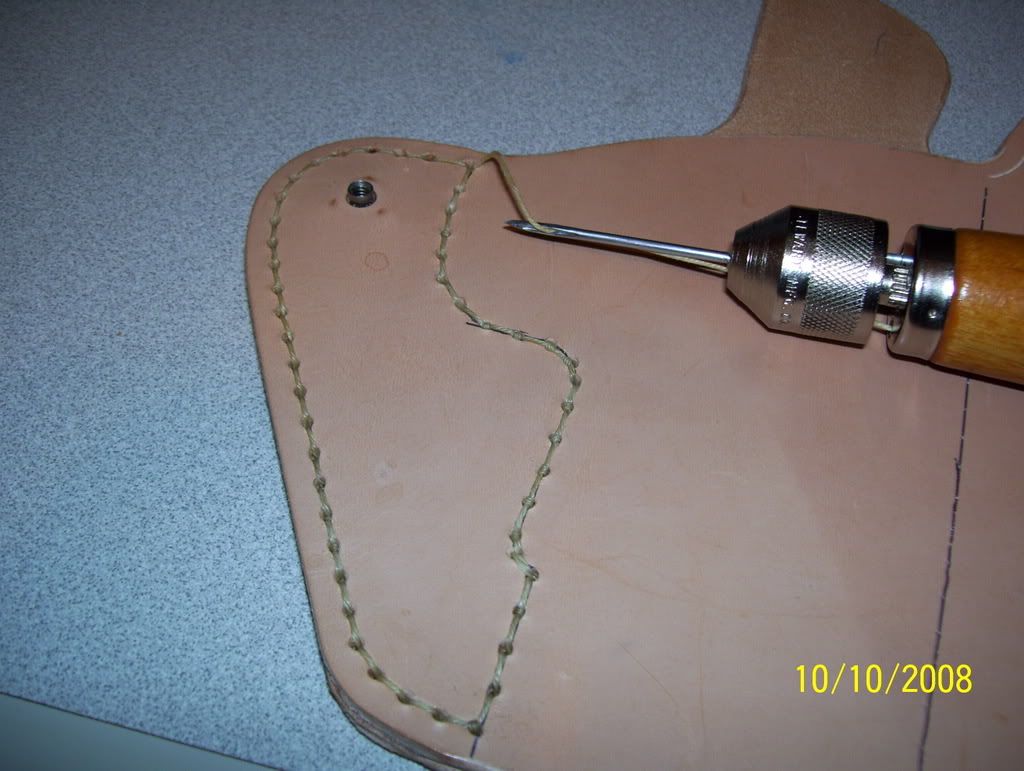 Here you see that I've gone round the back wing, drilling holes with my Dremel first, then doing a simple lock-stitch. Note that the holes are, frankly, too large. I couldn't find my smallest drill bit at the time. I ended up doing a second trip around the stitching to make up for the gaping holes in the leather left by the drill, and my less-than-optimum control of the awl. If you look closely, you can see where some of the knots have come through the front. VERY amateur, but I learned quickly!
 Another, closer, view of same. Also note the T-nut that I forgot to mention installing. Install is simple: drill hole (come to think, that was already done, too- did I mention Nate made this EASY?), insert T-nut, then glue the two halves together. Closer stitch detail, too. See what I mean about the knots coming through the front? Beginner mistake!
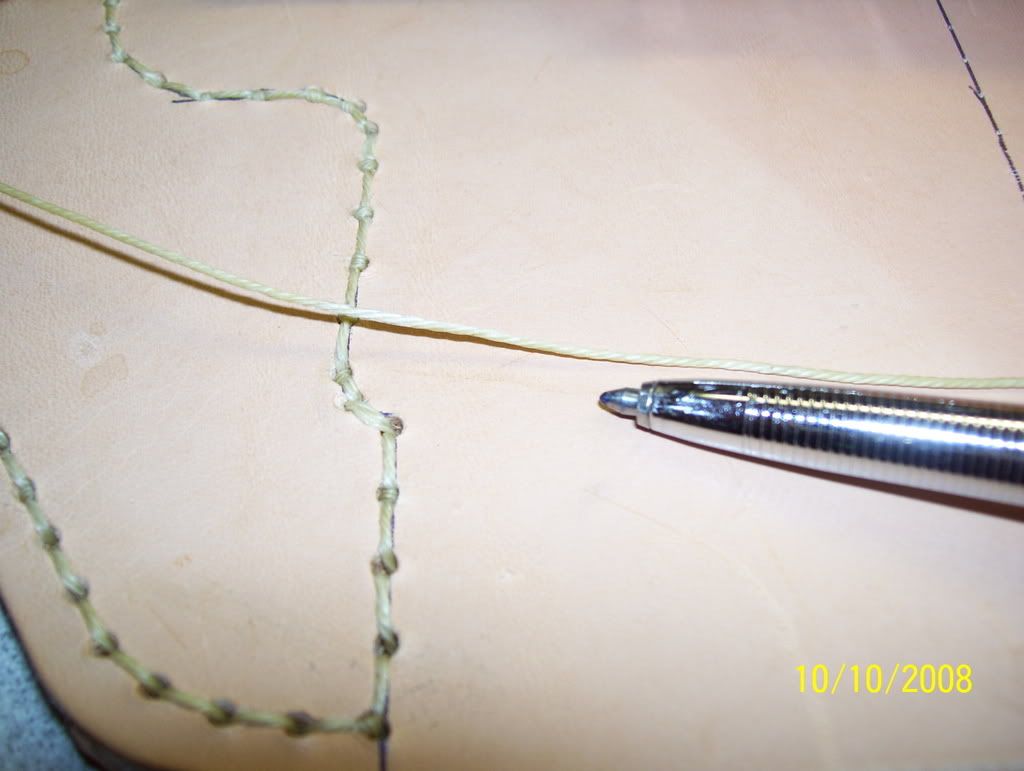 Closeup mainly to show the size of the line I am using. It's too big to call thread, too small to call rope. Waxed polyester, has a pretty hefty breaking strength. Yeah, it'll work! BTW- if you're looking for a sewing awl, by no means go buy one at your local boater's shop. I paid $27 for one at West Marine (well, I needed it THEN, to repair my ruck, going camping with the kid the next day). I could have gotten one for $13 online, and I stumbled across one VERY similar in Harbor Freight, with a 100-yard (as opposed to 30) skein of line, for $5 a few weeks later. Hell yes I bought it- I can't even get the line itself that cheap elsewhere. Need one? Drop me a line! (You see, how I made that little pun there... I am a kidder. I kid)
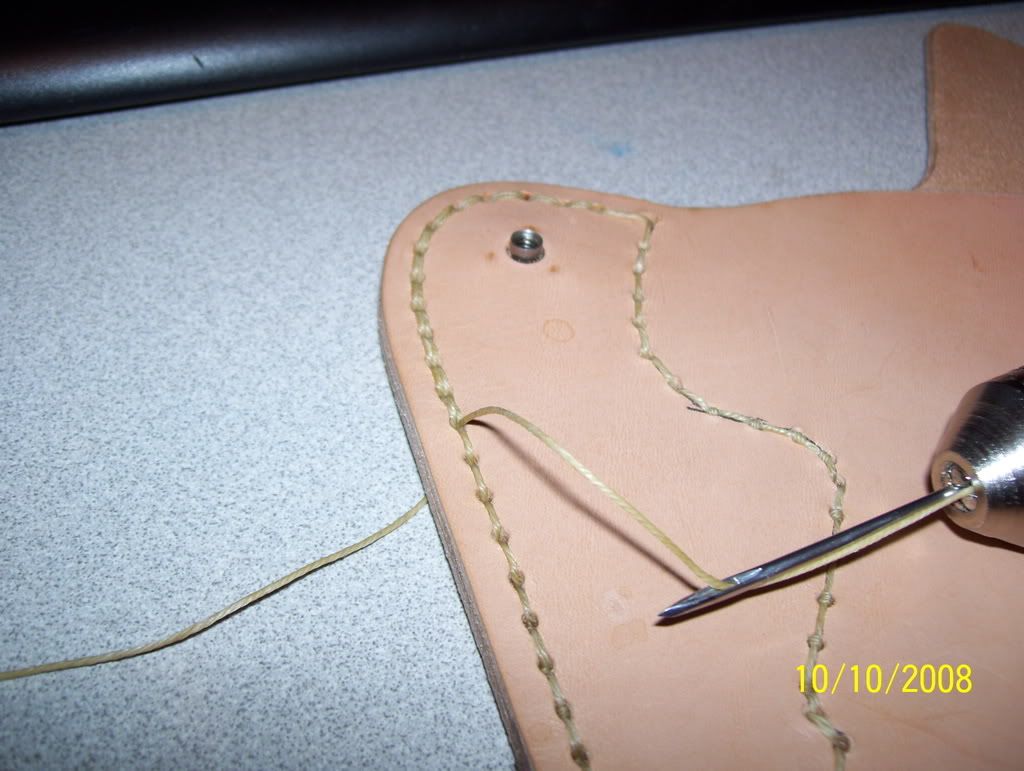 I should have mocked this one up better. What you are looking at is how the lockstitch works. Basically, poke the awl through the holes, then pull out a quantity of line on the back side, at least enough to go around the perimeter 1.5 times or you'll be cutting and retracing your route often to get a good lock. Getting the string to the back is easier said than done unless those holes are WAY too big. Solution: Punch awl all the way through. Pull it about halfway out. Use the tip of a spitzer round (or a pen, chopstick, whatever's handy) to grab that loop, and pull the awl through. Now pull the bitter (loose) end of the line through. Poke the awl through the next hole, withdraw, and run the bitter end through the loop. Pull on both lines, you've made a stitch!
I'm not real clear on the proper way to terminate the stitch. I backstitch two stitches, then run the bitter end through the loop three times, then pull. Cut flush, and apply brief heat to the remaining bit of the line. This ought to work.
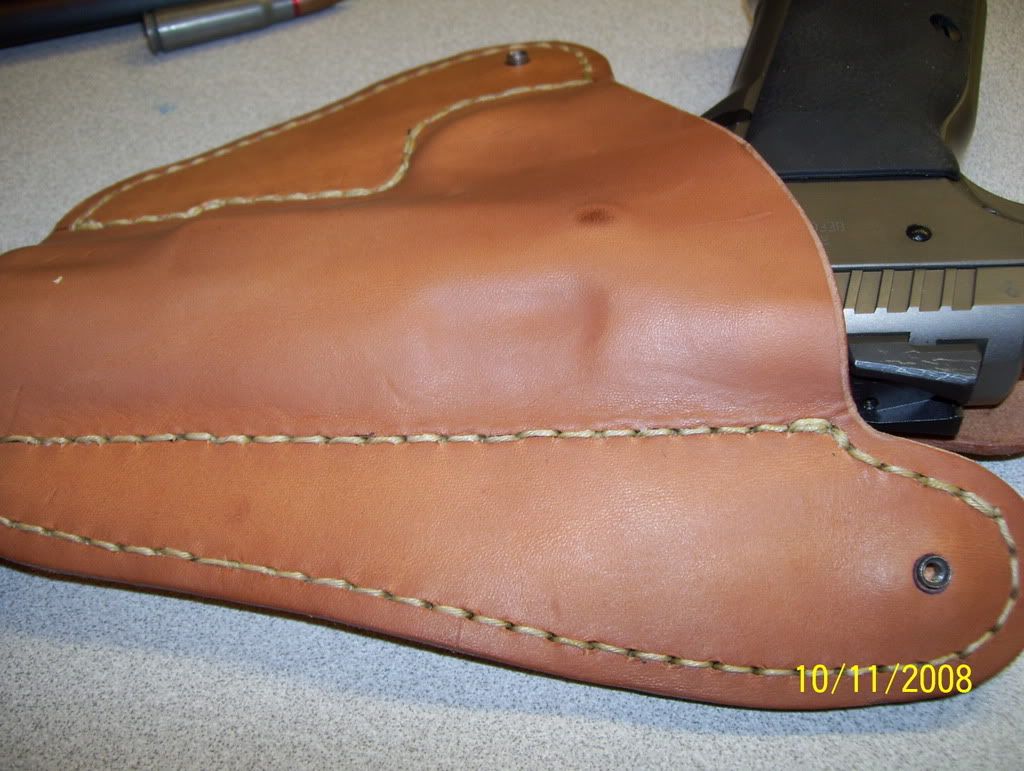
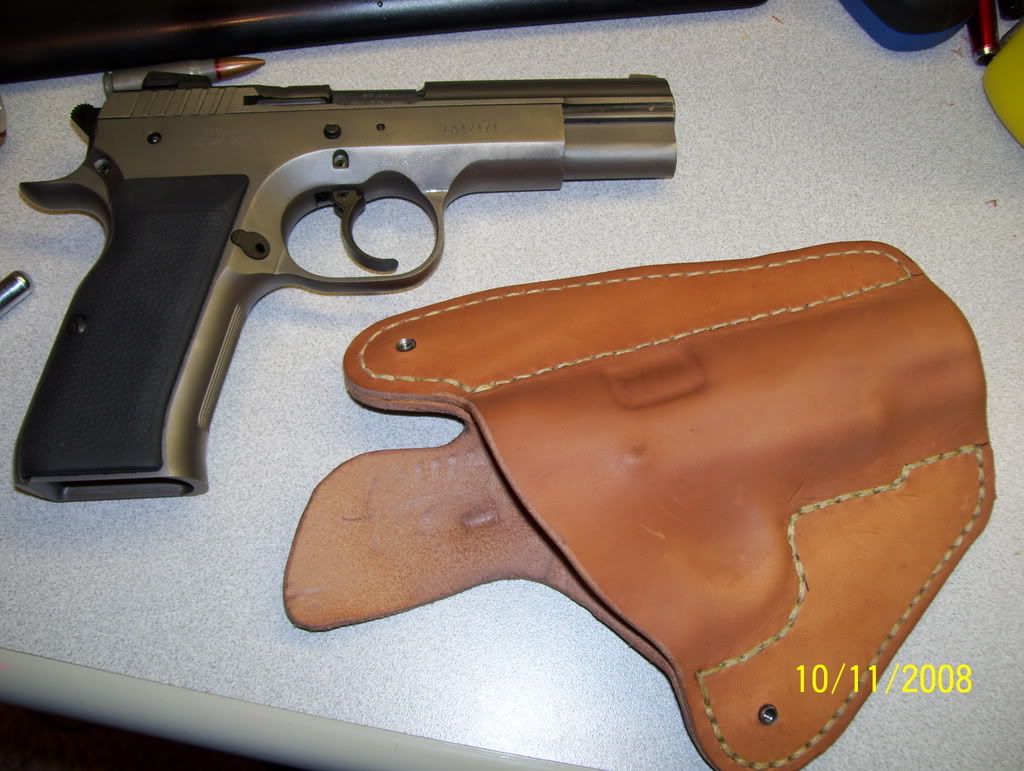
 Second lap of stitching on the back wing, completed. Looks a lot better now. For production use, I will run a double row of stitching up against the weapon as it's a high-stress area. Otherwise, single will be fine.
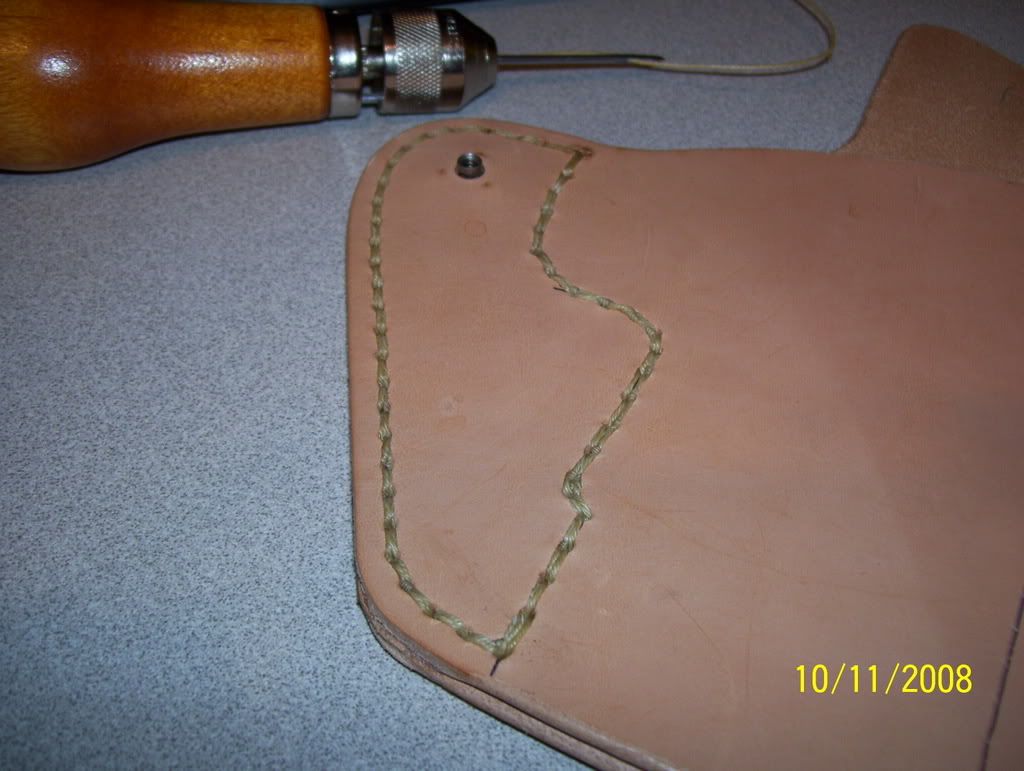
 Front wing completed now, too. Can you notice the difference? I found my smaller (smallest) bit, so only had to run one loop. Also, I had figured out how to run the awl properly at this point, ending up with the locks in the middle of the holes, not on the front or back. MUCH more professional. Almost looks like I know what I am doing, huh?
 I've wet the leather, just to the point that it's darker-brown. Literally a minute in very hot bathwater. Put it in the tub and swish it around- when it is uniformly dark, it's ready. It's very much like working with stiff clay at this point. You can see I've started the boning process, the trigger guard, dust cover, and takedown lever are most evident. Yes, I am a man that wears jewelry. Celtic stuff, mainly. Shaddup.
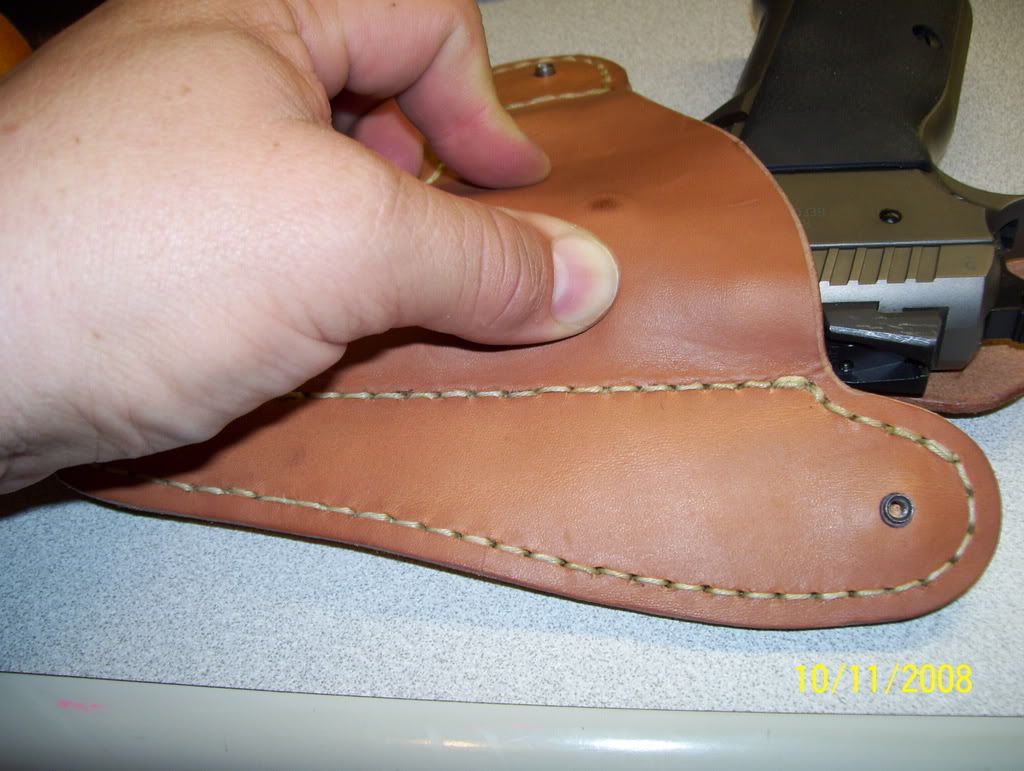
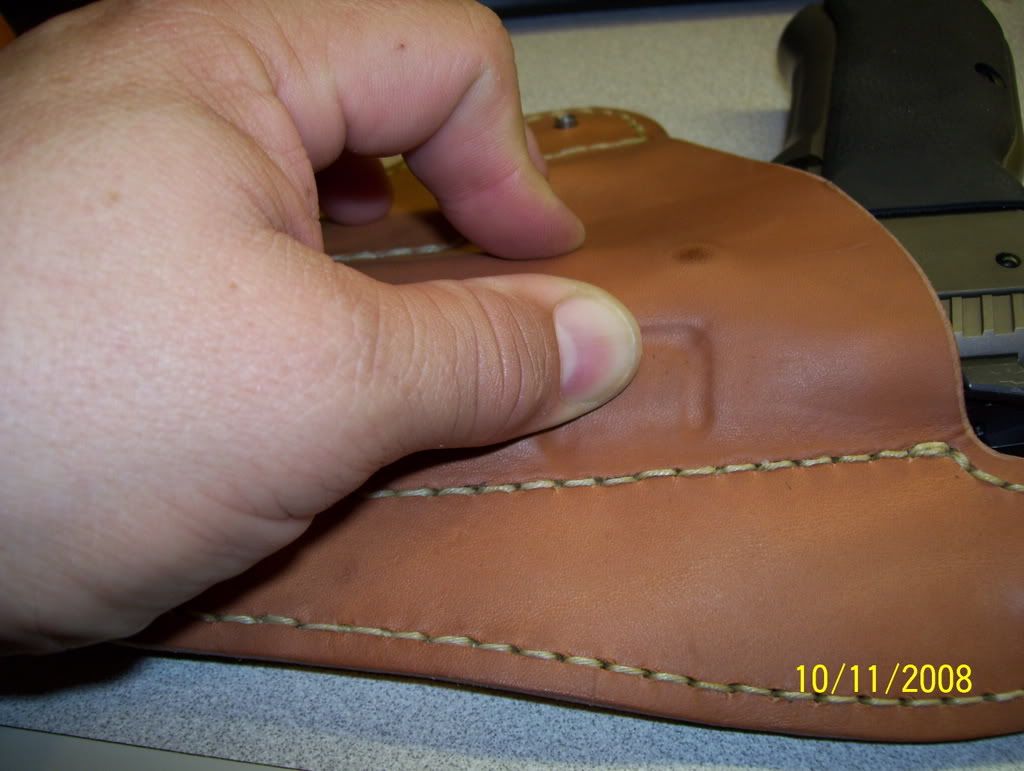
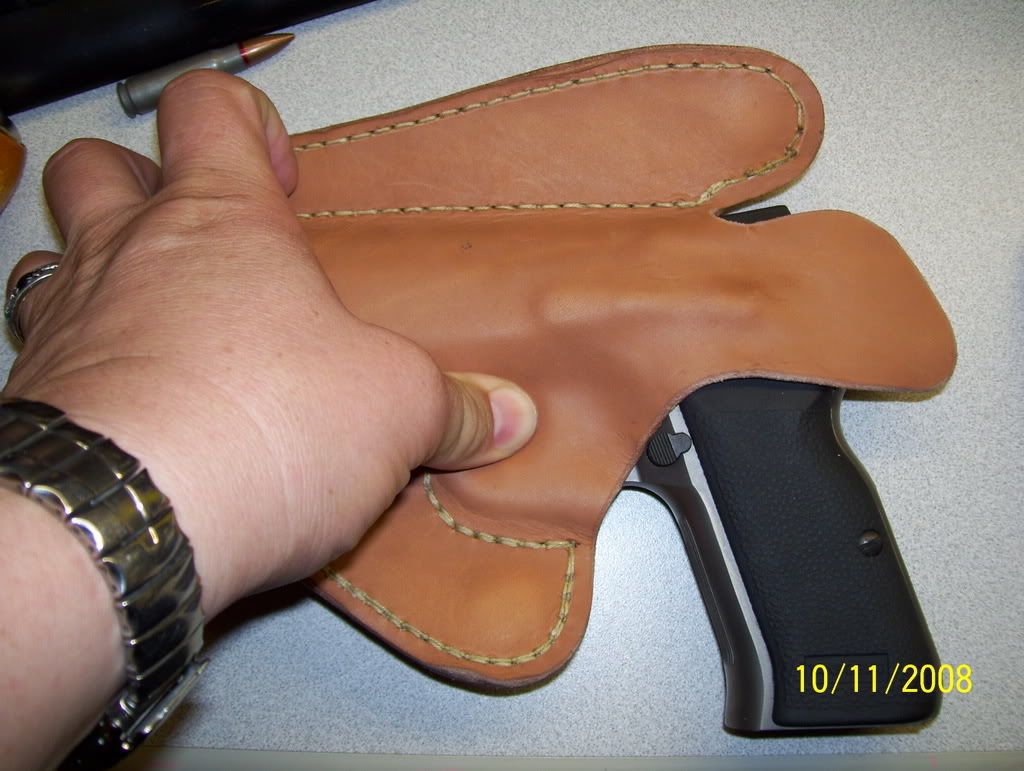 In the name of safety, and not wanting an AD when reholstering, I use an ultra high-tech, precision-engineered Trigger Guard Embossing device. OK, so it's my thumb. This ain't rocket science, folks. As a famous holster-maker once said "There's only so many ways to wrap leather around a fuckin' gun". Curmudgeonly fellow, that. I think I'd enjoy his company.
 Hey, if it's stupid but works... it ain't stupid. 'Nuff said.
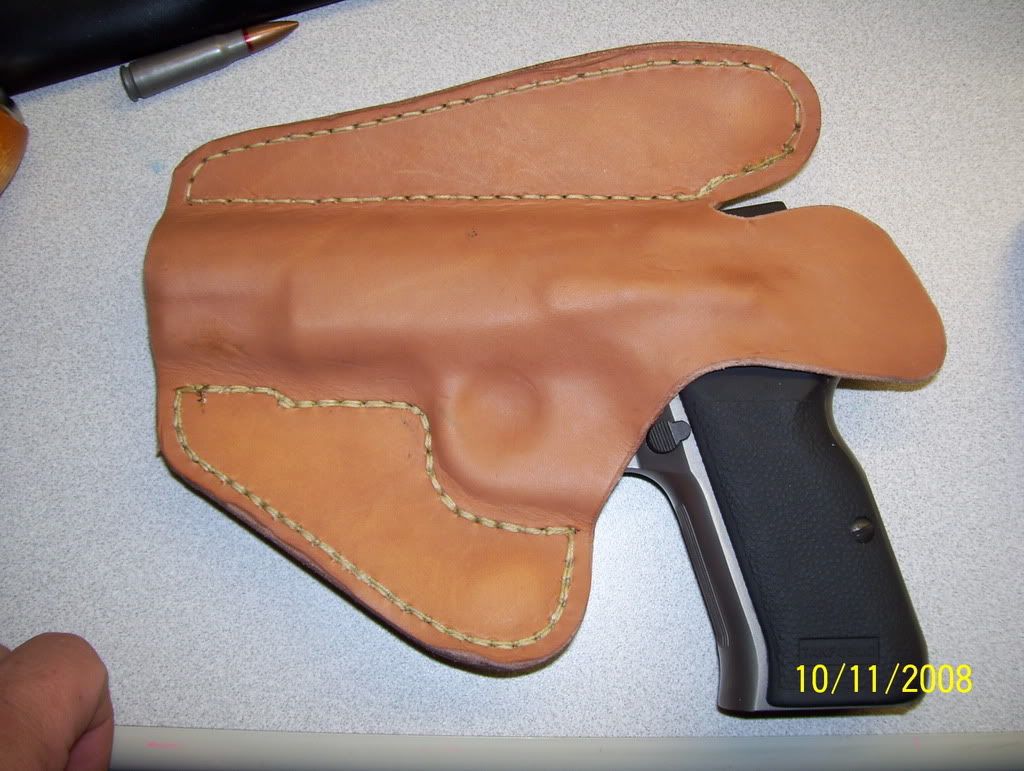
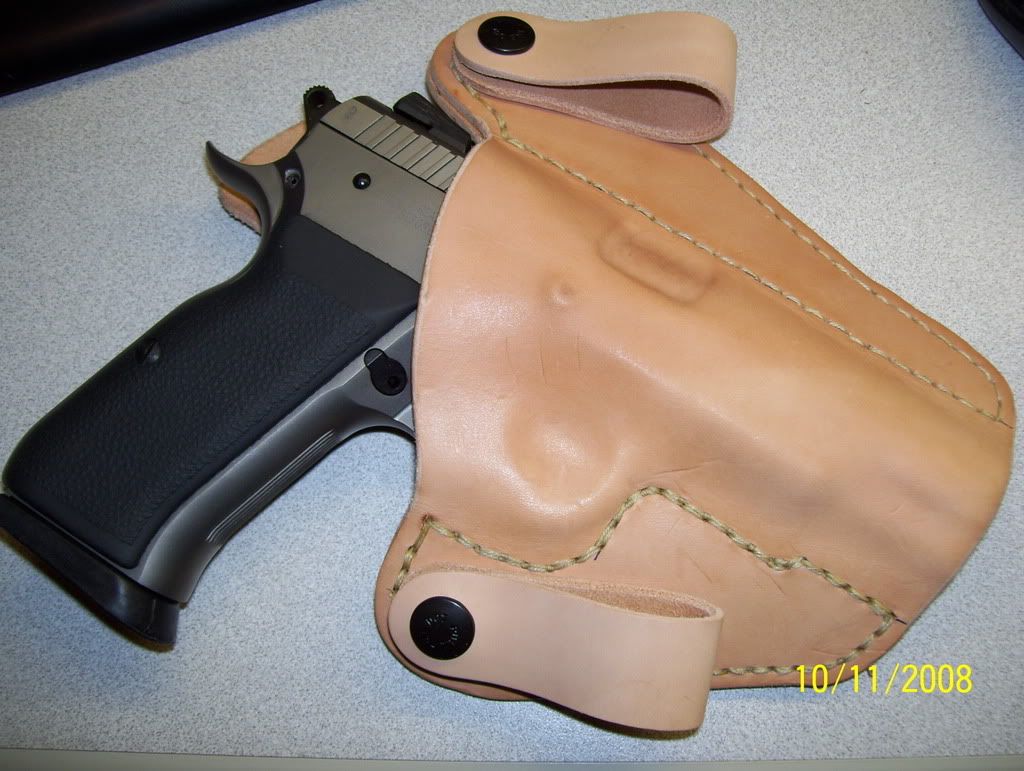
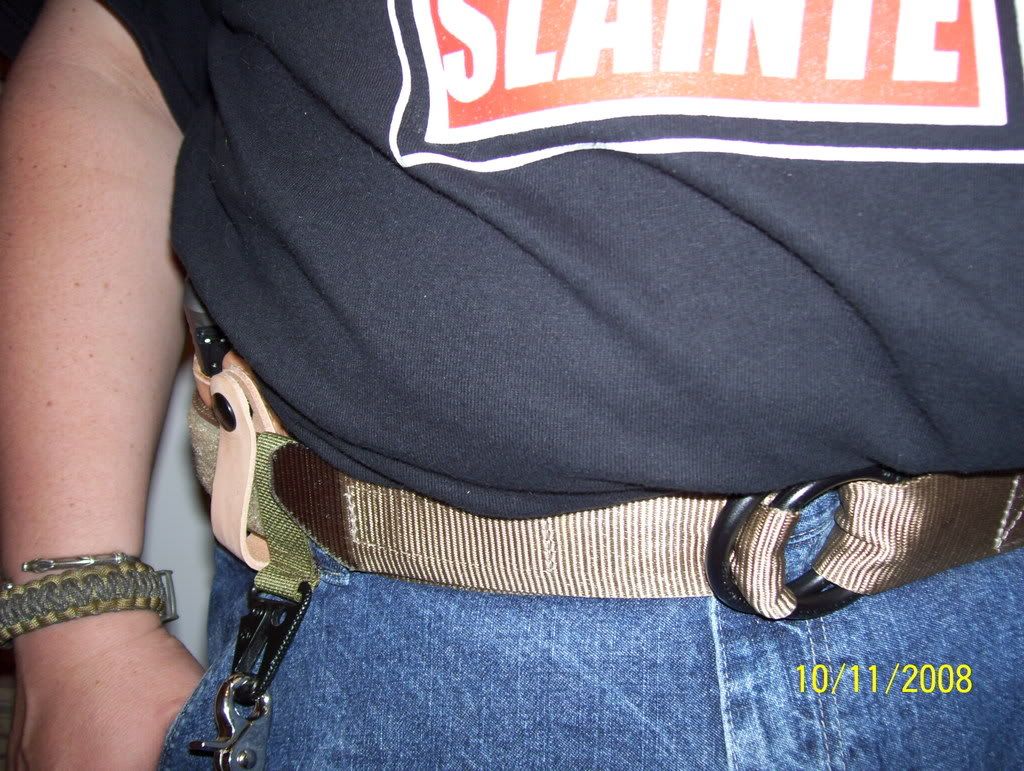
 As you can see, there's a VERY snug, secure fit. This weapon won't come out unless you mean to use it.
 YES, I know. Shut up! I am flat-out OUT of ammo for this weapon at this time, the safety is on, the trigger is covered, and my finger is nowhere near the trigger. Also, I cleared the weapon three times before putting it in the holster. I'm not a complete idiot (there are parts missing!). Nice view to show how the boning is split between the halves of the holster, to suck it into the hip more. Also, all the better to marvel at these cheap 6MP cameras that are out now. Why did I wait so long?
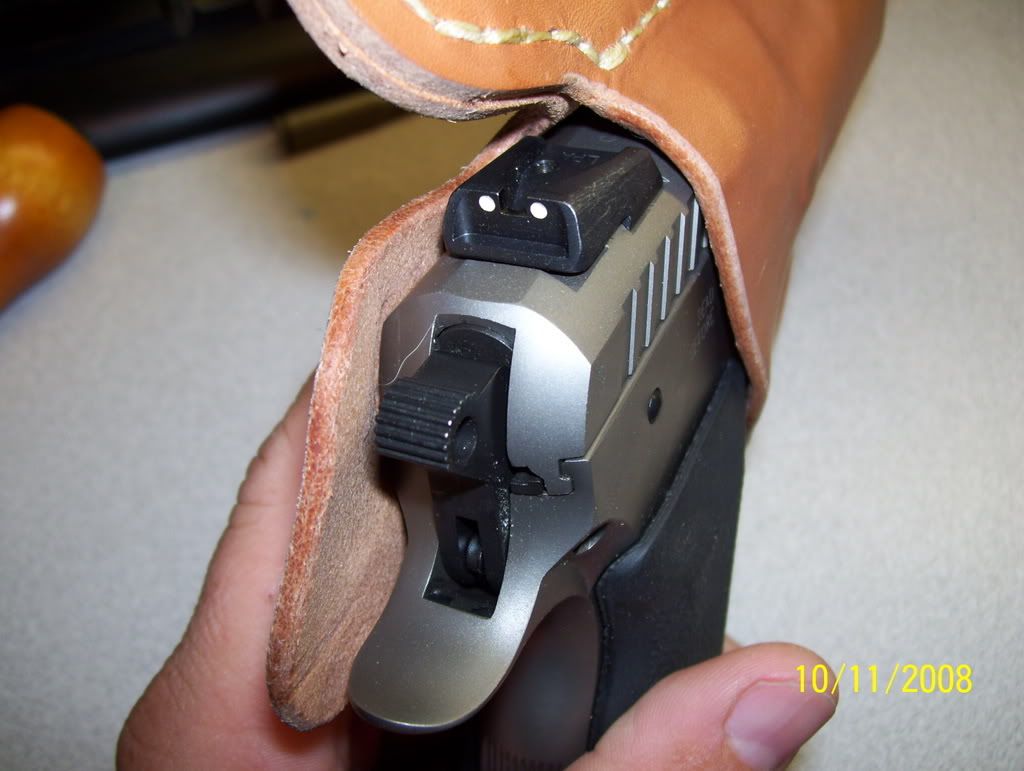
 Two shots of attempting to bone the ejection port with my thumb. Fail. While it's good enough for some folks, I like a holster with a well-defined ejection port- better retention. Hmm.. what can I use to better emboss this? If I only had some more deer antler left over I could make a tool with my Dremel tool...
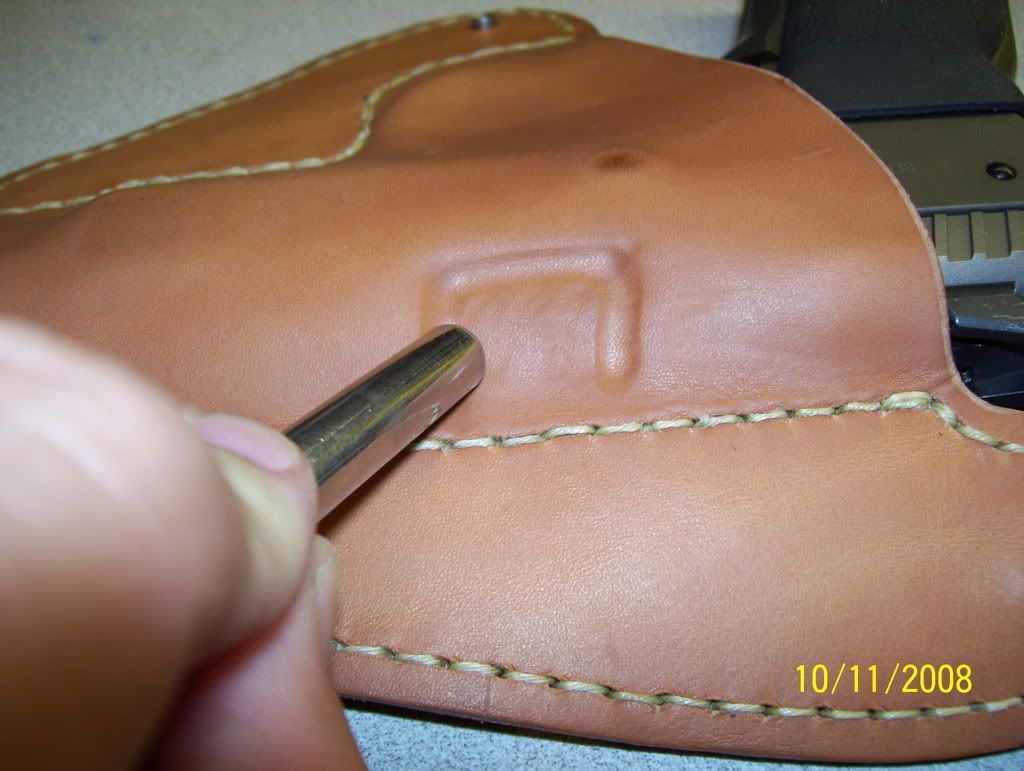 That's the ticket! A Fisher compact Space pen. Not only does it write in zero-g, vacuum, upside down, and prevent global thermonuclear war while saving the Apollo-13 astronauts- it also makes a damn fine embossing tool for wet leather. OK, so would a AA battery. But darn, now I have these nasty over-emphasized embossing marks around the port that look like crap. This would be easy to fix it this was really wet clay. Hmmm...
 Nice! Apparently the wet clay metaphor was more accurate than I realized.
 A very well-boned holster.
I've got to invest in a better backdrop. Are you folks tired of seeing my keyboard and desk yet?
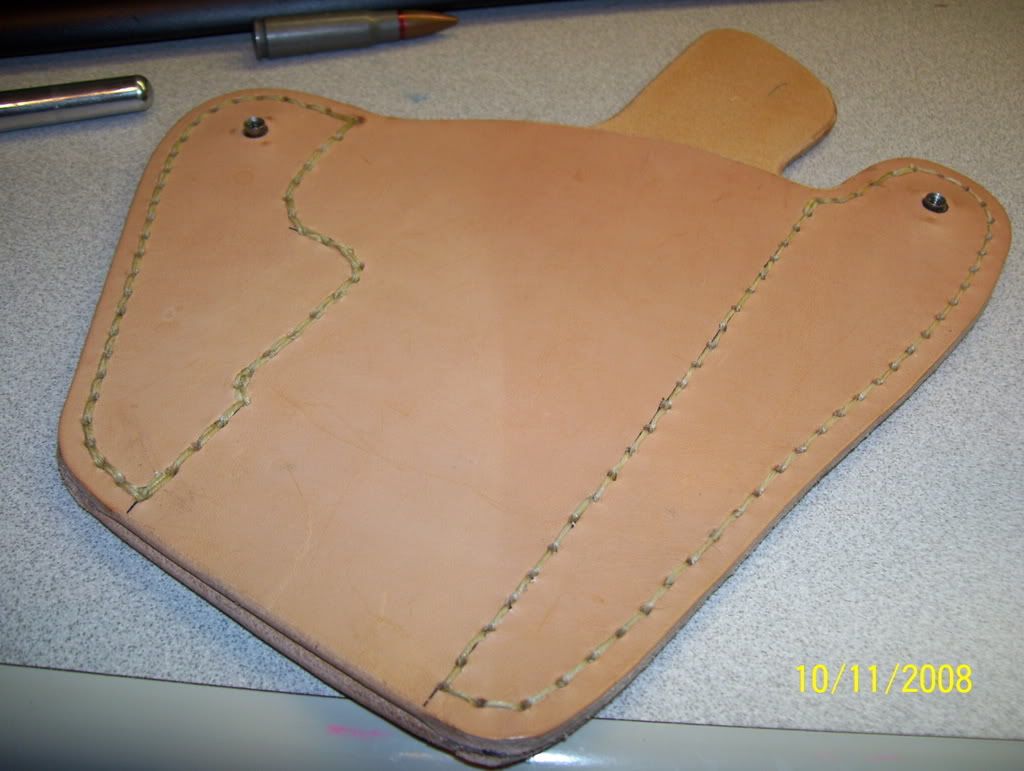
 Finished product shots
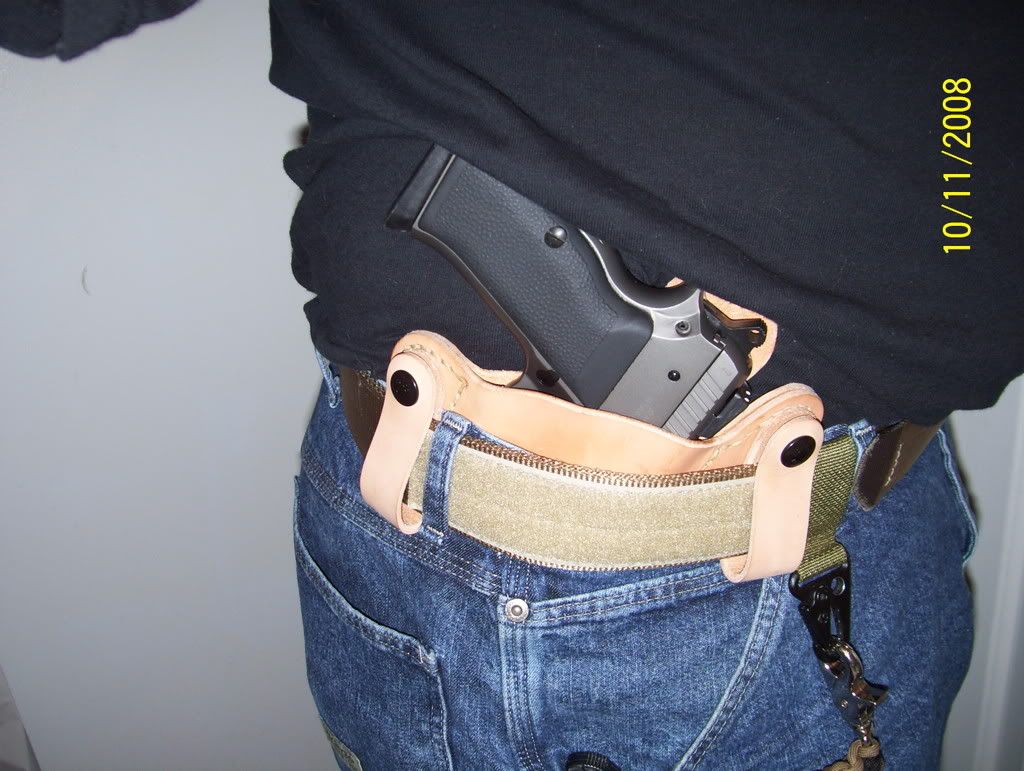
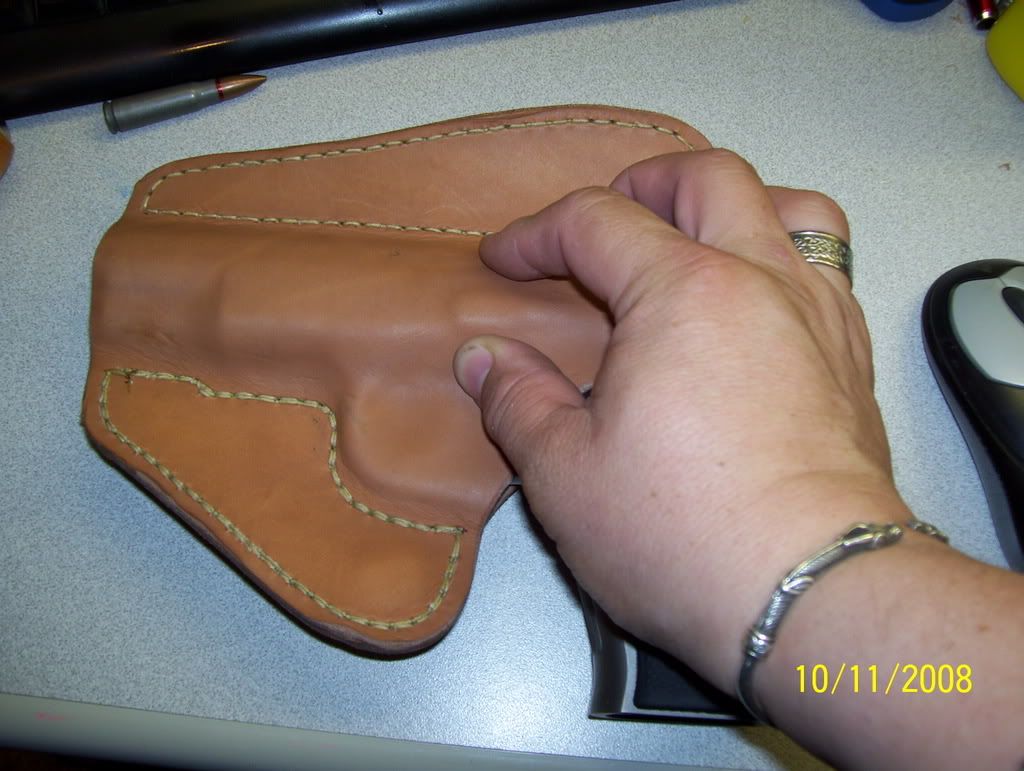
 It wears well, too!
This is in response to several folks that have asked for more info regarding the stitching and so on.
Here you see that I've gone round the back wing, drilling holes with my Dremel first, then doing a simple lock-stitch. Note that the holes are, frankly, too large. I couldn't find my smallest drill bit at the time. I ended up doing a second trip around the stitching to make up for the gaping holes in the leather left by the drill, and my less-than-optimum control of the awl. If you look closely, you can see where some of the knots have come through the front. VERY amateur, but I learned quickly! Another, closer, view of same. Also note the T-nut that I forgot to mention installing. Install is simple: drill hole (come to think, that was already done, too- did I mention Nate made this EASY?), insert T-nut, then glue the two halves together. Closer stitch detail, too. See what I mean about the knots coming through the front? Beginner mistake!Closeup mainly to show the size of the line I am using. It's too big to call thread, too small to call rope. Waxed polyester, has a pretty hefty breaking strength. Yeah, it'll work! BTW- if you're looking for a sewing awl, by no means go buy one at your local boater's shop. I paid $27 for one at West Marine (well, I needed it THEN, to repair my ruck, going camping with the kid the next day). I could have gotten one for $13 online, and I stumbled across one VERY similar in Harbor Freight, with a 100-yard (as opposed to 30) skein of line, for $5 a few weeks later. Hell yes I bought it- I can't even get the line itself that cheap elsewhere. Need one? Drop me a line! (You see, how I made that little pun there... I am a kidder. I kid)I should have mocked this one up better. What you are looking at is how the lockstitch works. Basically, poke the awl through the holes, then pull out a quantity of line on the back side, at least enough to go around the perimeter 1.5 times or you'll be cutting and retracing your route often to get a good lock. Getting the string to the back is easier said than done unless those holes are WAY too big. Solution: Punch awl all the way through. Pull it about halfway out. Use the tip of a spitzer round (or a pen, chopstick, whatever's handy) to grab that loop, and pull the awl through. Now pull the bitter (loose) end of the line through. Poke the awl through the next hole, withdraw, and run the bitter end through the loop. Pull on both lines, you've made a stitch!I'm not real clear on the proper way to terminate the stitch. I backstitch two stitches, then run the bitter end through the loop three times, then pull. Cut flush, and apply brief heat to the remaining bit of the line. This ought to work.
Second lap of stitching on the back wing, completed. Looks a lot better now. For production use, I will run a double row of stitching up against the weapon as it's a high-stress area. Otherwise, single will be fine. Front wing completed now, too. Can you notice the difference? I found my smaller (smallest) bit, so only had to run one loop. Also, I had figured out how to run the awl properly at this point, ending up with the locks in the middle of the holes, not on the front or back. MUCH more professional. Almost looks like I know what I am doing, huh? I've wet the leather, just to the point that it's darker-brown. Literally a minute in very hot bathwater. Put it in the tub and swish it around- when it is uniformly dark, it's ready. It's very much like working with stiff clay at this point. You can see I've started the boning process, the trigger guard, dust cover, and takedown lever are most evident. Yes, I am a man that wears jewelry. Celtic stuff, mainly. Shaddup. In the name of safety, and not wanting an AD when reholstering, I use an ultra high-tech, precision-engineered Trigger Guard Embossing device. OK, so it's my thumb. This ain't rocket science, folks. As a famous holster-maker once said "There's only so many ways to wrap leather around a fuckin' gun". Curmudgeonly fellow, that. I think I'd enjoy his company.Hey, if it's stupid but works... it ain't stupid. 'Nuff said.As you can see, there's a VERY snug, secure fit. This weapon won't come out unless you mean to use it.YES, I know. Shut up! I am flat-out OUT of ammo for this weapon at this time, the safety is on, the trigger is covered, and my finger is nowhere near the trigger. Also, I cleared the weapon three times before putting it in the holster. I'm not a complete idiot (there are parts missing!). Nice view to show how the boning is split between the halves of the holster, to suck it into the hip more. Also, all the better to marvel at these cheap 6MP cameras that are out now. Why did I wait so long?Two shots of attempting to bone the ejection port with my thumb. Fail. While it's good enough for some folks, I like a holster with a well-defined ejection port- better retention. Hmm.. what can I use to better emboss this? If I only had some more deer antler left over I could make a tool with my Dremel tool...That's the ticket! A Fisher compact Space pen. Not only does it write in zero-g, vacuum, upside down, and prevent global thermonuclear war while saving the Apollo-13 astronauts- it also makes a damn fine embossing tool for wet leather. OK, so would a AA battery. But darn, now I have these nasty over-emphasized embossing marks around the port that look like crap. This would be easy to fix it this was really wet clay. Hmmm... Nice! Apparently the wet clay metaphor was more accurate than I realized.A very well-boned holster. I've got to invest in a better backdrop. Are you folks tired of seeing my keyboard and desk yet?
Finished product shotsIt wears well, too!
Made a holster!
I have to say, I am pretty damn pleased with myself on this one...
First off- thanks to Nate at UBGHolsters for providing the die-cuts. He made this project REALLY easy, and confidence-inspiring.
This all came about because I wanted an IWB holster for my Tanfoglio TZ75 in 10mm. It's similar to the CZ, but different enough 'round the trigger guard that he wasn't sure it would work. So the whole "thought about building your own?" idea came about, and we ran with it from there.
He sent me a set of die-cuts (think, flats cut from cowhide, shaped like a holster but without the molding), a set of straps (which he was nice enough to assemble as I didn't have the press, belt clips (unrelated to the project but thrown in because he's a nice guy), and instructions. He's also taken great effort to reply to 40+ emails in the course of the discussion.
I provided the tools -a 7.62X39 round (get the bitter end of the line started), a Fisher Space Pen (for boning), rubber cement, a Dremel, draftsman's dividers, and a Sewing Awl- and effort. This was very much a "use what ya got laying about" effort. There are purpose built tools for this sort of work, but they're not needed.
To assemble the holster, I took the diecuts and lined them up all around the perimeter. Nate was good enough to mark out the glued area by way of using his CZ75 as a model for the TZ that now takes its place. I applied rubber cement to each side in accordance with the directions for a permanent bond, and let the joined pieces sit overnight under my rangebag with a few pistols in it. I measured off 5 millimeters (about as close as I could figure to 1/5 of an inch) and locked my dividers in, then followed the stitchline with them as if I was plotting a course, which if you think about it, I was.
I took the joined pieces, a 2X4 bit of scrap, my Dremel, and a TINY bit (about 1/32 if I recall- it's too small to read), and drilled at each mark the dividers had left. I used my sewing awl to sew up each stitchline, and then tried to testfit the weapon- it will NOT go, dry, don't even try it.
So then I wet the holster thoroughly in hot bath water. You don't want to let it sit in there for any more than a minute or so- I actually just grabbed it and slid it around in the water till it was visibly wet through (watch for the color change). At this point the leather will have the consistency of wet clay. I took my well-oiled gun and slid it into the holster- it will go with a little effort- and then started on the boning.
You use your fingers and smooth the leather around all the points of the weapon- the safety, the triggerguard, and so on. With automatics, pay particular attention to the ejection port and the trigger guard- this is where your retention comes from. Now is a good time to set the holster in terms of it's curvature, as well- it's going to have to curve to go around the body part it's designed to fit (round my waist in this case). Once happy, pull the weapon out, and set the holster in front of a fan for a few hours to a few days, depending on how wet you got the leather. Now- go dry, clean, and oil your weapon, particularly if you've got a parkerized finish!
As this is my first go at this, and I used natural polyester waxed thread (read- it won't take dye), I'm going to leave this holster in the natural. Next one will be sewed with my preferred black thread, and will be dyed black. I have no experience with that as of yet, but I'm told to use oil-based dyes and a sealer.
Not bad for a first go, all things considered. I learned a lot here.
I can not thank Nate of UBGHolsters enough for his encouragement, parts, advice and overall brain-dump when it came to my numerous stupid questions. He made what could have been a disaster, easy. I've been wanting to try this for years and after all his effort the hardest part of the job was sewing the leather. By the way- he gave me all this info all the while knowing that I was considering starting up a holster-making business.
First off- thanks to Nate at UBGHolsters for providing the die-cuts. He made this project REALLY easy, and confidence-inspiring.
This all came about because I wanted an IWB holster for my Tanfoglio TZ75 in 10mm. It's similar to the CZ, but different enough 'round the trigger guard that he wasn't sure it would work. So the whole "thought about building your own?" idea came about, and we ran with it from there.
He sent me a set of die-cuts (think, flats cut from cowhide, shaped like a holster but without the molding), a set of straps (which he was nice enough to assemble as I didn't have the press, belt clips (unrelated to the project but thrown in because he's a nice guy), and instructions. He's also taken great effort to reply to 40+ emails in the course of the discussion.
I provided the tools -a 7.62X39 round (get the bitter end of the line started), a Fisher Space Pen (for boning), rubber cement, a Dremel, draftsman's dividers, and a Sewing Awl- and effort. This was very much a "use what ya got laying about" effort. There are purpose built tools for this sort of work, but they're not needed.
To assemble the holster, I took the diecuts and lined them up all around the perimeter. Nate was good enough to mark out the glued area by way of using his CZ75 as a model for the TZ that now takes its place. I applied rubber cement to each side in accordance with the directions for a permanent bond, and let the joined pieces sit overnight under my rangebag with a few pistols in it. I measured off 5 millimeters (about as close as I could figure to 1/5 of an inch) and locked my dividers in, then followed the stitchline with them as if I was plotting a course, which if you think about it, I was.
I took the joined pieces, a 2X4 bit of scrap, my Dremel, and a TINY bit (about 1/32 if I recall- it's too small to read), and drilled at each mark the dividers had left. I used my sewing awl to sew up each stitchline, and then tried to testfit the weapon- it will NOT go, dry, don't even try it.
So then I wet the holster thoroughly in hot bath water. You don't want to let it sit in there for any more than a minute or so- I actually just grabbed it and slid it around in the water till it was visibly wet through (watch for the color change). At this point the leather will have the consistency of wet clay. I took my well-oiled gun and slid it into the holster- it will go with a little effort- and then started on the boning.
You use your fingers and smooth the leather around all the points of the weapon- the safety, the triggerguard, and so on. With automatics, pay particular attention to the ejection port and the trigger guard- this is where your retention comes from. Now is a good time to set the holster in terms of it's curvature, as well- it's going to have to curve to go around the body part it's designed to fit (round my waist in this case). Once happy, pull the weapon out, and set the holster in front of a fan for a few hours to a few days, depending on how wet you got the leather. Now- go dry, clean, and oil your weapon, particularly if you've got a parkerized finish!As this is my first go at this, and I used natural polyester waxed thread (read- it won't take dye), I'm going to leave this holster in the natural. Next one will be sewed with my preferred black thread, and will be dyed black. I have no experience with that as of yet, but I'm told to use oil-based dyes and a sealer.
Not bad for a first go, all things considered. I learned a lot here.
I can not thank Nate of UBGHolsters enough for his encouragement, parts, advice and overall brain-dump when it came to my numerous stupid questions. He made what could have been a disaster, easy. I've been wanting to try this for years and after all his effort the hardest part of the job was sewing the leather. By the way- he gave me all this info all the while knowing that I was considering starting up a holster-making business.
07 October 2008
Bugs, Mr. Rico!!!
OK, so I've got this...thing... about critters with more than 4 legs or less than 2.
So I get home about 2200 this evening and as usual keep the lights off so as to avoid waking the wife, who's a light sleeper.
I get about halfway across the living room- it's not quite pitch black, mind- and something brushes across the top of my skull. My bald skull- I shave my head to complete the job Mother Nature began. I grab my flashlight off my belt and investigate, and find this-
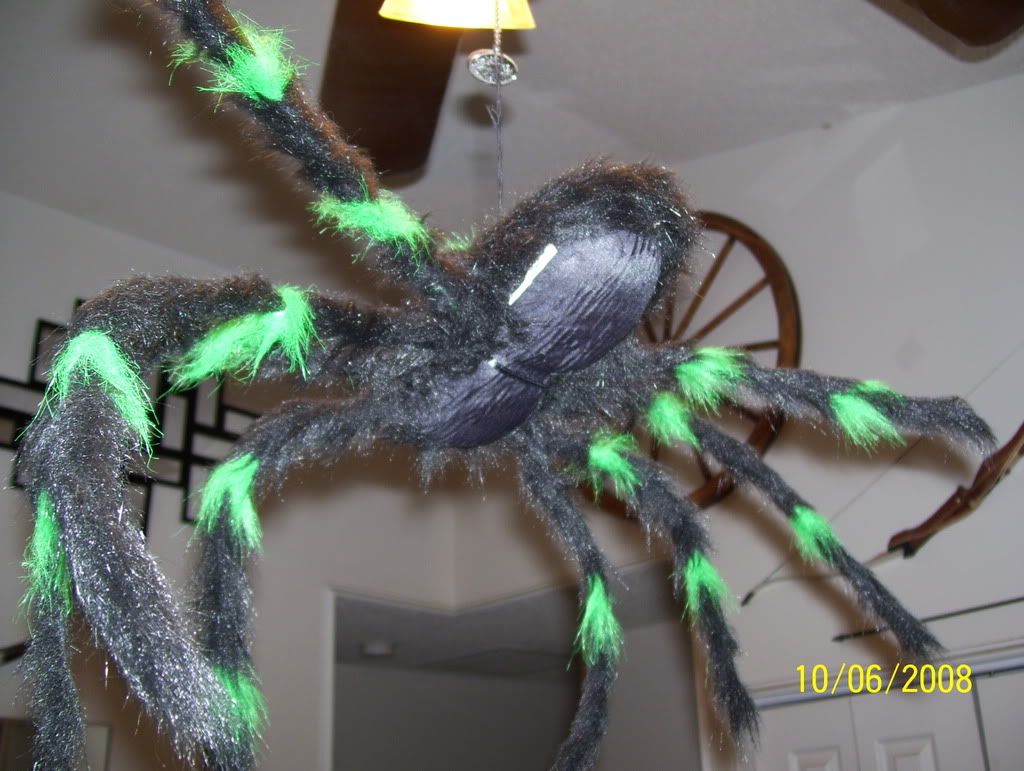 right overhead. Except not lit anywhere NEAR as well as it is in the picture.
There follows a moment of sheer terror when the primitive lizardbrain part of me quickly recognizes two body segments and EIGHT FREAKING HAIR LEGS, six inches from my face. This all happens in a few microseconds and while I'm happy to report I didn't scream (THIS time!), I did express my surprise in a much loftier manner:
NNNGGUUUAAARRRGGGHHH... Ah, shit. Goddamnit.
The giggling from the back of the house from my son, and the loudly whispered "Ha! We got him!" accompanied by a sound that can only be a high-five tell the rest of the story. I have been set up. I have been "punked", by my lovely wife and most-loved son.
I'm NOT amused. Looking at that damn thing still creeps me out, even with all the lights on in the room.
So I get home about 2200 this evening and as usual keep the lights off so as to avoid waking the wife, who's a light sleeper.
I get about halfway across the living room- it's not quite pitch black, mind- and something brushes across the top of my skull. My bald skull- I shave my head to complete the job Mother Nature began. I grab my flashlight off my belt and investigate, and find this-
right overhead. Except not lit anywhere NEAR as well as it is in the picture. There follows a moment of sheer terror when the primitive lizardbrain part of me quickly recognizes two body segments and EIGHT FREAKING HAIR LEGS, six inches from my face. This all happens in a few microseconds and while I'm happy to report I didn't scream (THIS time!), I did express my surprise in a much loftier manner:
NNNGGUUUAAARRRGGGHHH... Ah, shit. Goddamnit.
The giggling from the back of the house from my son, and the loudly whispered "Ha! We got him!" accompanied by a sound that can only be a high-five tell the rest of the story. I have been set up. I have been "punked", by my lovely wife and most-loved son.
I'm NOT amused. Looking at that damn thing still creeps me out, even with all the lights on in the room.
04 October 2008
What kind of leading man are you?
I really thought I'd be more of the John Wayne type, but:
Humphrey Bogart
You scored 62% Tough, 5% Roguish, 33% Friendly, and 5% Charming!

You're the original man of honor, rough and tough but willing to stick your neck out when you need to, despite what you might say to the contrary. You're a complex character full of spit and vinegar, but with a soft heart and a tender streak that you try to hide. There's usually a complicated dame in the picture, someone who sees the real you behind all the tough talk and can dish it out as well as you can. You're not easy to get next to, but when you find the right partner, you're caring and loyal to a fault. A big fault. But you take it on the chin and move on, nursing your pain inside and maintaining your armor...until the next dame walks in. Or possibly the same dame, and of all the gin joints in all the world, it had to be yours. Co-stars include Ingrid Bergman and Lauren Bacall, hot chicks with problems.
huh.
I NEVER wear a suit. The most formal I get is a pair of khakis without cargo pockets, and a pilot's shirt.
But yeah, the rest of it's pretty much nailed me.
Humphrey Bogart
You scored 62% Tough, 5% Roguish, 33% Friendly, and 5% Charming!
You're the original man of honor, rough and tough but willing to stick your neck out when you need to, despite what you might say to the contrary. You're a complex character full of spit and vinegar, but with a soft heart and a tender streak that you try to hide. There's usually a complicated dame in the picture, someone who sees the real you behind all the tough talk and can dish it out as well as you can. You're not easy to get next to, but when you find the right partner, you're caring and loyal to a fault. A big fault. But you take it on the chin and move on, nursing your pain inside and maintaining your armor...until the next dame walks in. Or possibly the same dame, and of all the gin joints in all the world, it had to be yours. Co-stars include Ingrid Bergman and Lauren Bacall, hot chicks with problems.
huh.
I NEVER wear a suit. The most formal I get is a pair of khakis without cargo pockets, and a pilot's shirt.
But yeah, the rest of it's pretty much nailed me.
Geekin' out with the kid...
Today I made a stove for camping with the rugrat.
Out of two soda cans!
No, seriously...
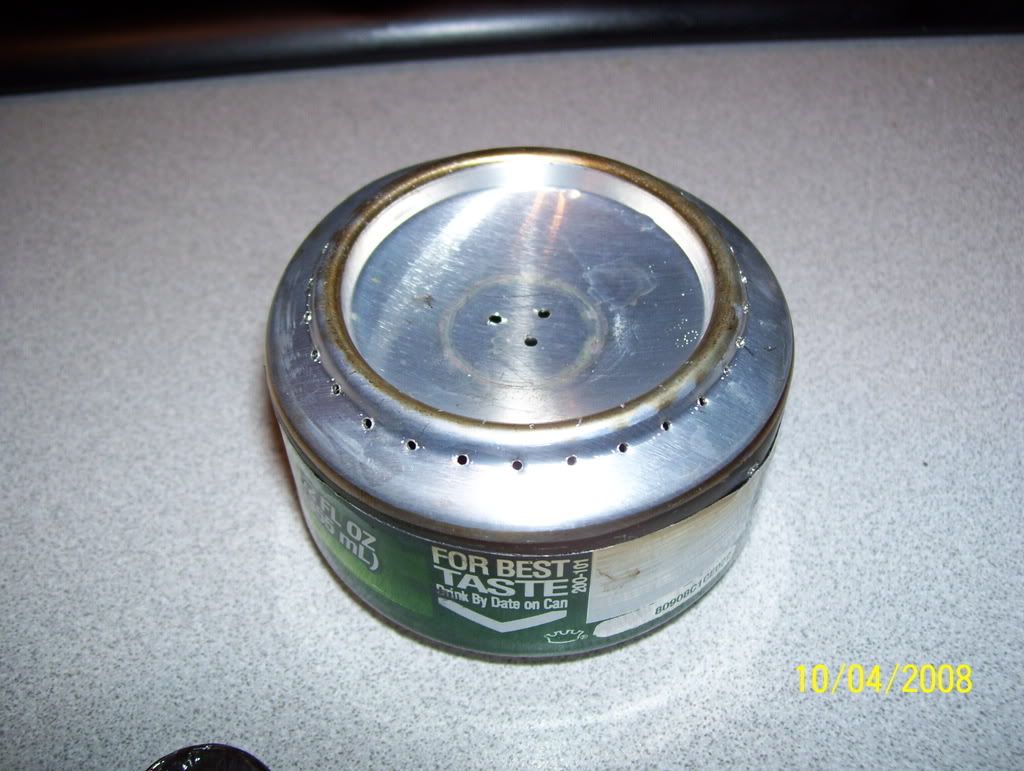
Tested it by boiling water for the kid and I for hot cocoa. Took 6 minutes to boil half a liter of water. I'd call it a success! By the way, it uses high-proof alcohol (70% or better, isopropyl, methanol, or drinking)for fuel.
Will build a bigger one shortly, as I've just reached the bottom of the second can of Foster's Lager...
Yes, I could have bought a whole messkit WITH a stove very similar, that is able to be capped and reclosed, for $30. I still may, for the ability to be able to stop and start the stove at will with fuel still inside. If interested, I believe they're called Trangia stoves.
This was mainly an intellectual exercise in figuring out how the thing works, if it works well, and to do something with my kid while instilling a thirst for knowledge and ability to reason through problems that might be encountered. Cost was really $0- I pulled the cans out of the trash.
Success, on all fronts, beyond measure. I'm gonna have to run this up the flagpole at the next Scout campout and see if they would like me to teach the boys how to do it (with adult help, of course).
Out of two soda cans!
No, seriously...
Tested it by boiling water for the kid and I for hot cocoa. Took 6 minutes to boil half a liter of water. I'd call it a success! By the way, it uses high-proof alcohol (70% or better, isopropyl, methanol, or drinking)for fuel.
Will build a bigger one shortly, as I've just reached the bottom of the second can of Foster's Lager...
Yes, I could have bought a whole messkit WITH a stove very similar, that is able to be capped and reclosed, for $30. I still may, for the ability to be able to stop and start the stove at will with fuel still inside. If interested, I believe they're called Trangia stoves.
This was mainly an intellectual exercise in figuring out how the thing works, if it works well, and to do something with my kid while instilling a thirst for knowledge and ability to reason through problems that might be encountered. Cost was really $0- I pulled the cans out of the trash.
Success, on all fronts, beyond measure. I'm gonna have to run this up the flagpole at the next Scout campout and see if they would like me to teach the boys how to do it (with adult help, of course).
Subscribe to:
Posts (Atom)


